
I don’t know the author of this Irish blessing, but its perfect for today!
“For each petal on the shamrock
This brings a wish your way
Good health, good luck and happiness
For today and every day”


I don’t know the author of this Irish blessing, but its perfect for today!
“For each petal on the shamrock
This brings a wish your way
Good health, good luck and happiness
For today and every day”

Happy New Year Greetings! I wanted to share a little after Christmas fun before saying goodbye to 2024. It was inspired by many similar ideas posted on Pinterest and an experimental, kiln melted, bottle piece I was saving. Remember this awkward looking piece from a previous post? https://glassictouch.com/2023/10/01/recycled-bottle-kiln-play-diy/

Jute twine was used as a hanger, but wanting a thinner, natural looking string to hang my items with, I soaked white cotton string in coffee.
I found this project easier to do while the stick was hanging on a nail, but laying it on a flat surface would work as well.
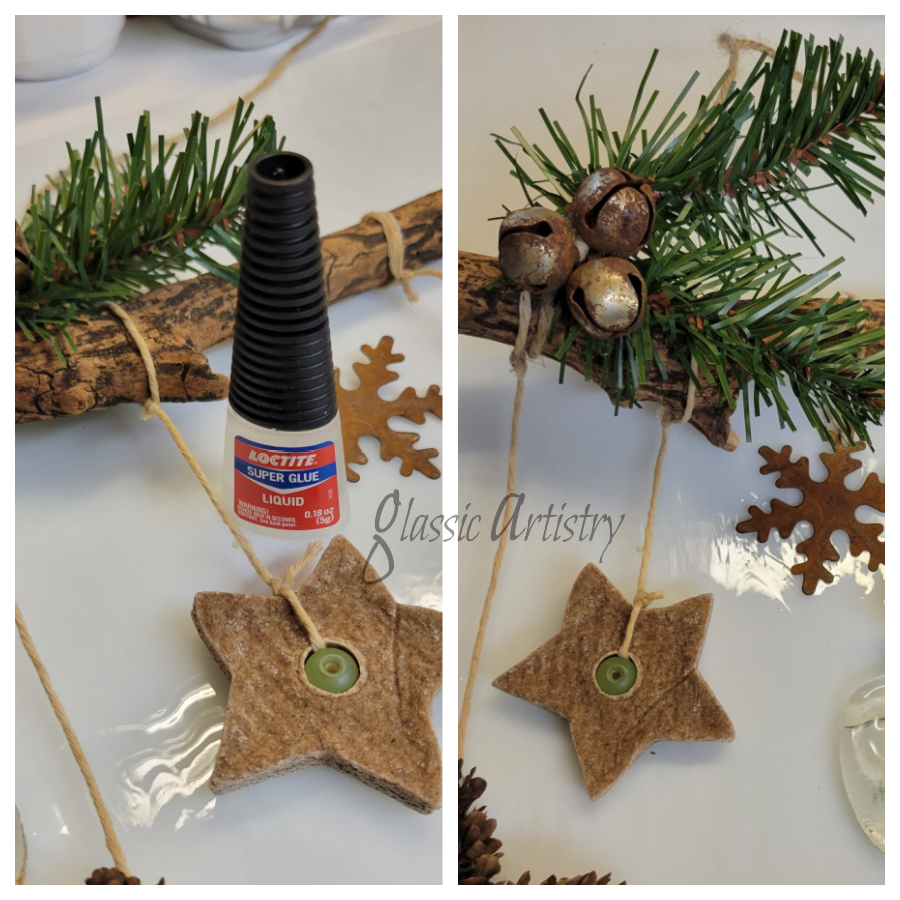
After gathering a variety of pieces from my rusty/crafting stash, and sanding/staining an old stick that was approximately 21” long, bits and pieces were put together to tie on.
Along with the melted bottle I used clear glass donuts, mini pinecones, star cookie cutter, stars, cinnamon ornaments that were made several years ago, small brown bottle, bells, dried orange slices, metal snowflakes cut from a rusty garland, and faux greenery. The small pearl embellishment in the center of the glass donuts were made by gluing a pearl in a small opened up bell.
When finished, I put a drop of super glue on every knot for reinforcement.


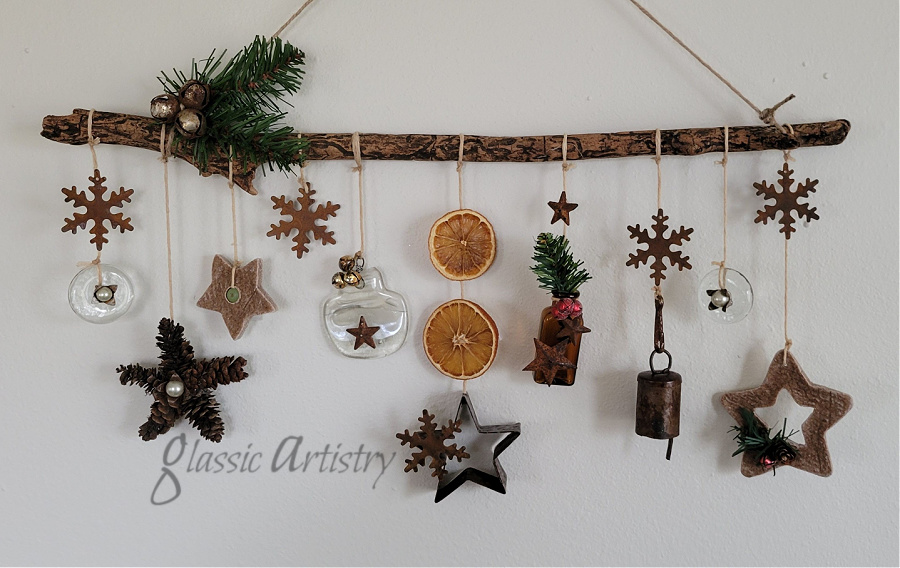
I absolutely loved this project. So much fun! There’s never ending ways you can do it. Can you imagine a big long one, maybe hanging over a couch at Christmas time? And think of all the seasonal themes; I’m already thinking hearts!
Comment, like and share if you wish. I’ll be back with more in 2025!
I’m back with the long neglected review of the inventory sale I had last spring. It’s a little different from other posts I’ve written, but we’ll give it a go.
Ready, and wanting, to move on to new things, the main goal was to clear my garage of all the lamp pieces, salt/pepper shakers, and other bits and bobs I had collected over the years; offering some finished pieces and lots of parts for others to create their own.
Here’s a glimpse at a small portion of piles as we sorted.


There’s quite a few pictures so I thought it best to break this into a couple of posts with no detailed tutorials. Things are similar to past projects and created with the stacking method on a threaded rod as I always liked to do, as well as the same cleaning and finishing process, etc.
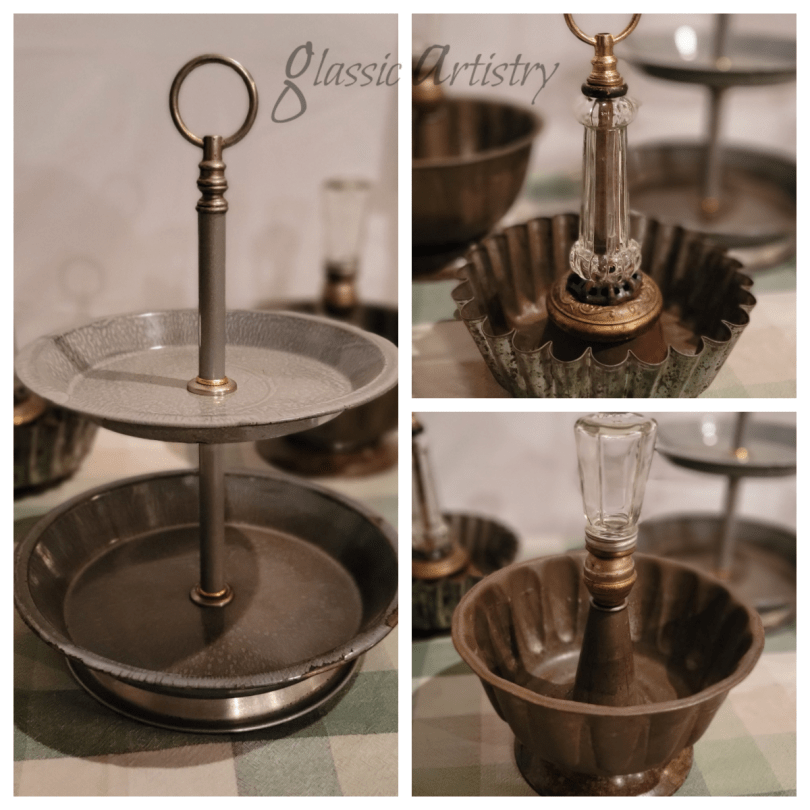
Last April, I was making what I called display trays. https://glassictouch.com/2022/04/18/tiered-tray-diy-repurposed-enamelware/ and https://glassictouch.com/2022/04/27/vintage-style-display-tray-diy/ . They were a ton of fun to make so I made some more. To keep things short and simple I’m going to post a picture of the completed item and the layout of the pieces (if I have it) in the order they were used so you can see how it went together. My hope is just to inspire since the use of salvaged and found materials would make exact duplication impossible.
A salt shaker topper was a perfect fit for the first one.


A clear glass lamp piece was used to top off another one. Regretfully, I haven’t any pictures for this one and can’t remember what was used to fill the cavity of the pan underneath. I’m thinking maybe an upturned zinc canning lid with a hole drilled in it, but I’m not sure.

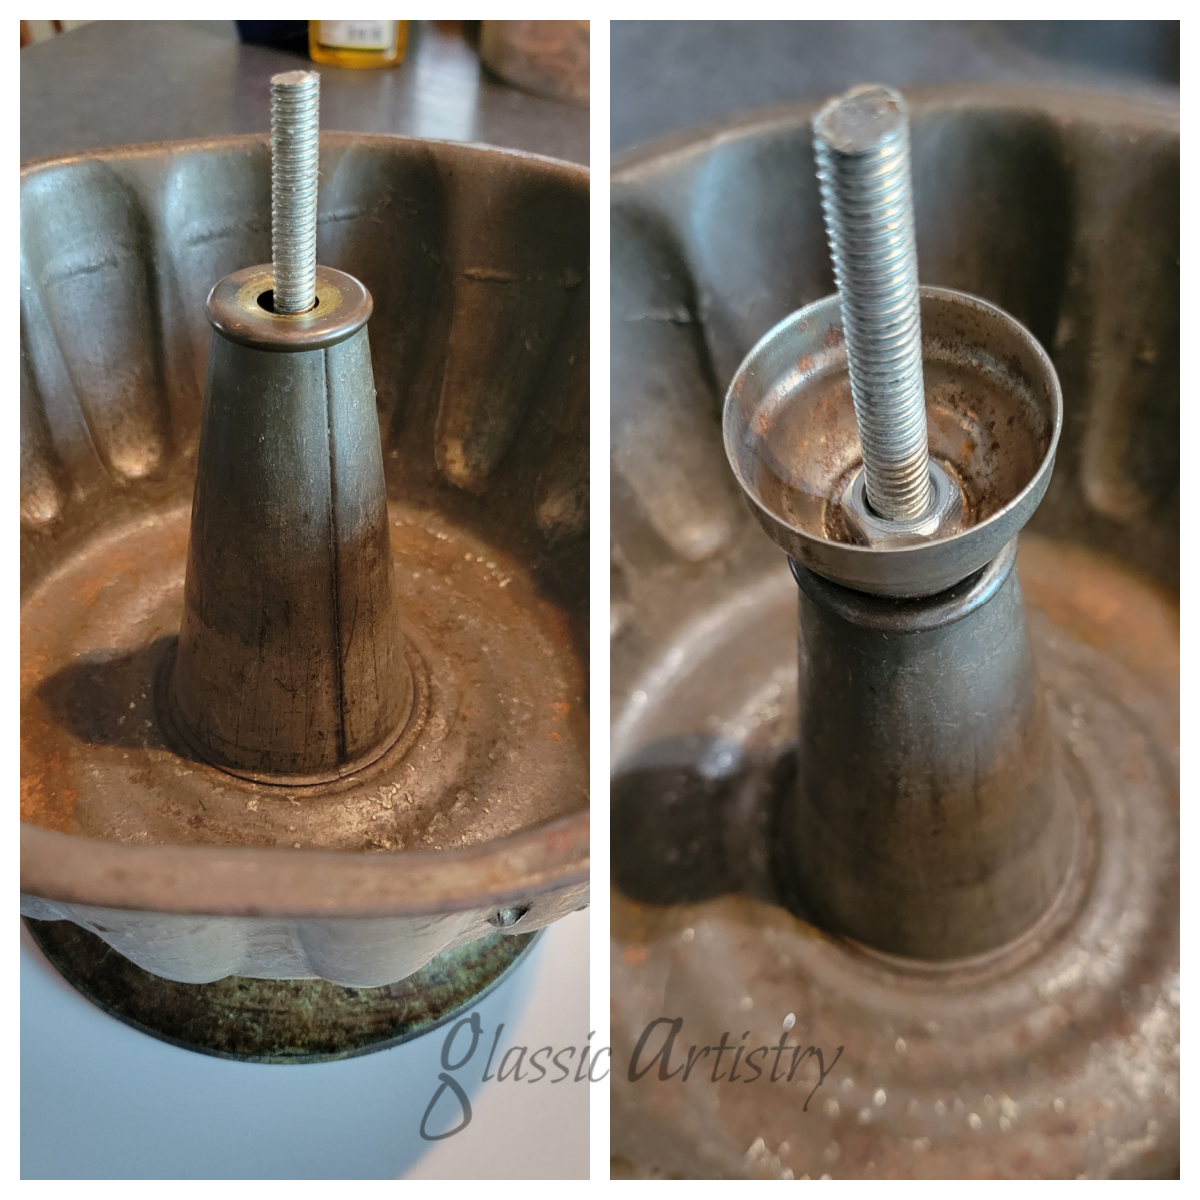
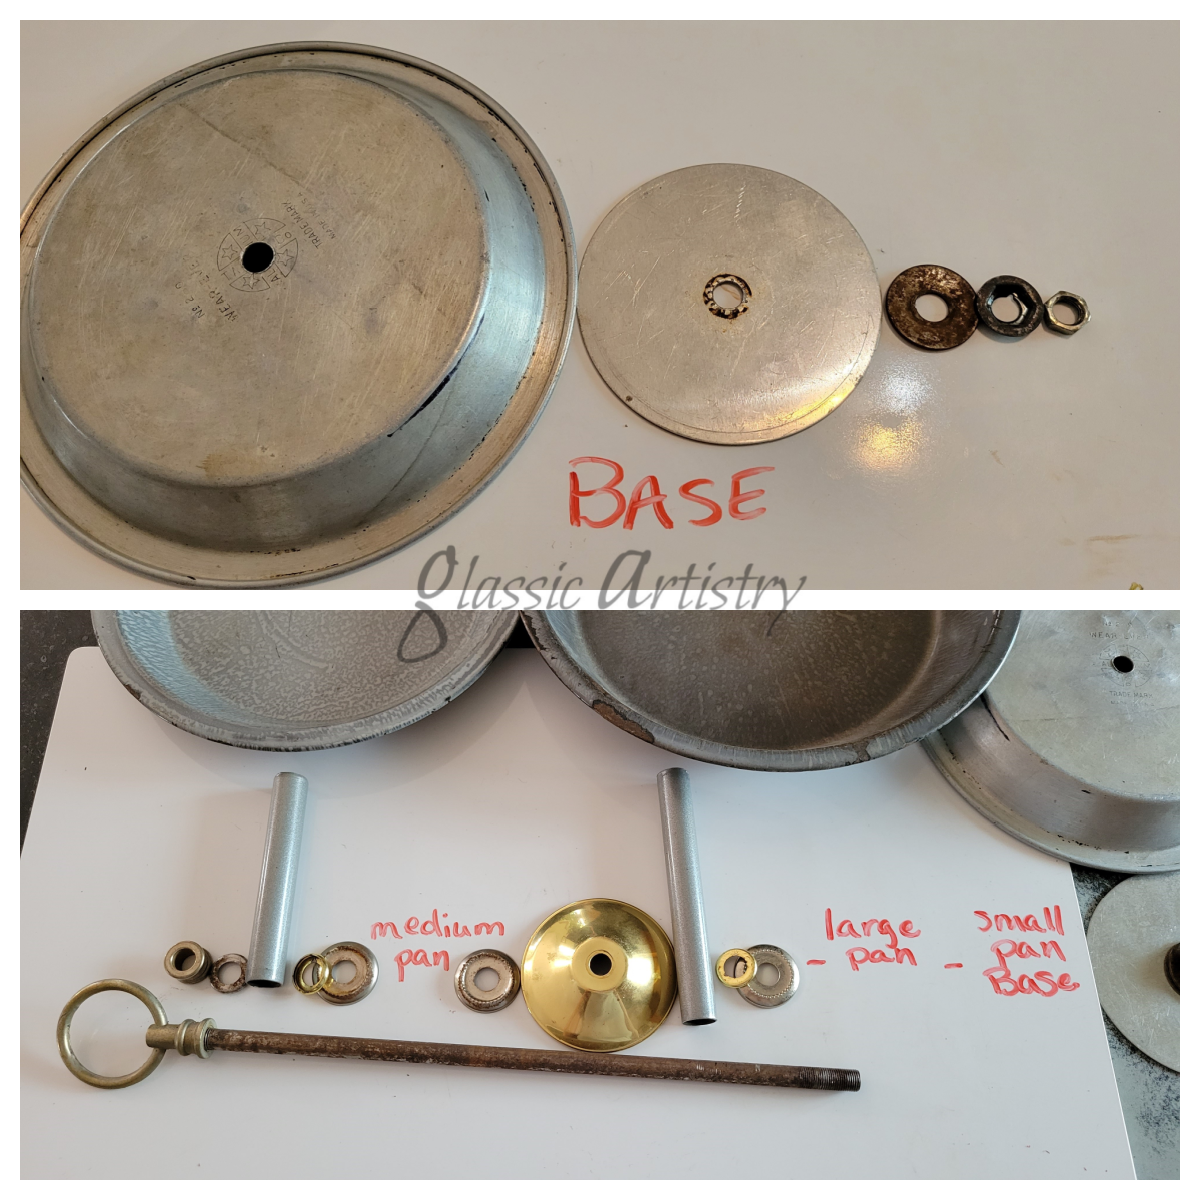
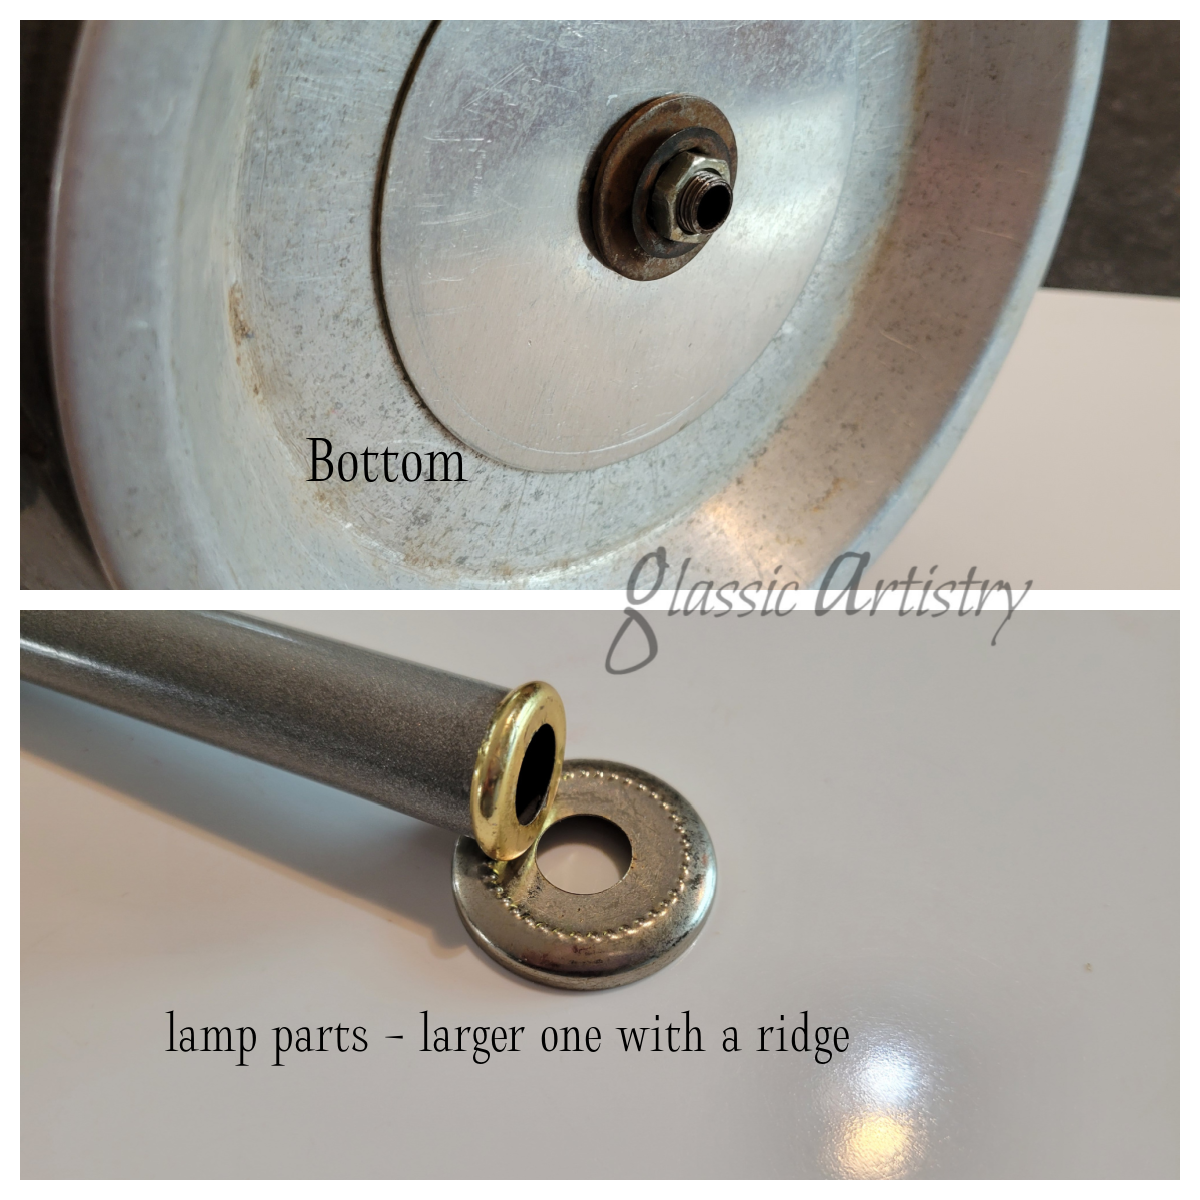
I couldn’t pass up the chance to play with the pie pans I had collected before they got away from me. Some good looking conduit, salvaged from something taken apart ages ago, covered the center threaded rod nicely.
Two small brass lamp pieces added between the conduit and the surfaces of the pans not only hid the raw edges of the conduit but helped provide sturdiness. As shown below, the larger of the brass lamp pieces has a ridge and gives the capped conduit a place to seat.

Well, I think I’m calling that a wrap for Part One. I hope it wasn’t too boring, I tried hard to keep it short. I’ll be back soon with pictures of the garden chandeliers and stakes in Part Two. 🙂
Please feel free to leave a comment, ask questions, like and share. I love hearing from readers.
Stay Well and Stay Safe Friends!

With the summer dates on the calendar filling in almost quicker than I can write them down, I’ve had to kick my garage clearing project into a higher gear. A tag sale is being planned at my home toward the end of May so there’s going to be a lot of crazy going on here for the next 2 ½ weeks. Fun crazy!
But first, I wanted to put up a quick post on a newly finished display tray created from a vintage springform baking pan, a brown ceramic insulator, metal lamp ring, wooden finial, and a zinc Ball canning lid stacked on a short length of ⅜” threaded rod. It may seem like an odd assortment of pieces, but the different materials melded together beautifully.
Before starting, a ⅜” hole was drilled in the center of the zinc lid, and a 11/32” hole was drilled in the bottom center of the wooden finial. The hole in the finial is slightly smaller so the threaded rod will fit snugly. An assortment of washers and nuts were found to fit the threaded rod.
As with previous projects, all pieces were cleaned well and waxed before laying them out to be assembled.

The finial was constructed first.


The biggest challenge I had with this piece was to find an item that would fit perfectly inside the pan center from the bottom and not slip through. The zinc lid was the solution for me.


Would love to know your thoughts. Please feel free to comment and share. Until next time …
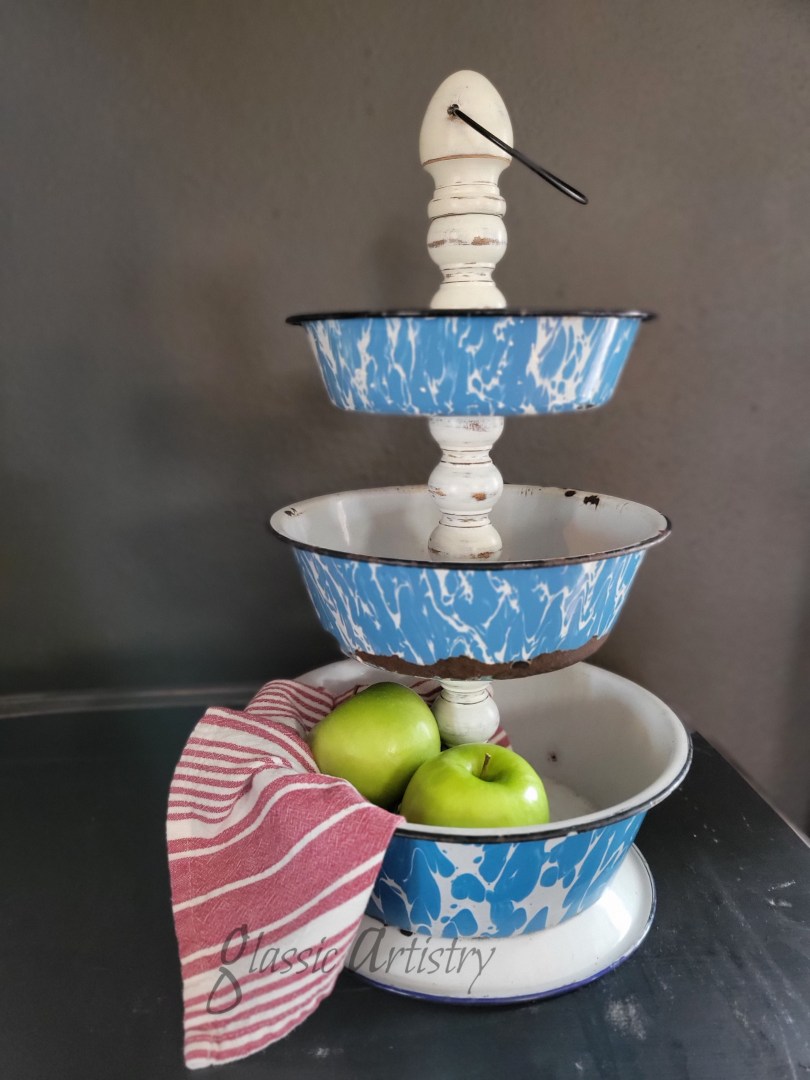
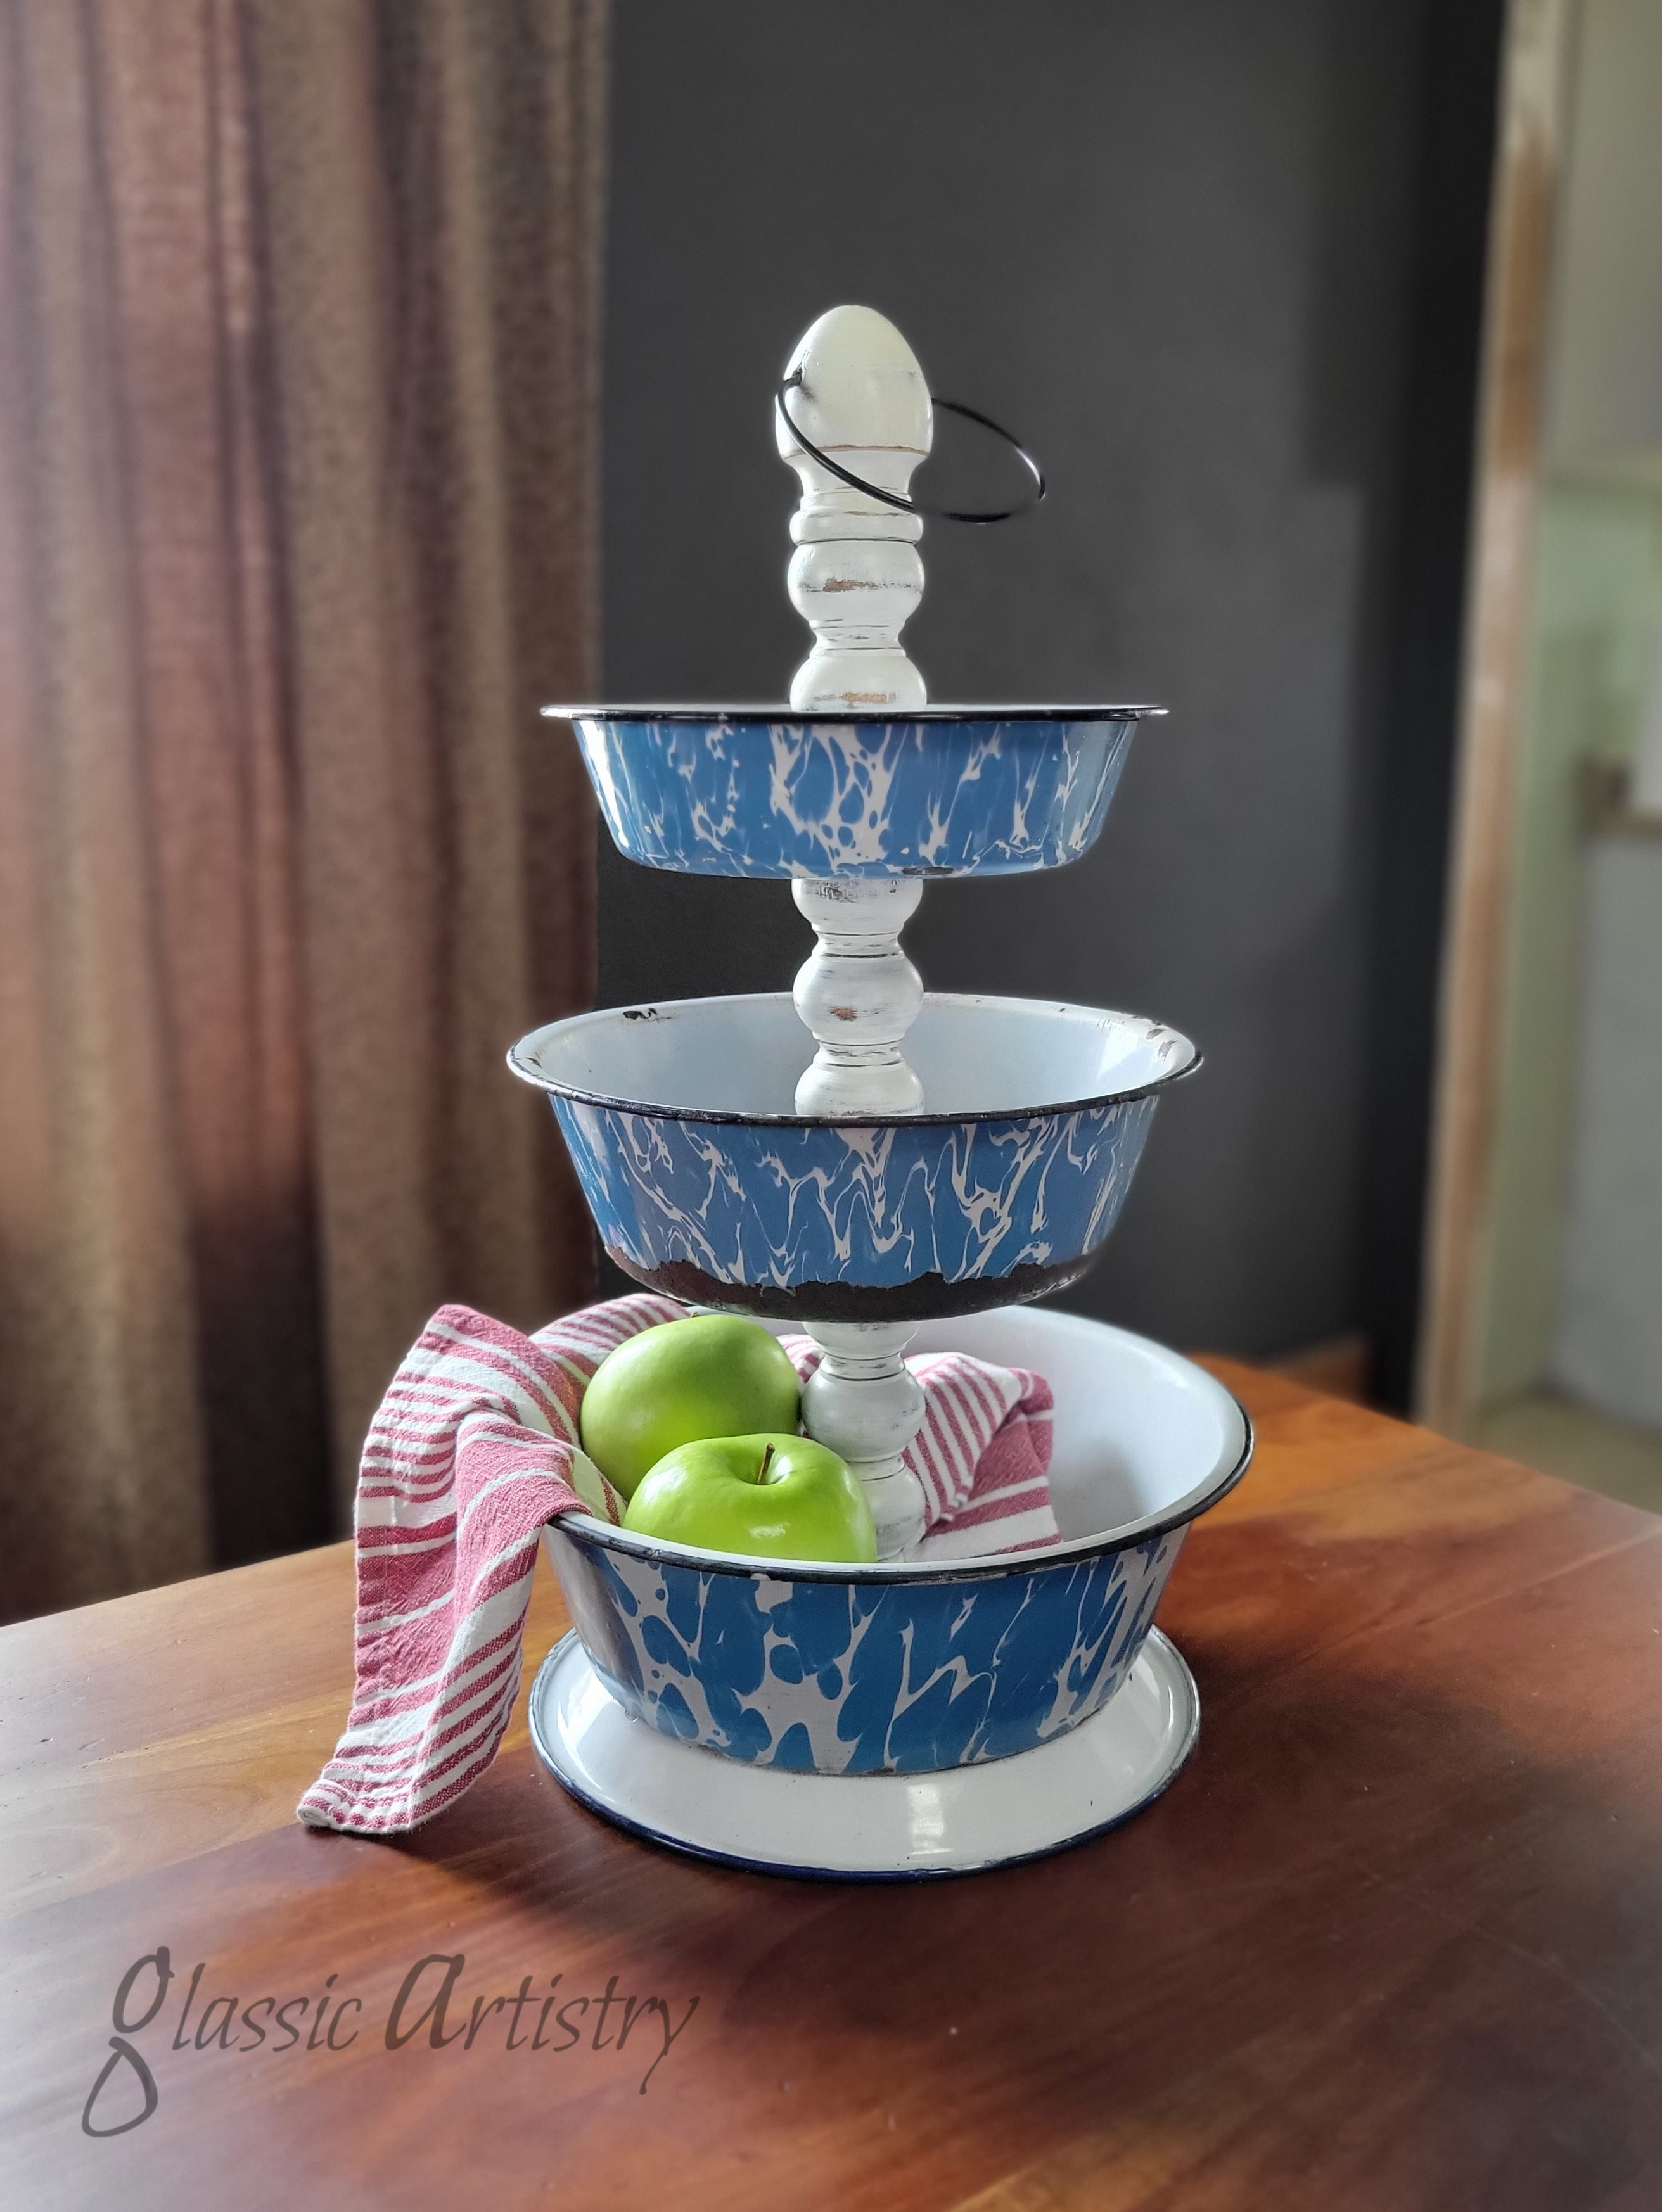
I’m back with my first tiered tray. As mentioned in my previous post, I’m working to clear out old before bringing in new. I would like to use as many of my gathered pieces as possible, so you may be seeing several small projects over the next two months and occasional tag sales at my home to help achieve my goal.
To get started, a collection of three worn enamelware pans were taken to the drill press and 5/16″ holes drilled through their centers. The enamel coating will chip away during drilling. I applied a coat of clear fingernail polish around the drilled holes and any chipped edges of the enamel to prevent any further chipping. A clear sealer could be used for this step too. After the fingernail polish was dry, the enamelware was waxed and buffed.


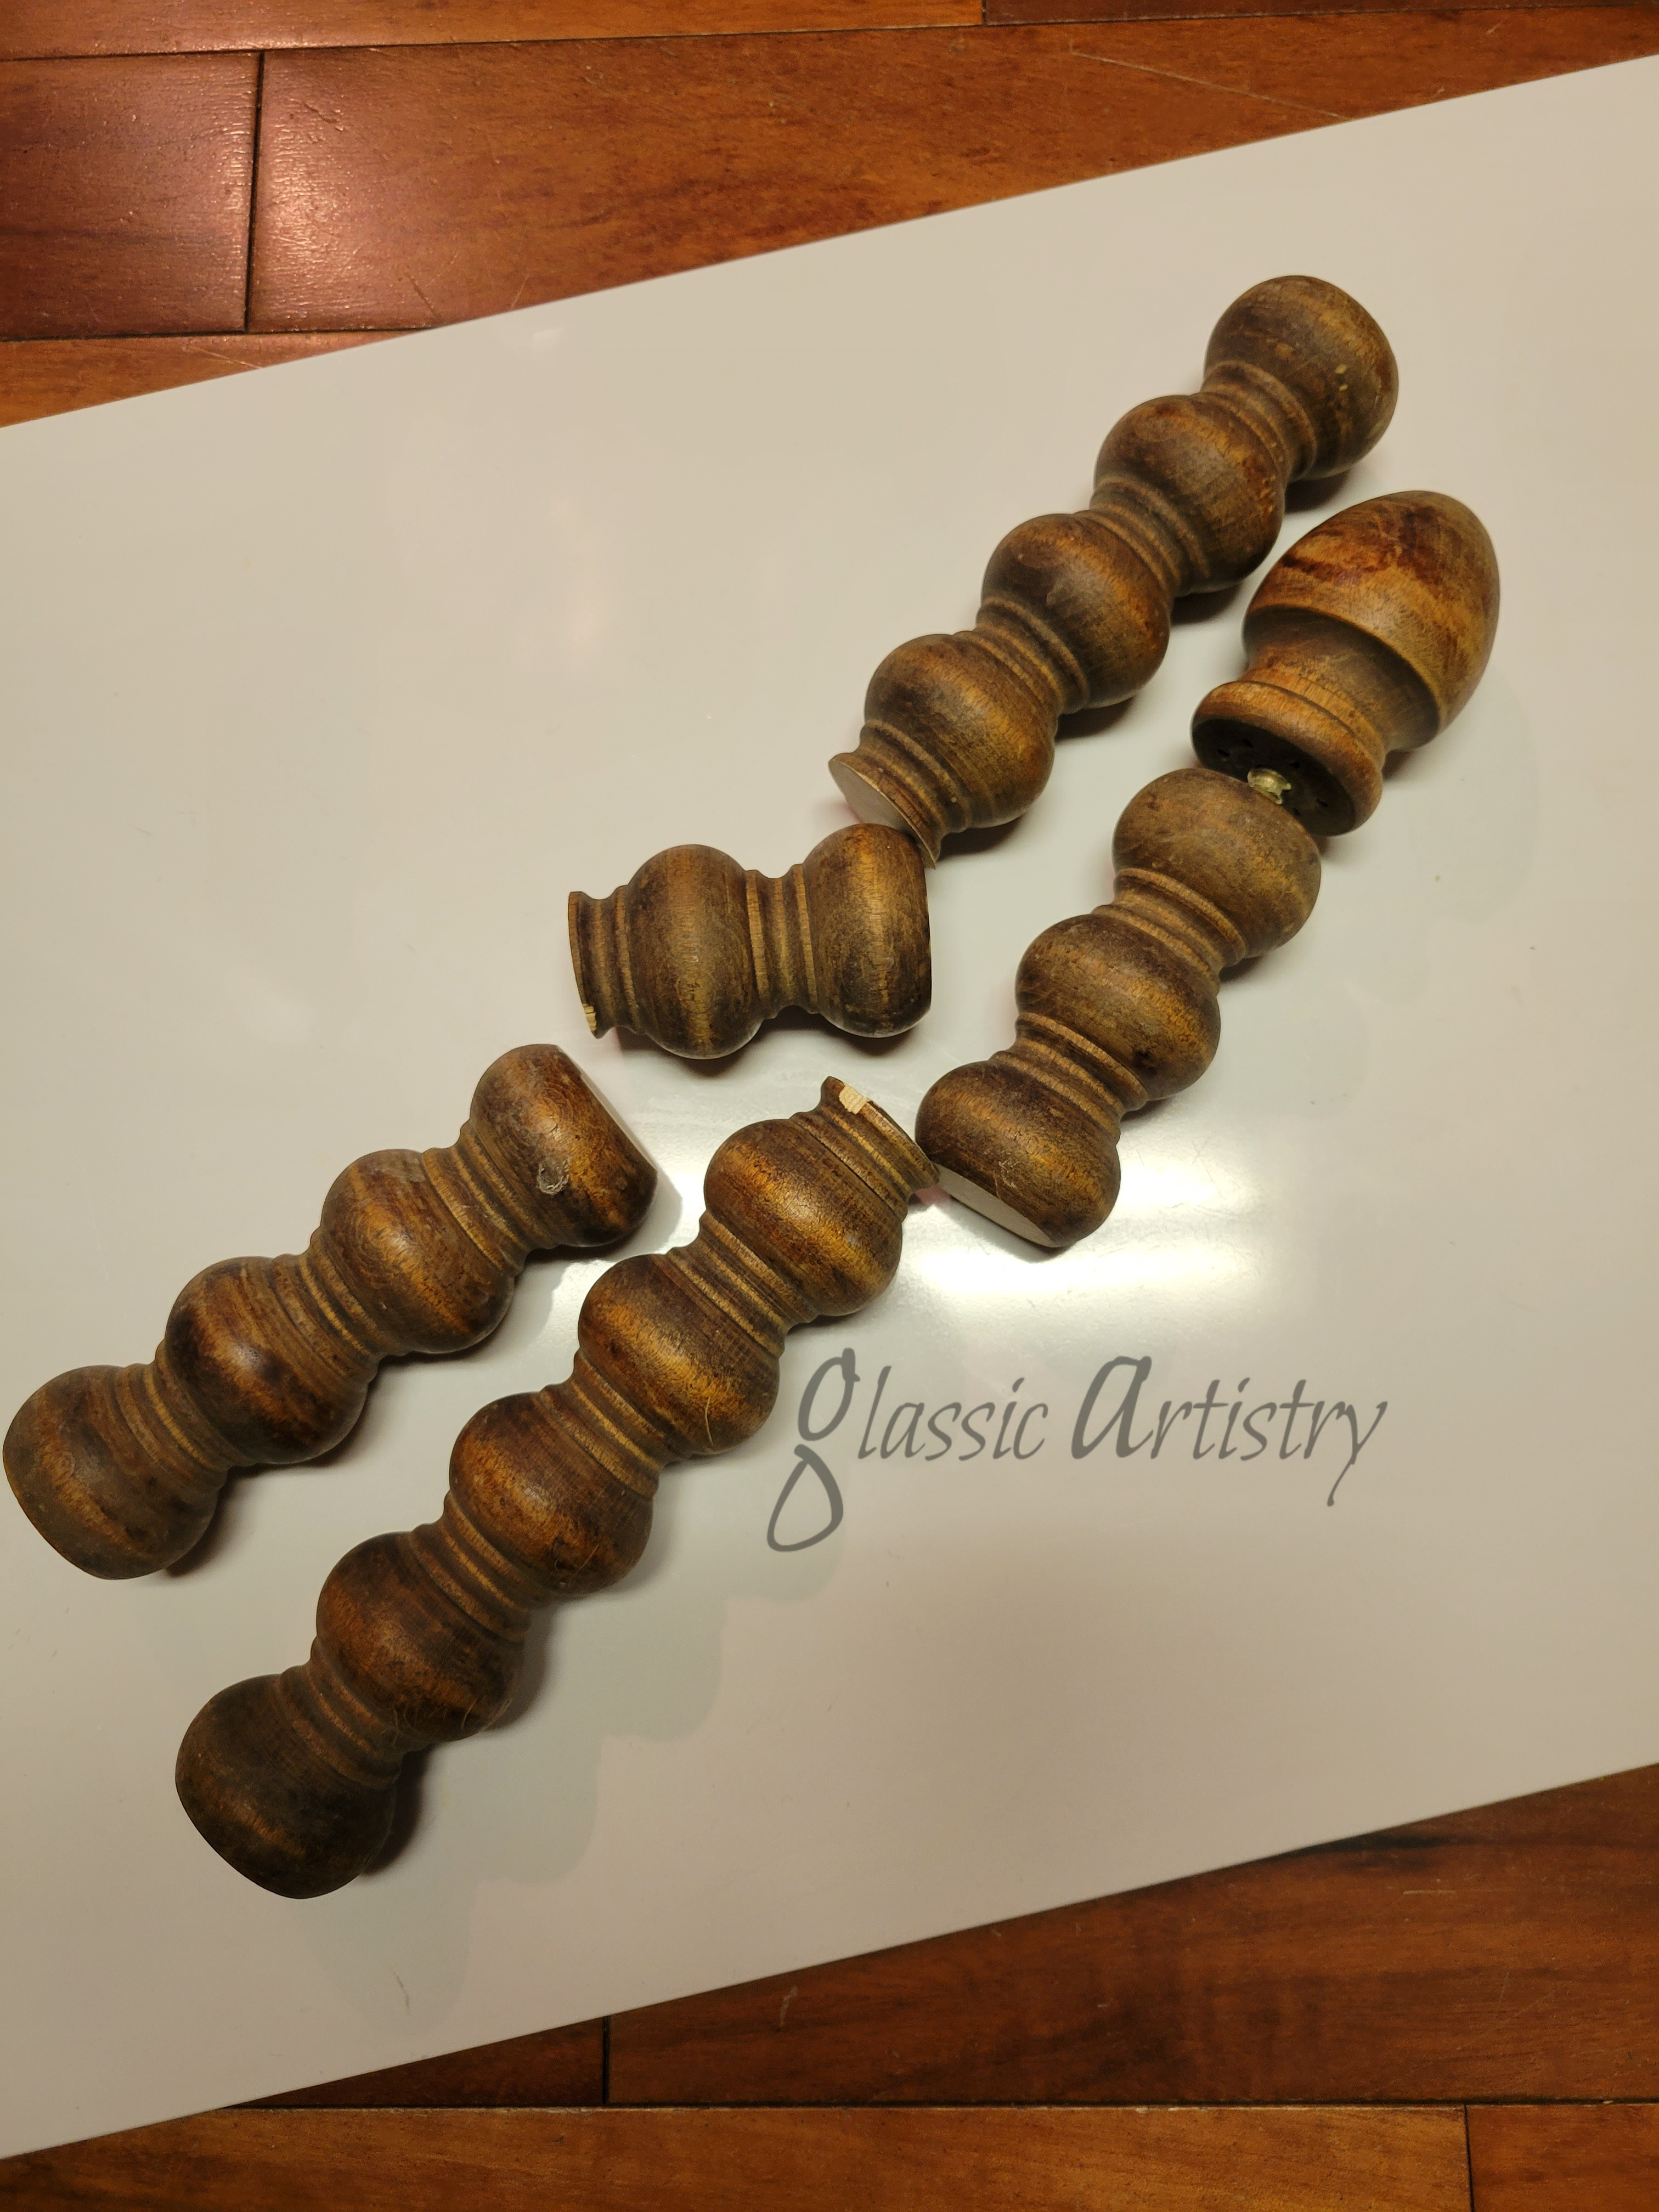
I chose two decorative spindles to use as spacers between the pans. I thought their design worked well, they already had center holes in one end, and one already had a finial; perfect. After cutting them to the lengths desired, they went to the drill press and a hole was drilled through the length of them using the original hole as a guide. They were sanded, painted, and sealed.
A piece of 5/16″ threaded rod was cut to the length needed and a washer and nut found to fit it.

The pieces were slipped on the rod, working from the top down and secured with the washer and nut.

I thought it was finished at this point, but after looking at for a week, I had to add one more detail; a wire ring at the top.
With bolt cutters, a circle was cut from a steel bedspring; sanded, painted, sealed. The tray was taken apart and the finial drilled through at the drill press. The steel ring was almost unbudgeable. I had to hold the finial while my husband stretched the ring enough to get it the holes; its a tight fit.
The tray was reassembled and done! I have my first item for a future tag sale!

Please like, comment, and share as you wish. Keep recycling, repurposing, and upcycling, each small step helps.
This time of year is the greatest … back out in the garden, doing yard work, and mowing. I get some of my best thinking done while on a mower.
Best of all, our year of homeschooling was successfully completed last week! I think the whole family let out a big sigh of relief over that, lol. You definitely have to give teachers and others who homeschool every year a standing ovation; it’s a lot of work, and patience.
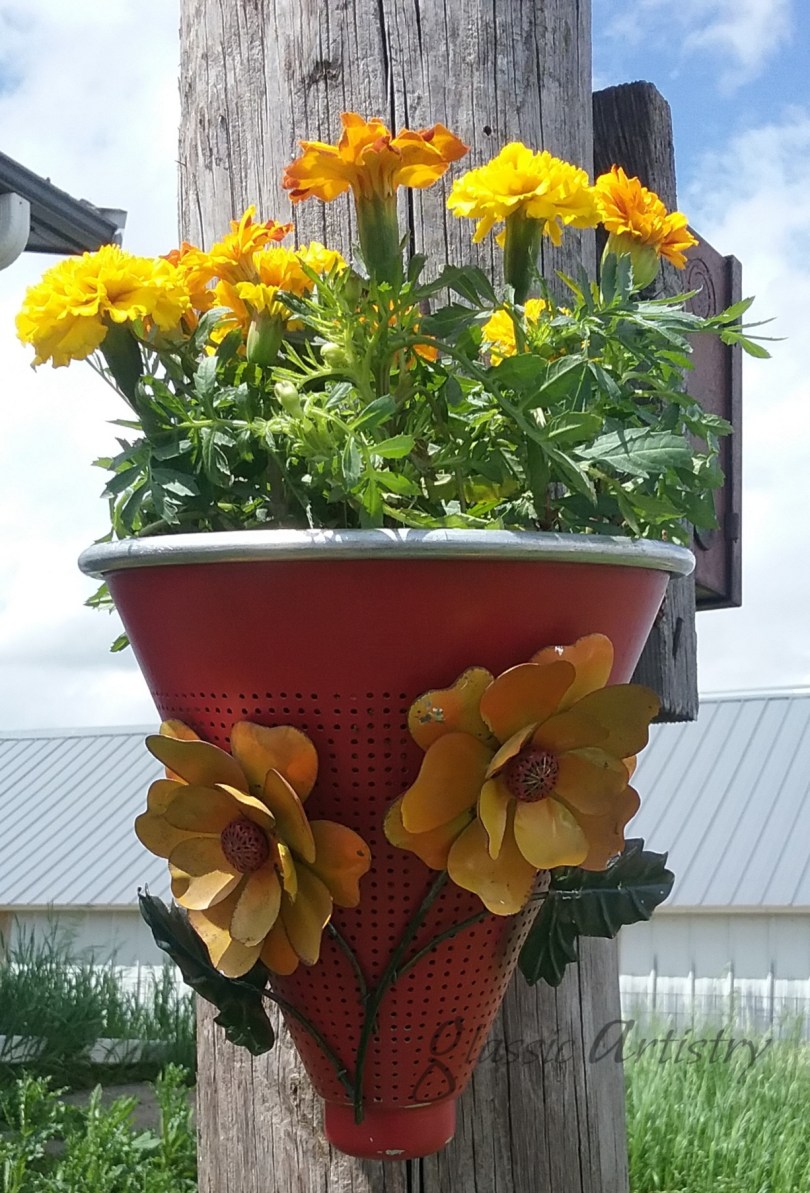
Anyway, having a little free time on my hands now, I made something quick and fun to hang on a couple of ugly poles in my yard.
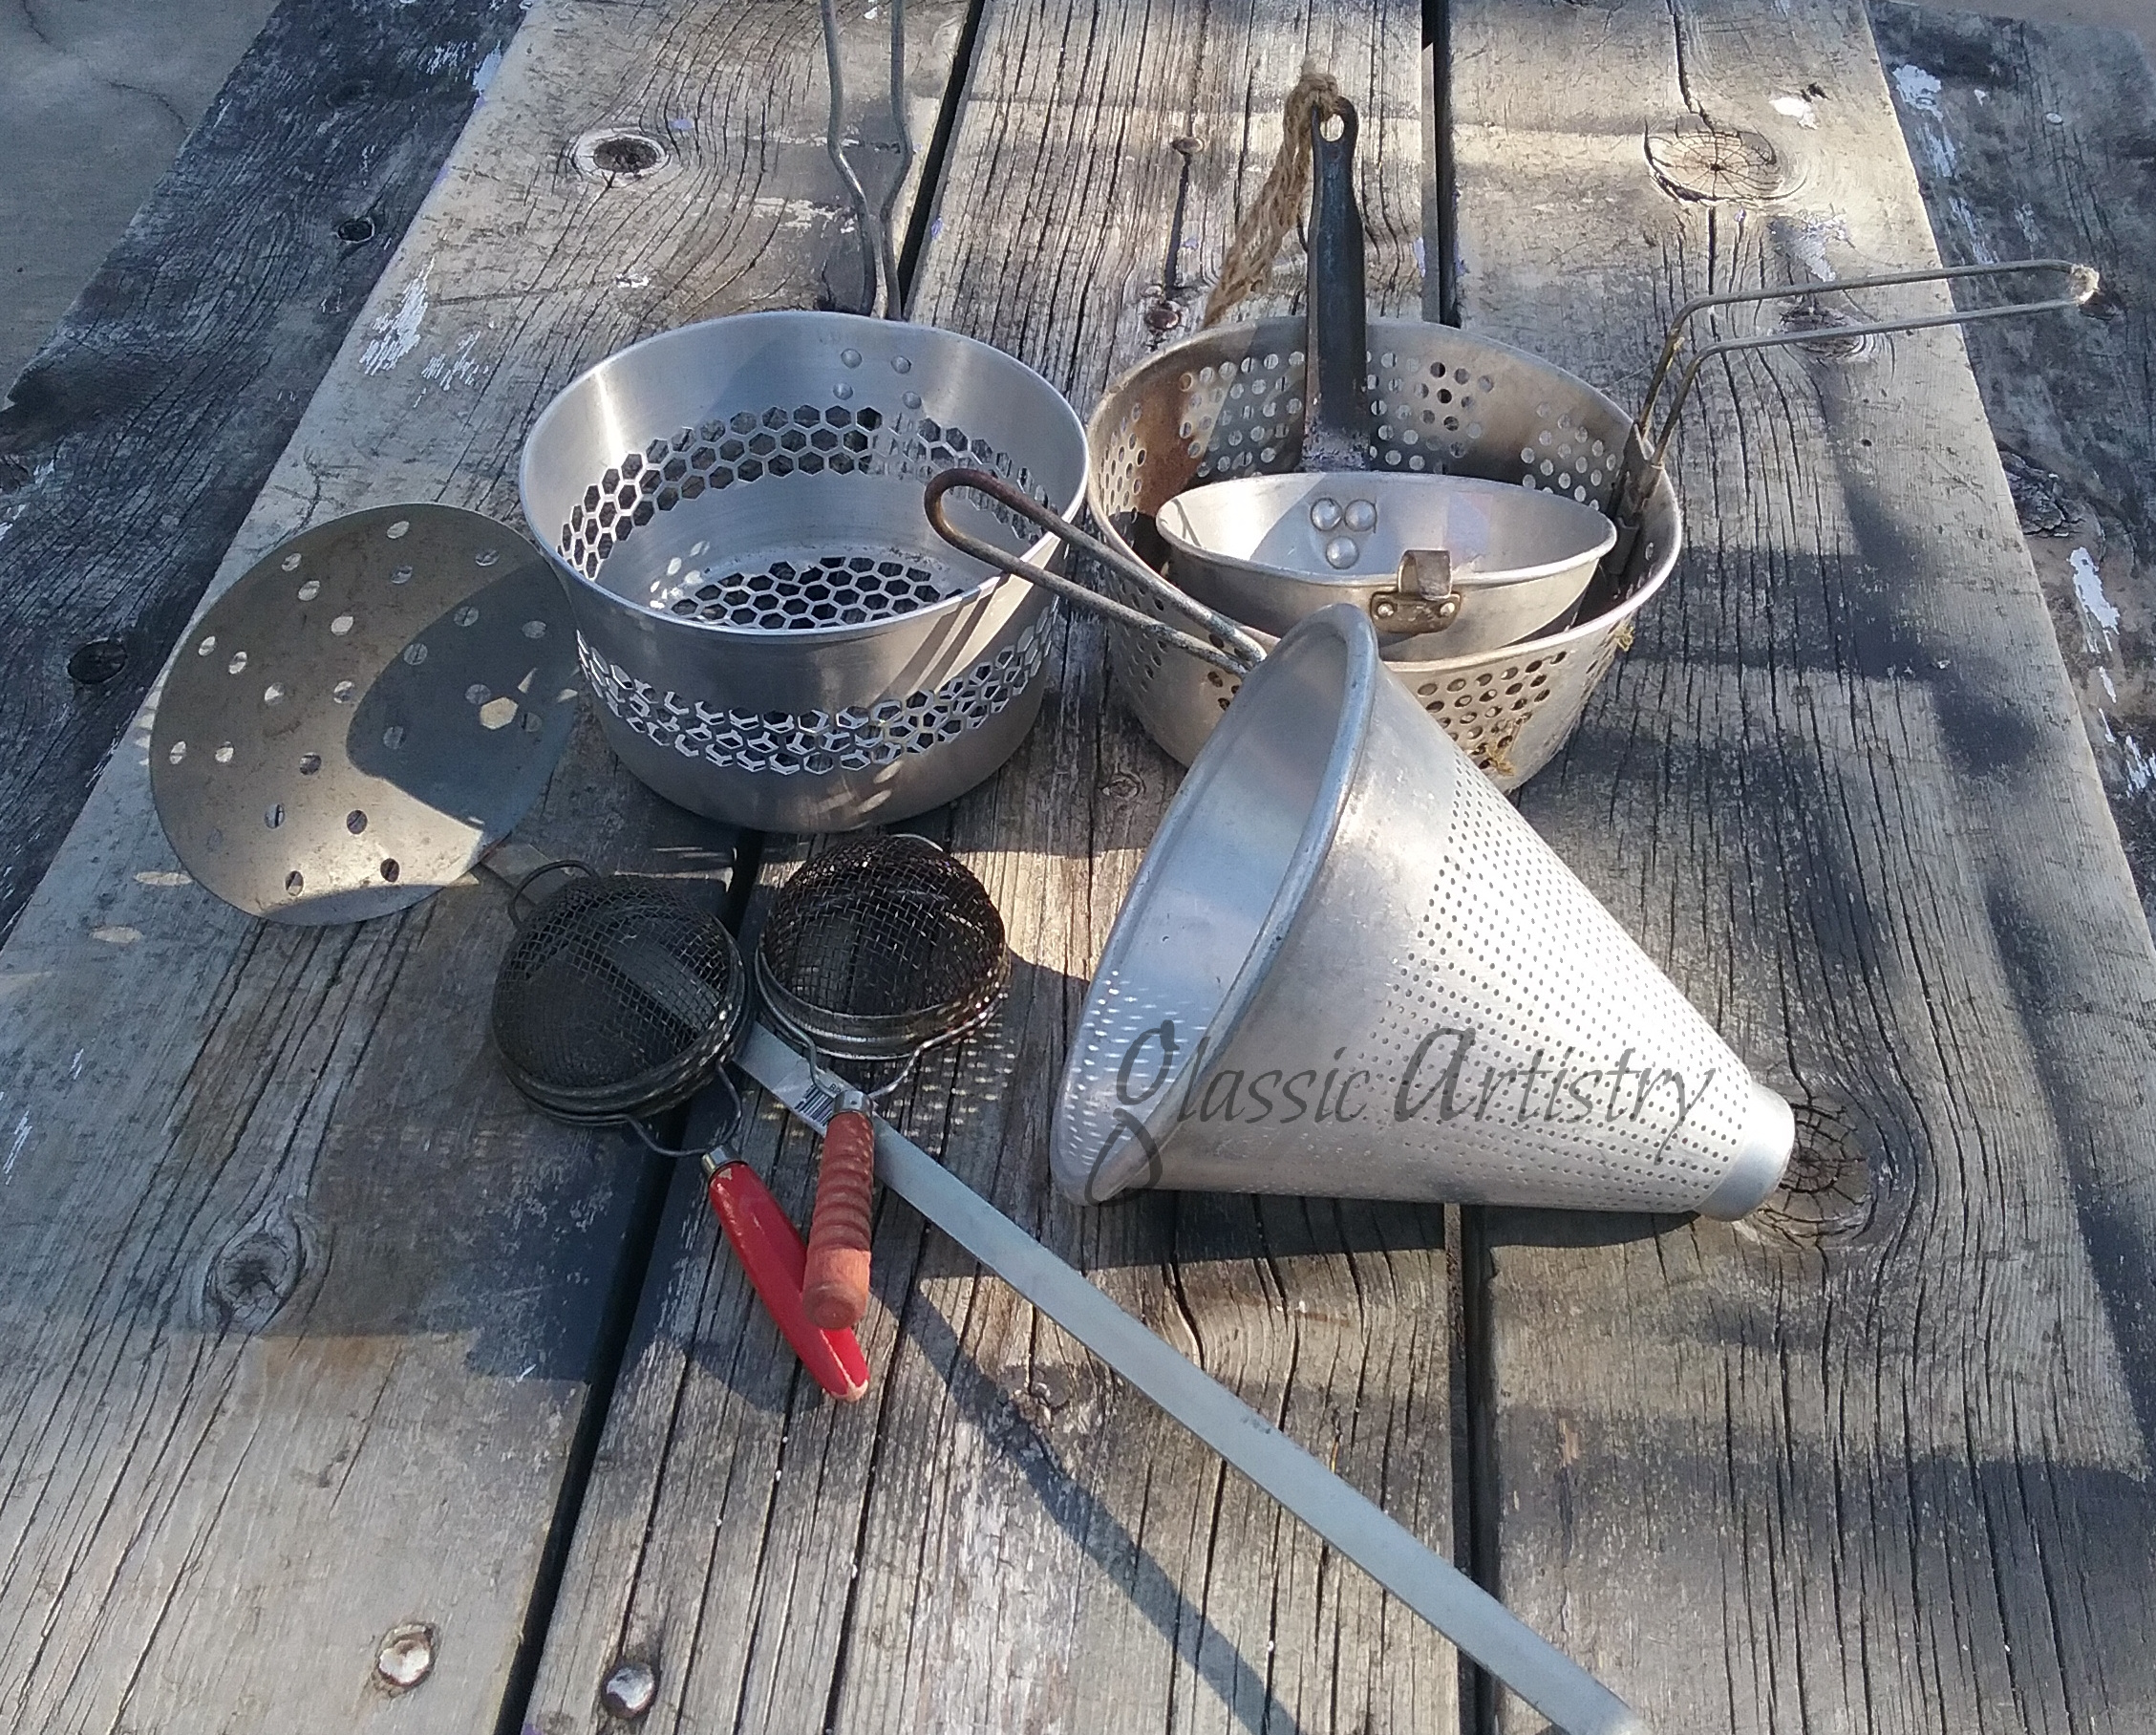
I have a small pile of metal strainers and such that I’ve found in the salvage dropped off for my husband. Seems no one wants the poor things unless they’re a special vintage piece.
I used to collect the most interesting ones and we would heat the handles a bit to bend them upright and be used as hangers. I’d sell them at vintage markets for a couple bucks each. The large mesh ones were the most popular, but not as easy to come by anymore.
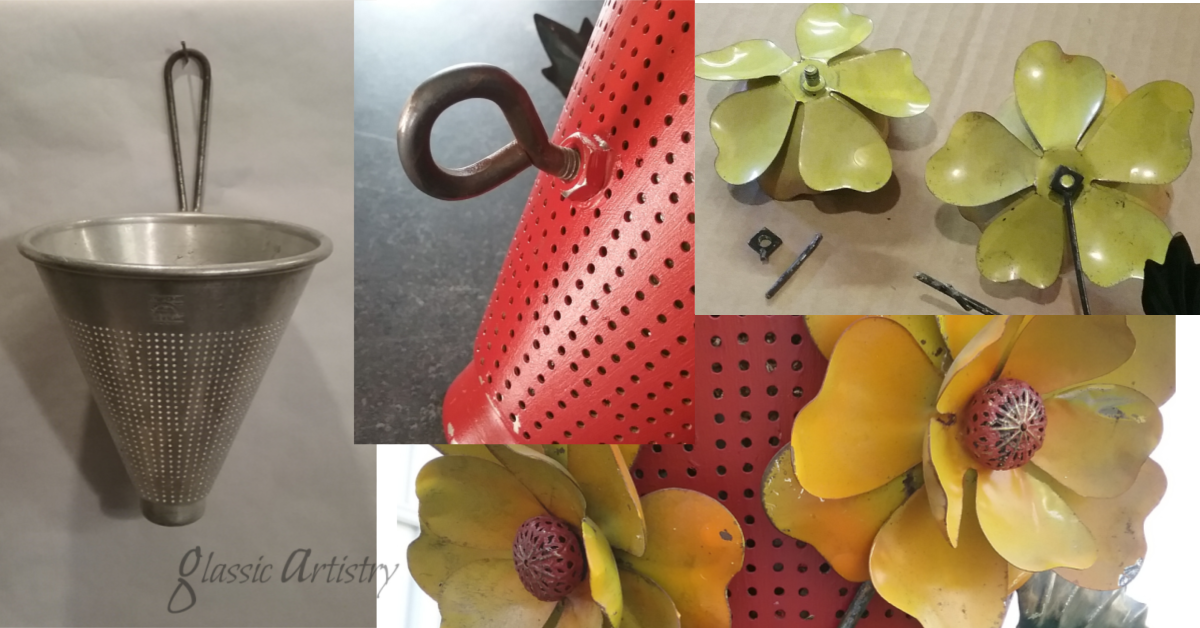
Many of you know I have a thing for metal flowers too. If you’re lucky you can find some that are constructed with a screw and nut which makes them really easy to work with. I usually find flowers at garage sales, thrift stores, and flea markets. My stash was getting pretty thin until I recently scored some beautiful ones from my sister and her husband who own Mc’Do-its Upcycled, Repurposed and Flea Markets. It’s awesome having them so close, they’ve had just what I was searching for on several occasions.


I’m ready to share what I came up with, but please remember there are no limits when it comes to projects like these. Use whatever you have; paint, washers, glass donuts, wire, buttons, etc. I played around with several ideas before settling on the ones I wanted.
Had to have a touch of blue –

An eye bolt was added to the back to help it hang evenly and provide a loop for a wire to be threaded through and secured to prevent rocking from side to side. Two glass donuts were wired to the handle.

This vintage look might be my favorite –
Here’s another useful tip – slide pieces of wax paper under the pieces you are wiring on to prevent your base paint from getting scratched.


Boho anyone? Just because it has a hanger doesn’t mean you have to hang it.
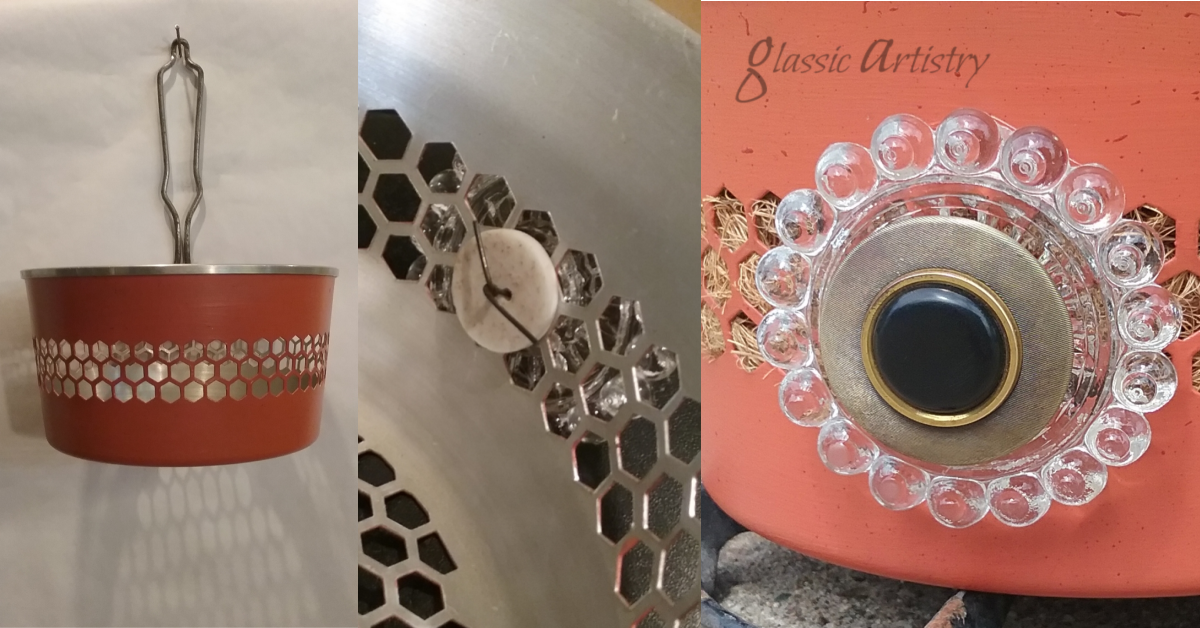
Exterior orange paint, red speckles, clear spray sealer. A medallion was made with a large decorative coat button on top of a glass lamp piece. The wire is threaded through the button and through a hole in the glass piece. The wires went through an old button on the inside of the basket to hold it securely.

And then there’s this one, just because I thought it would be cute in the kitchen.

So, what do you think? Don’t these look like fun? Please, feel free to comment if you like. I love hearing from readers.
Back soon!

Spring break gave me the time needed to complete my latest project.
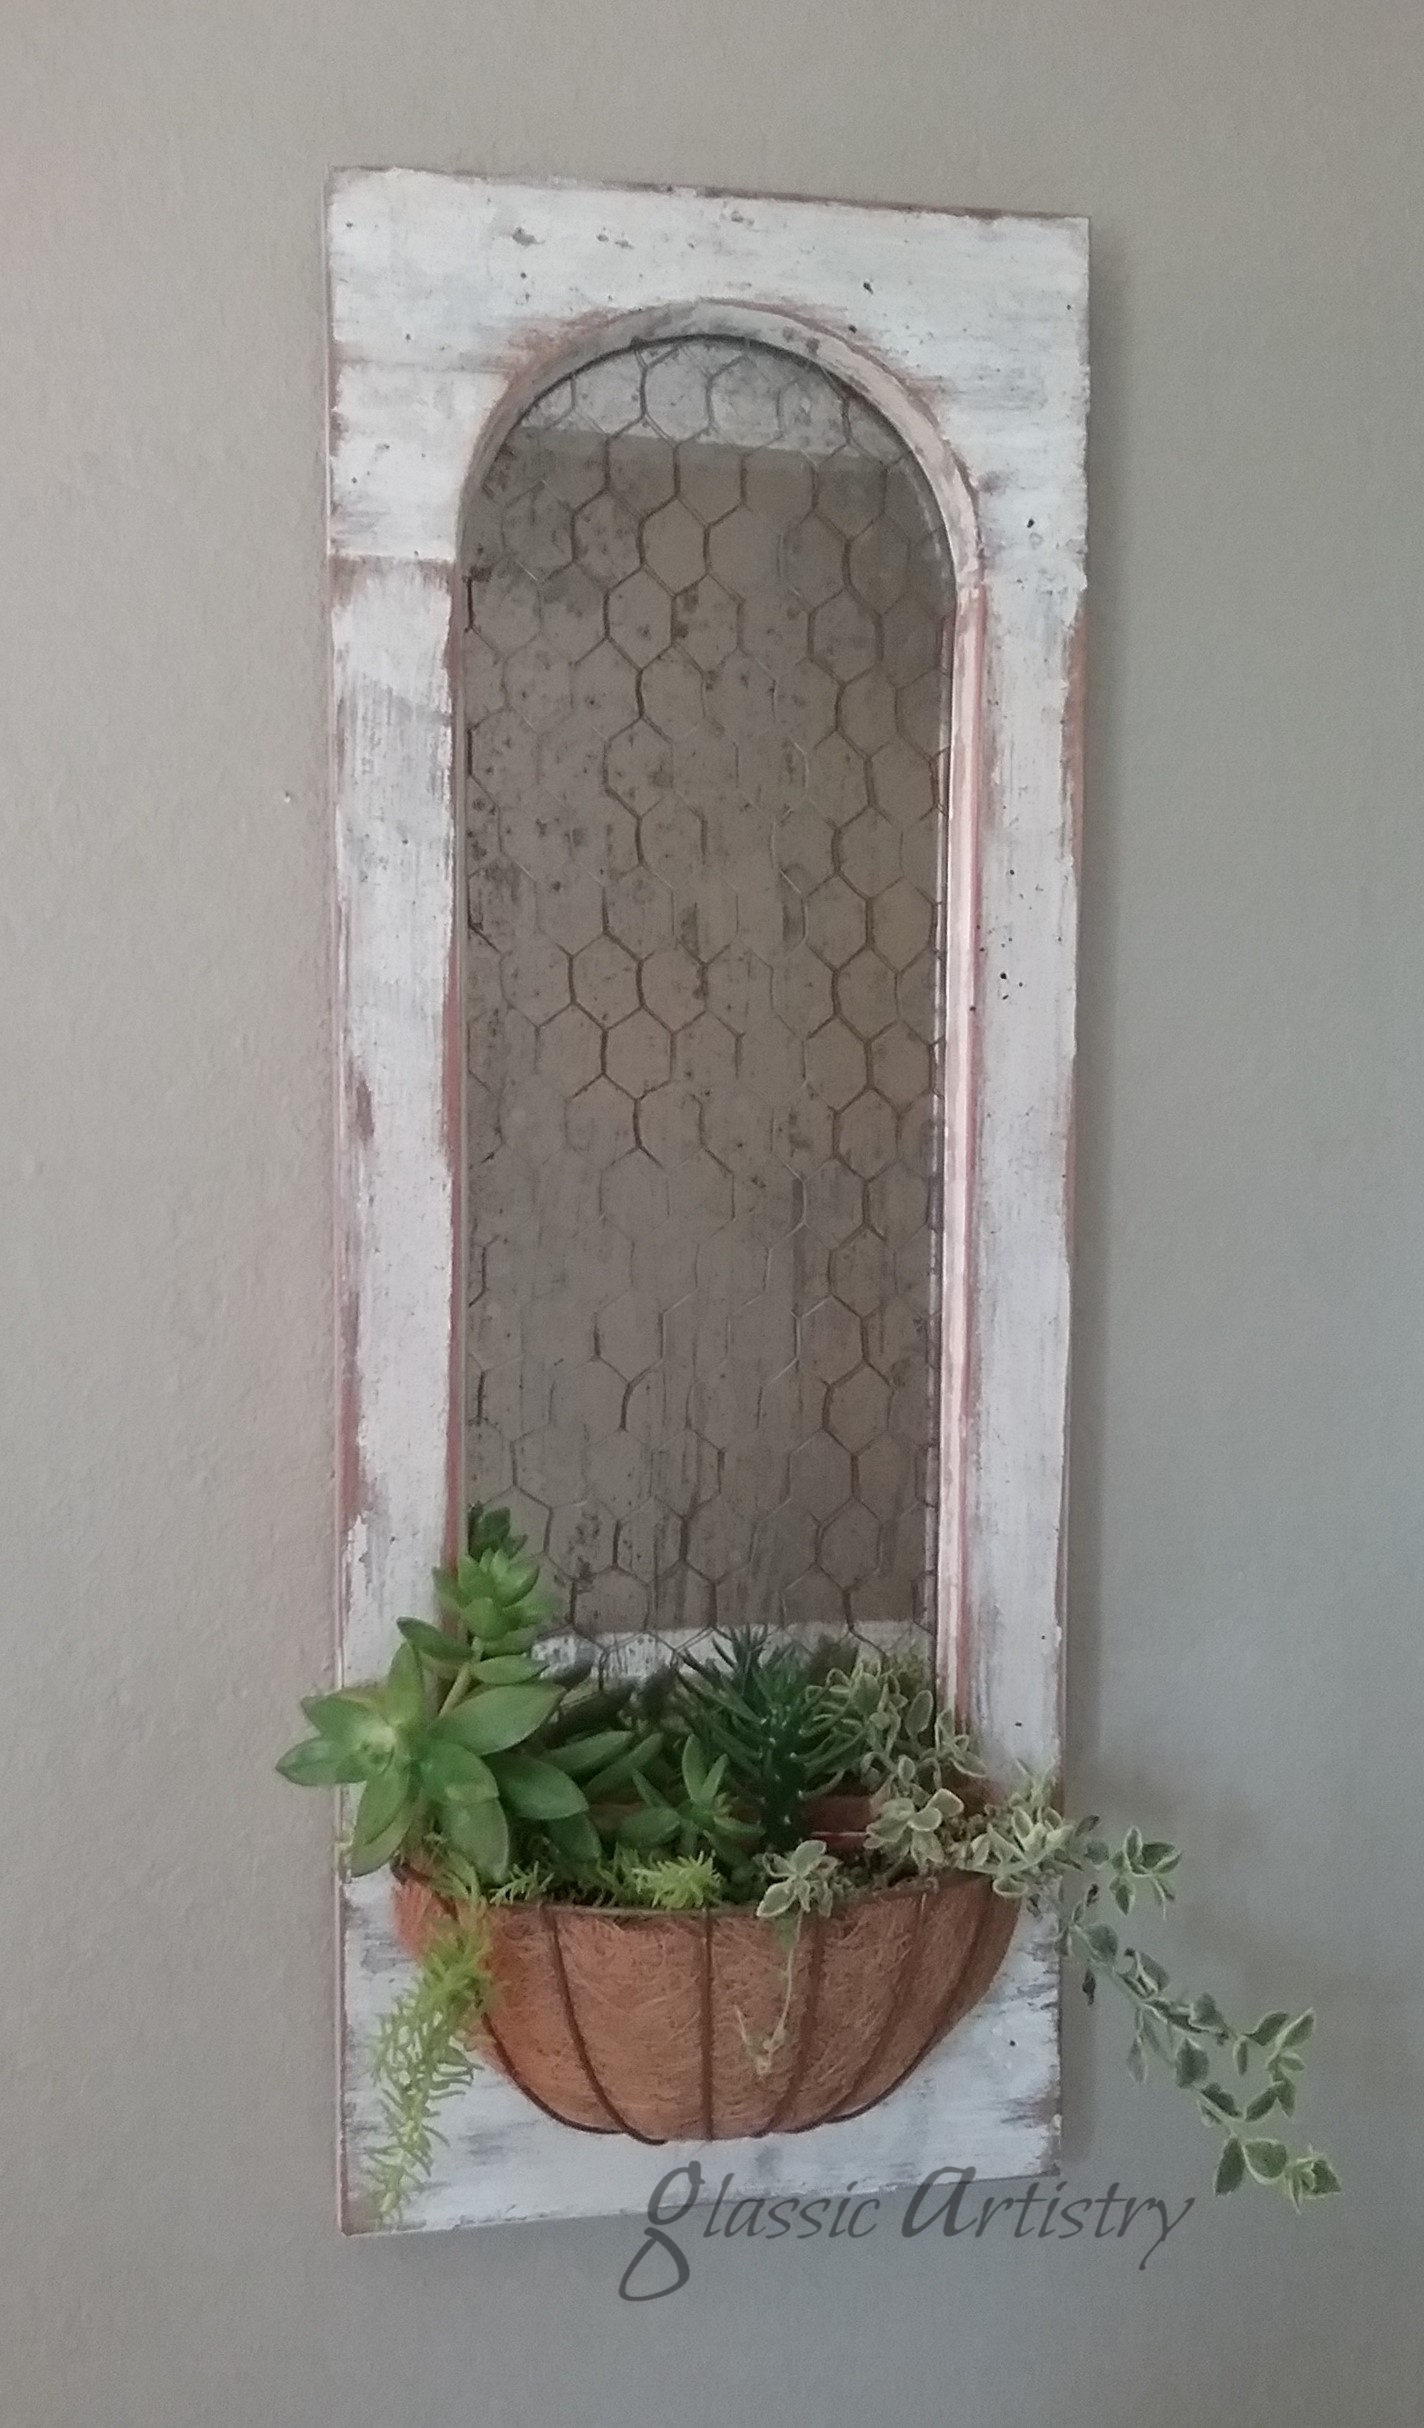
I’m pretty excited about this piece. Not only do I get something for my bathroom wall, I discovered a nifty new way to make a basket that may come in handy in the future.
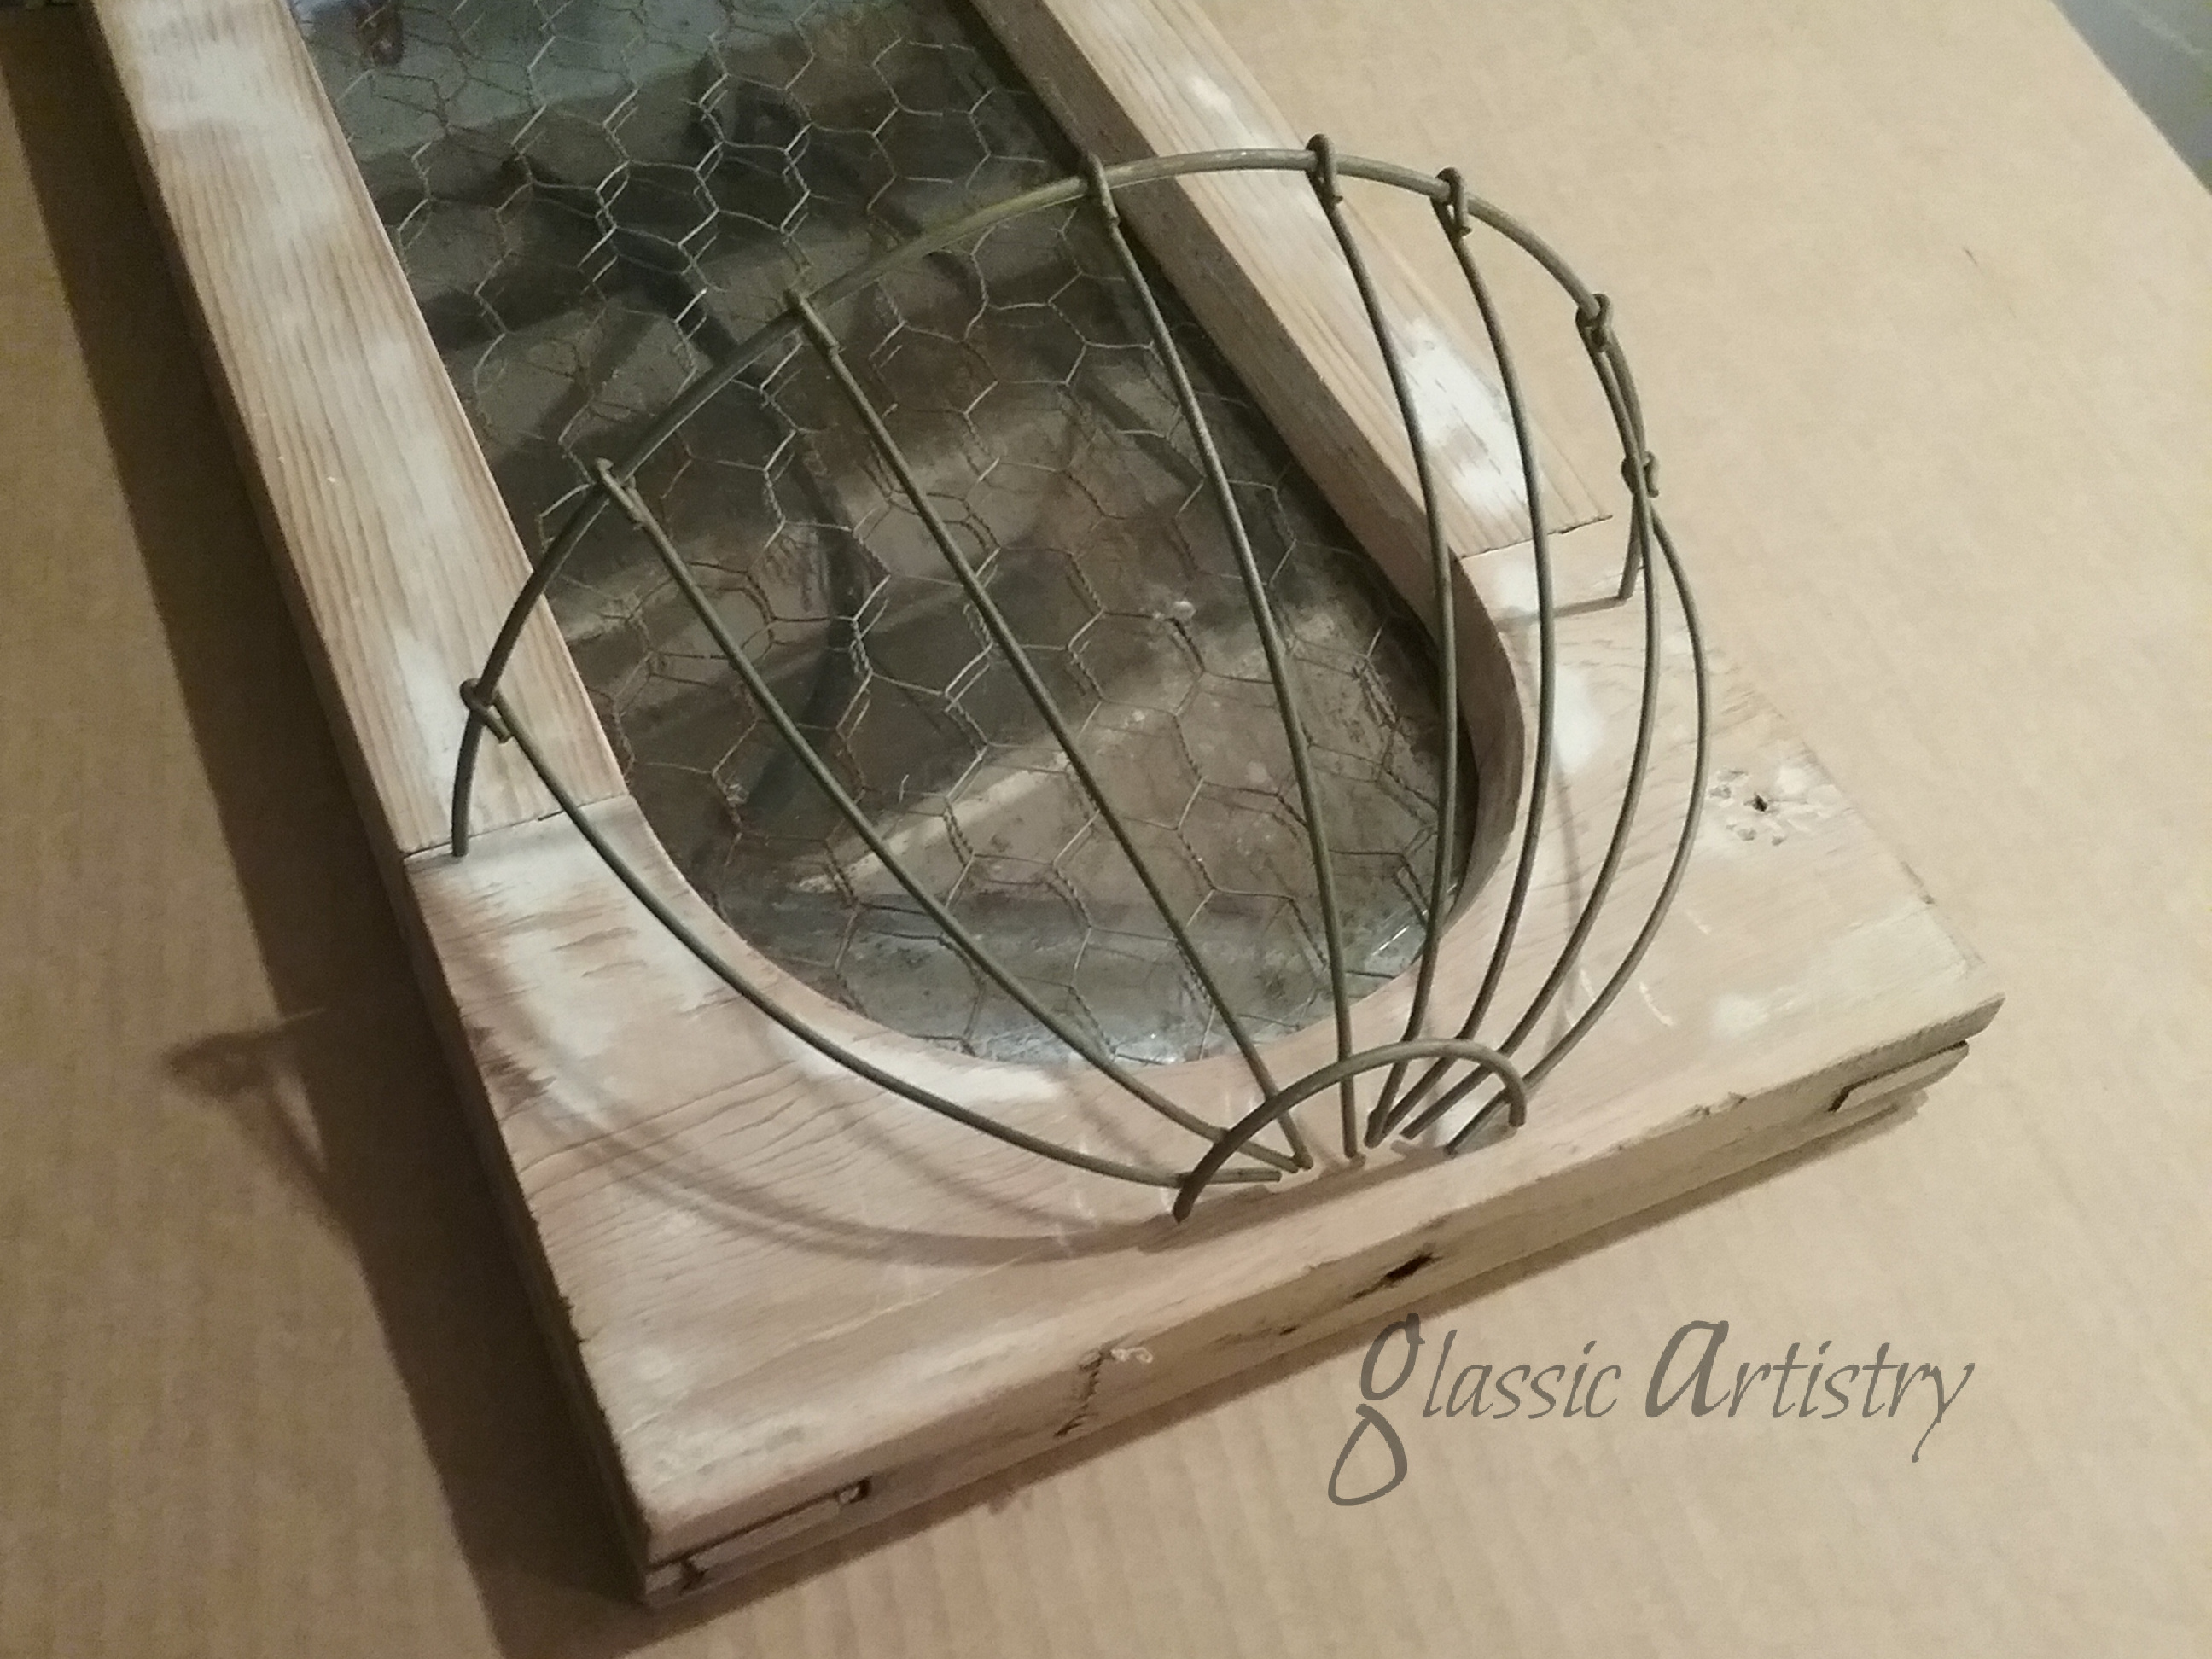
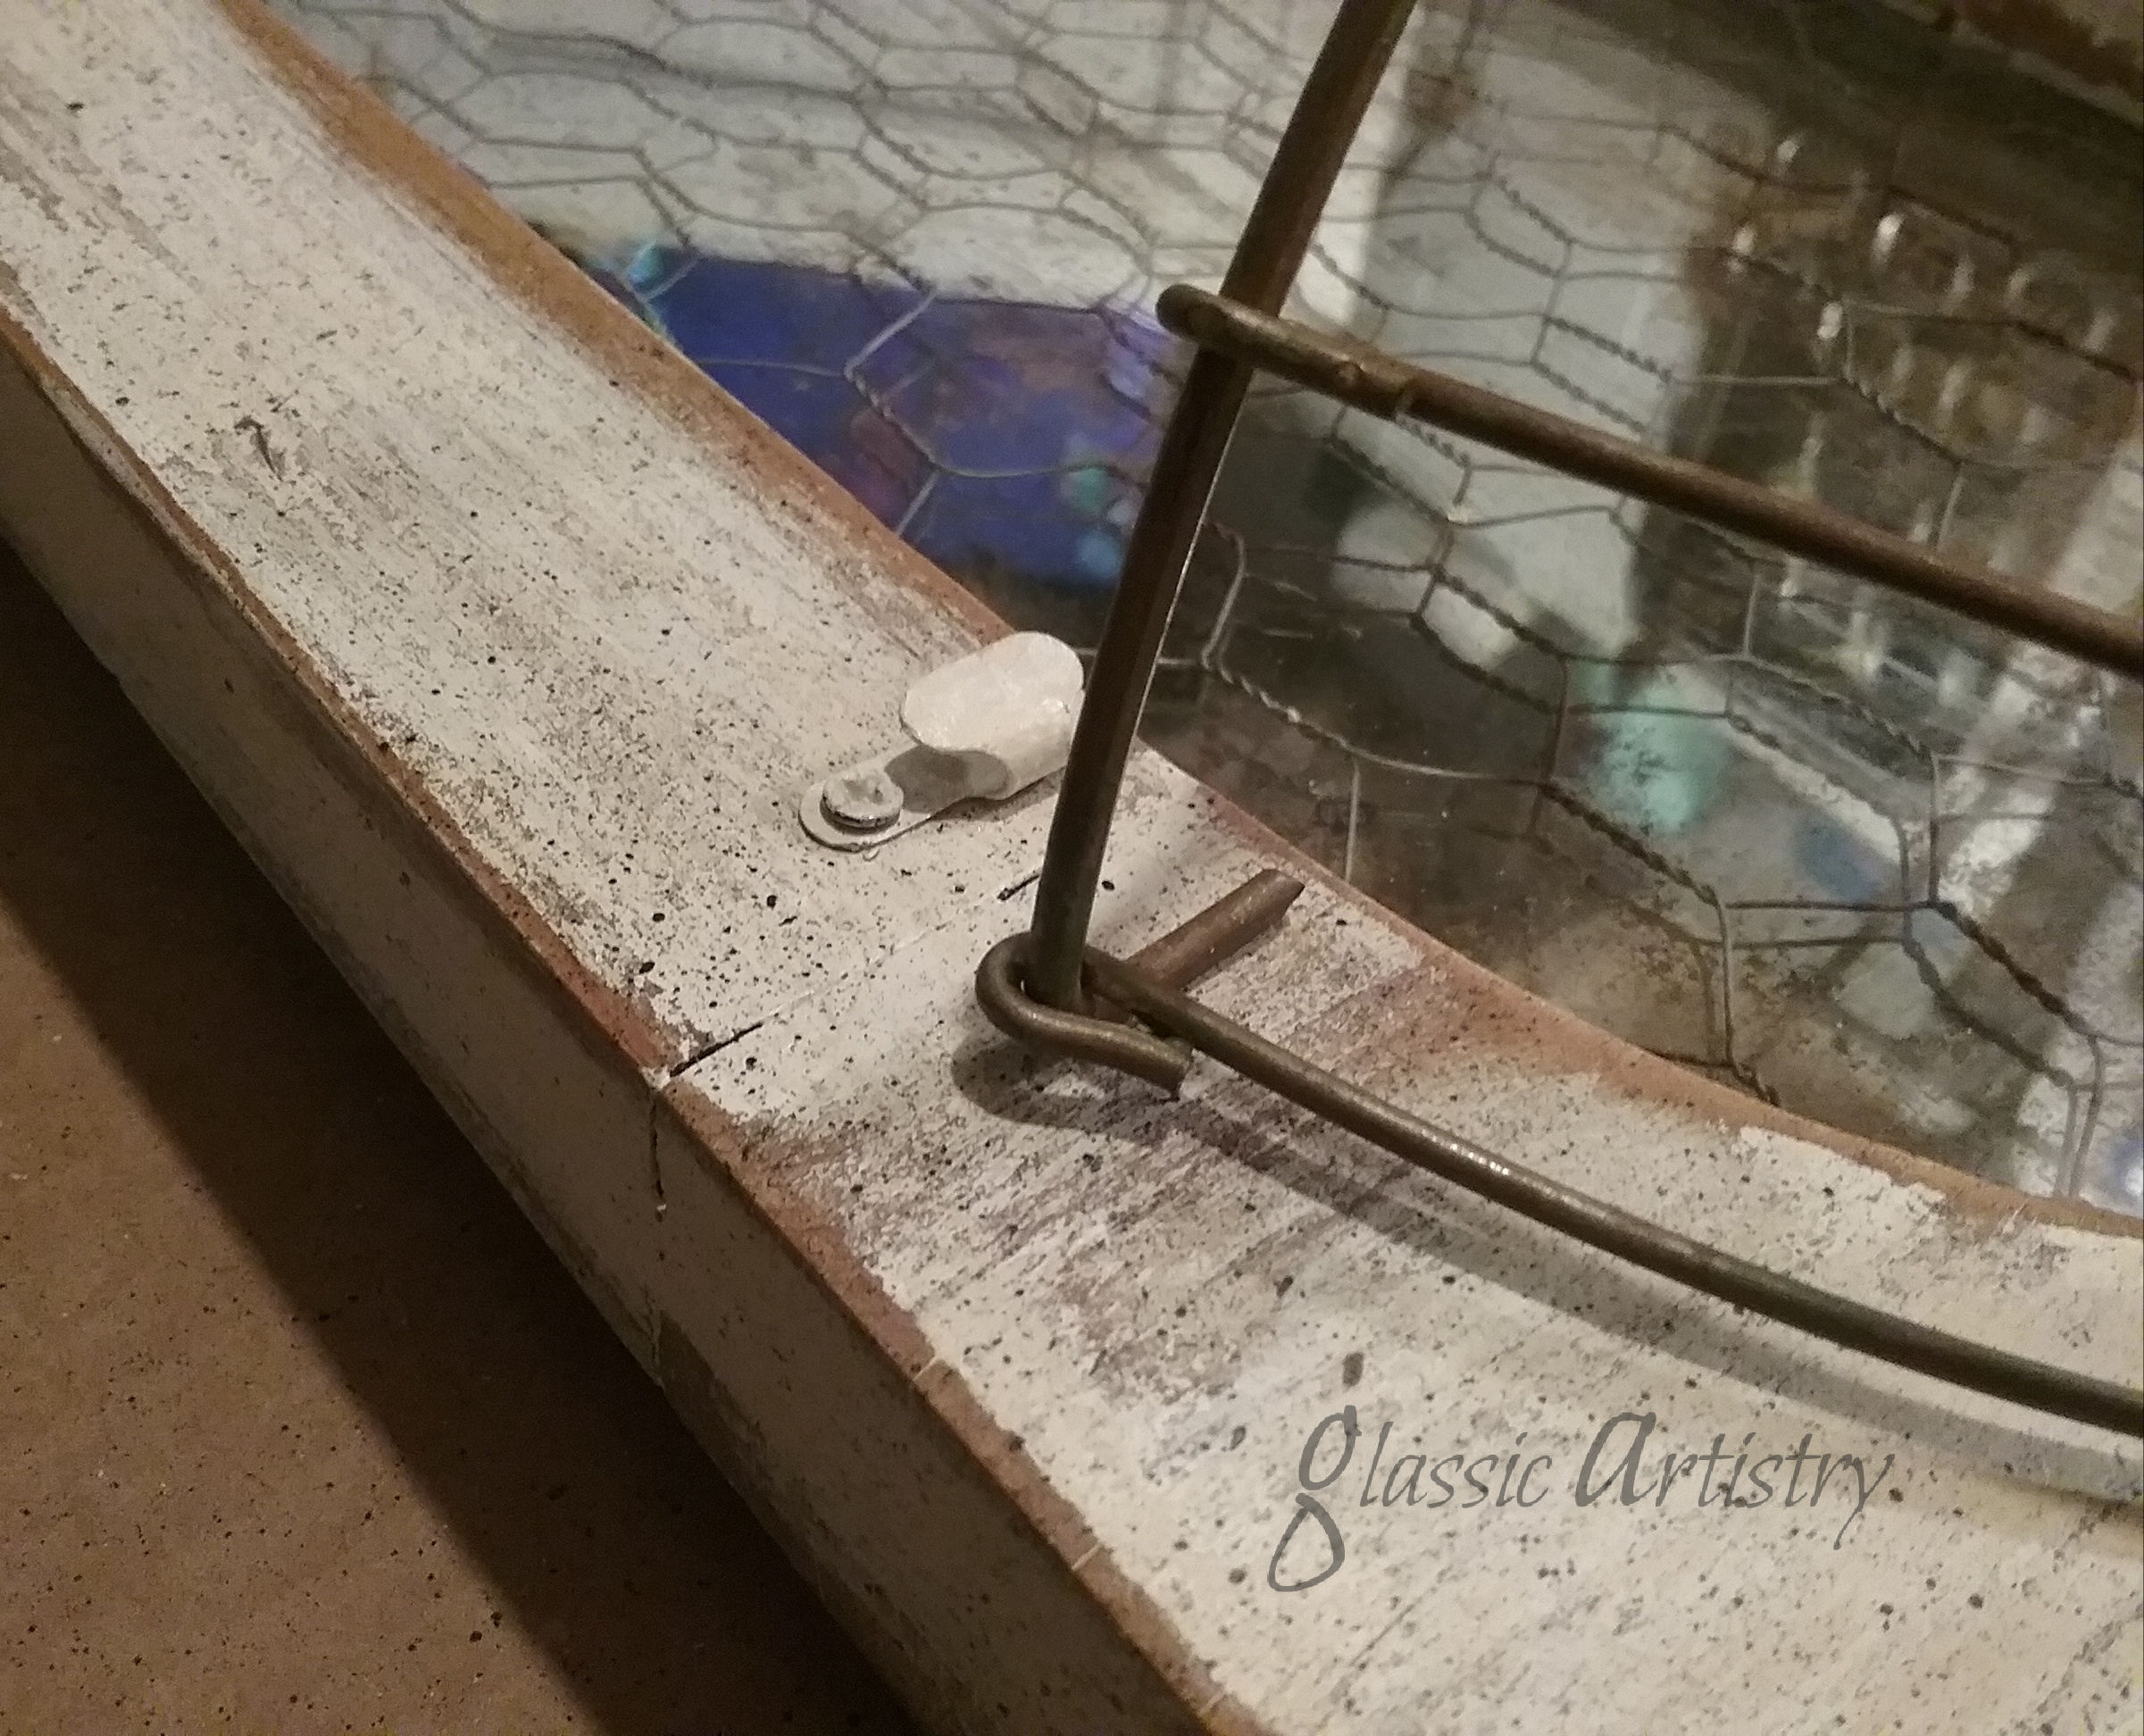
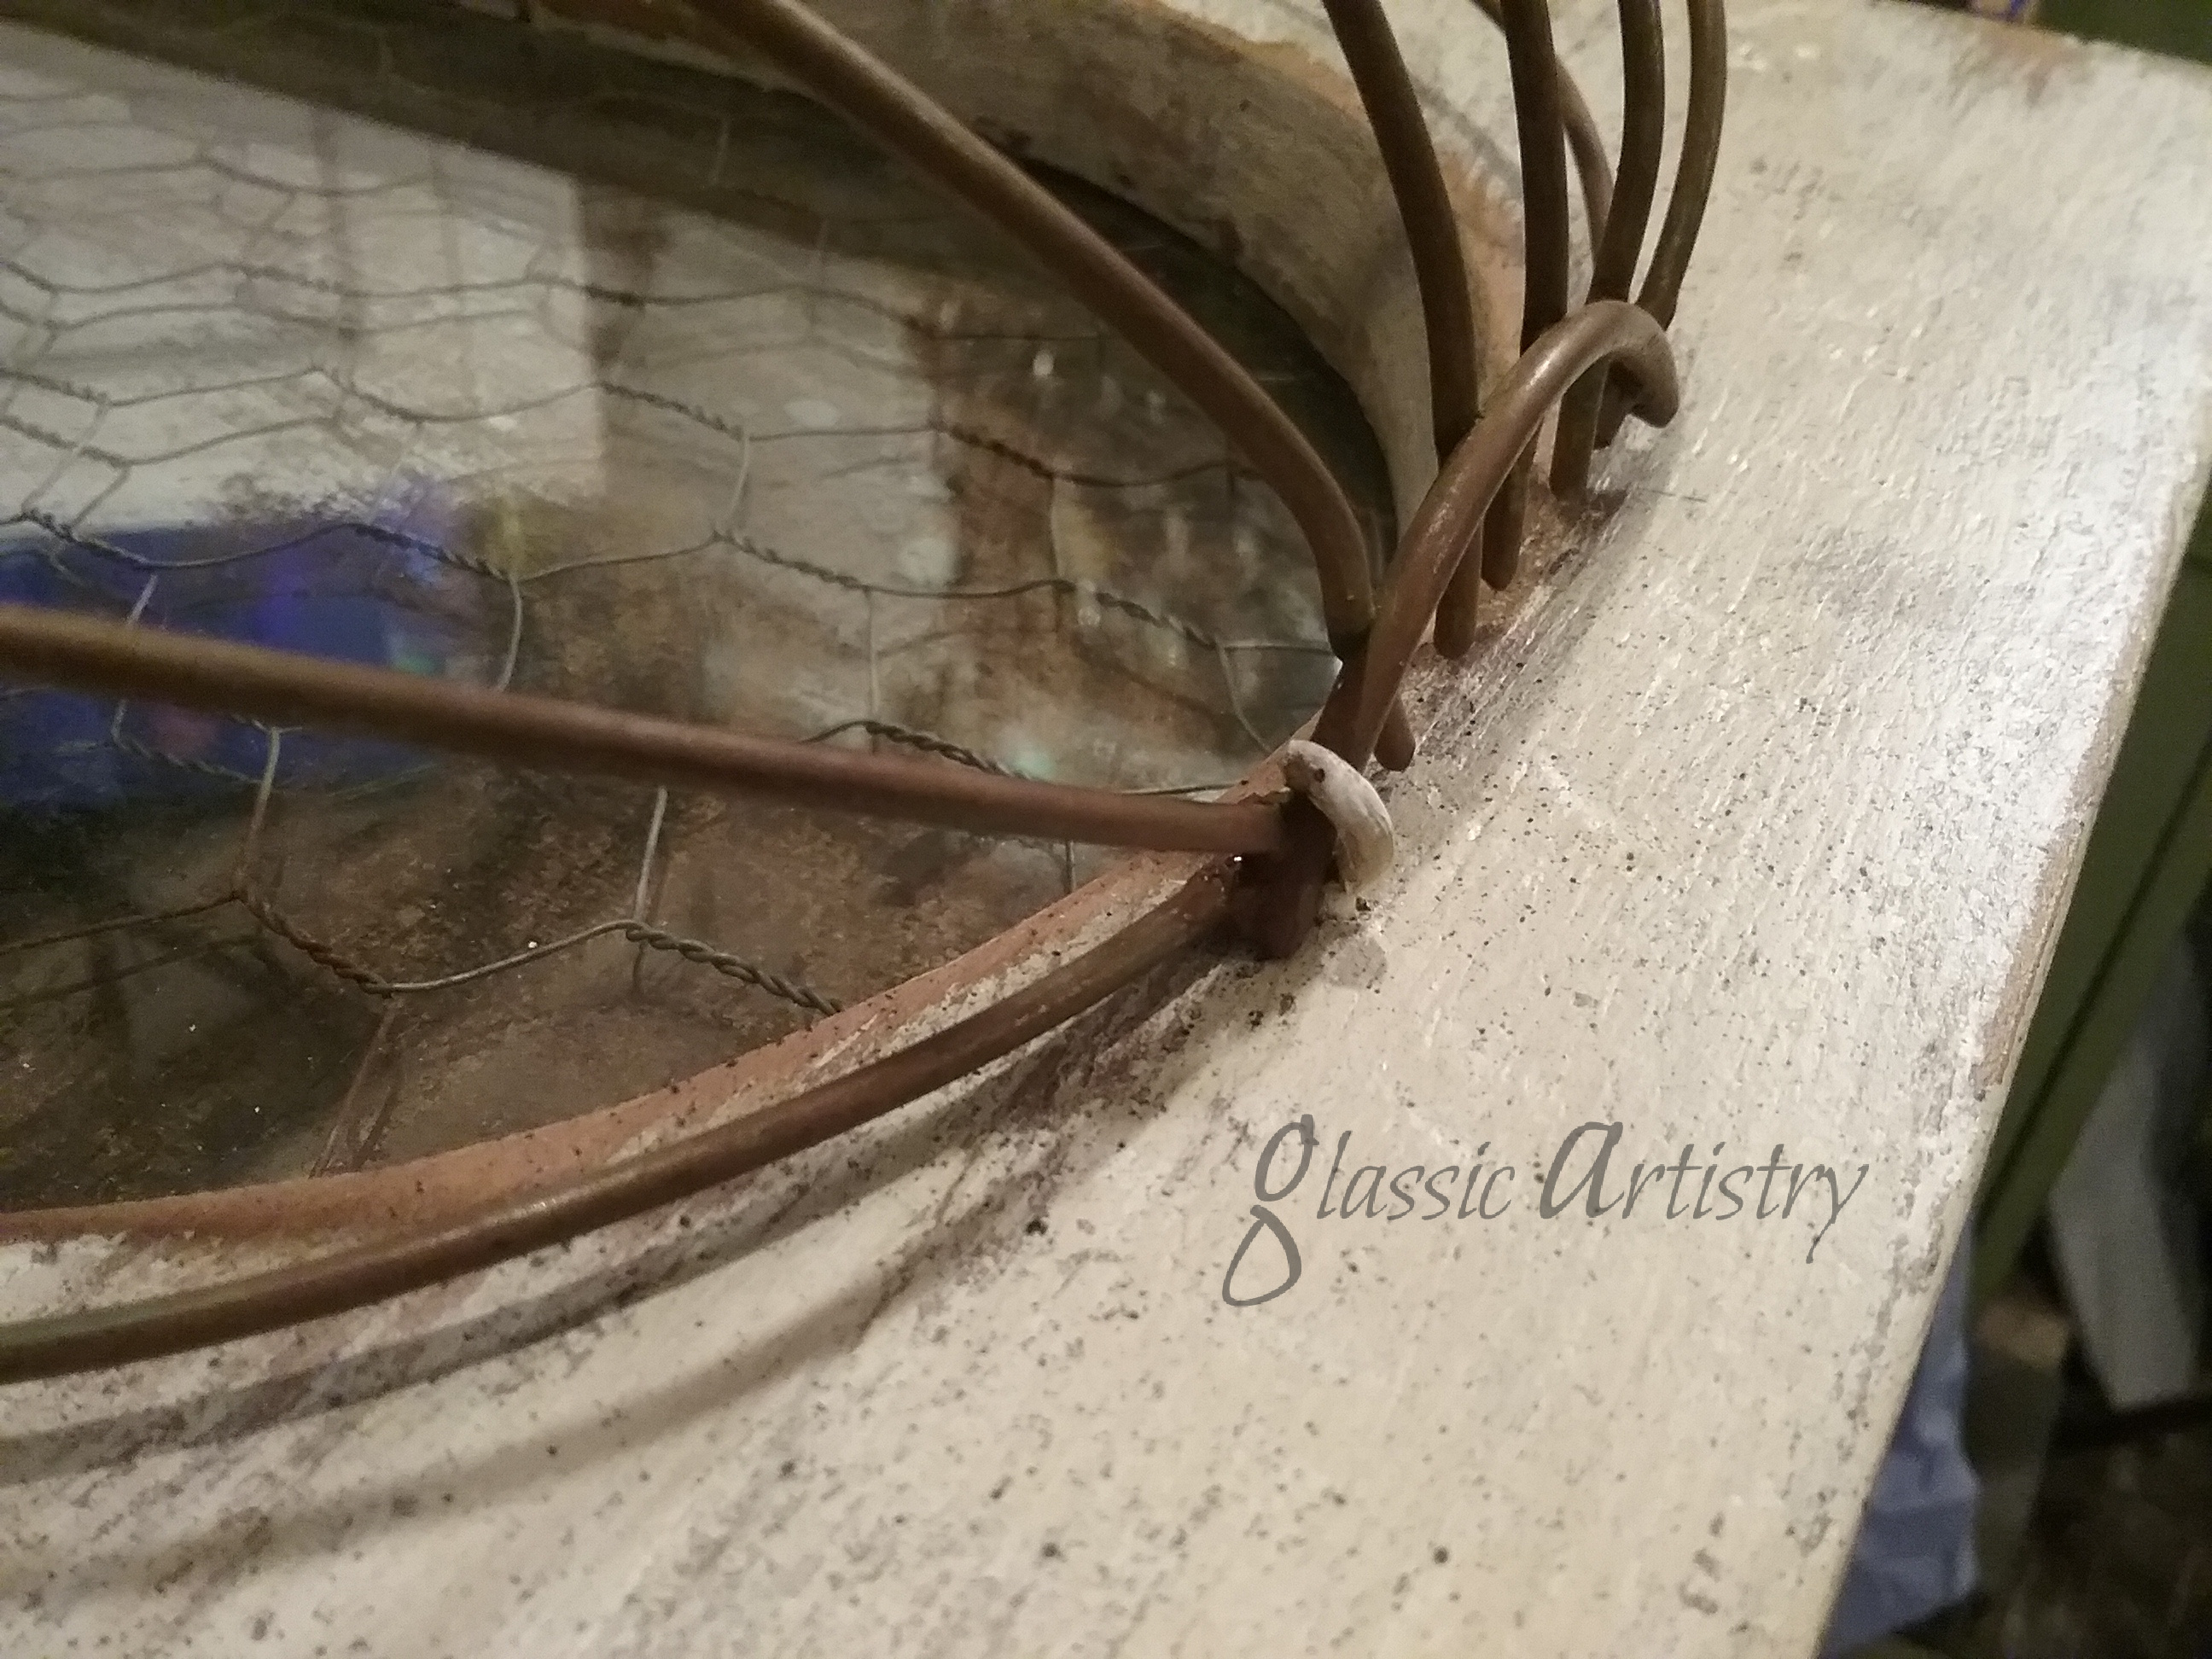
I started with a chunky, long, oval wooden frame purchased at a vintage fair a few years back. It needed a little work to get squared up and made sturdy before a cardboard template could be drawn for the opening.

Tracing the template, I cut and shaped a piece of mirror, a piece of clear glass, and a piece of old chicken wire. The mirror was cut from an unwanted, inexpensive, thin, full length mirror I had in the garage, and luckily I found a large enough piece of clear glass in an old window pane. Another option for this planter would be to use chicken wire alone.

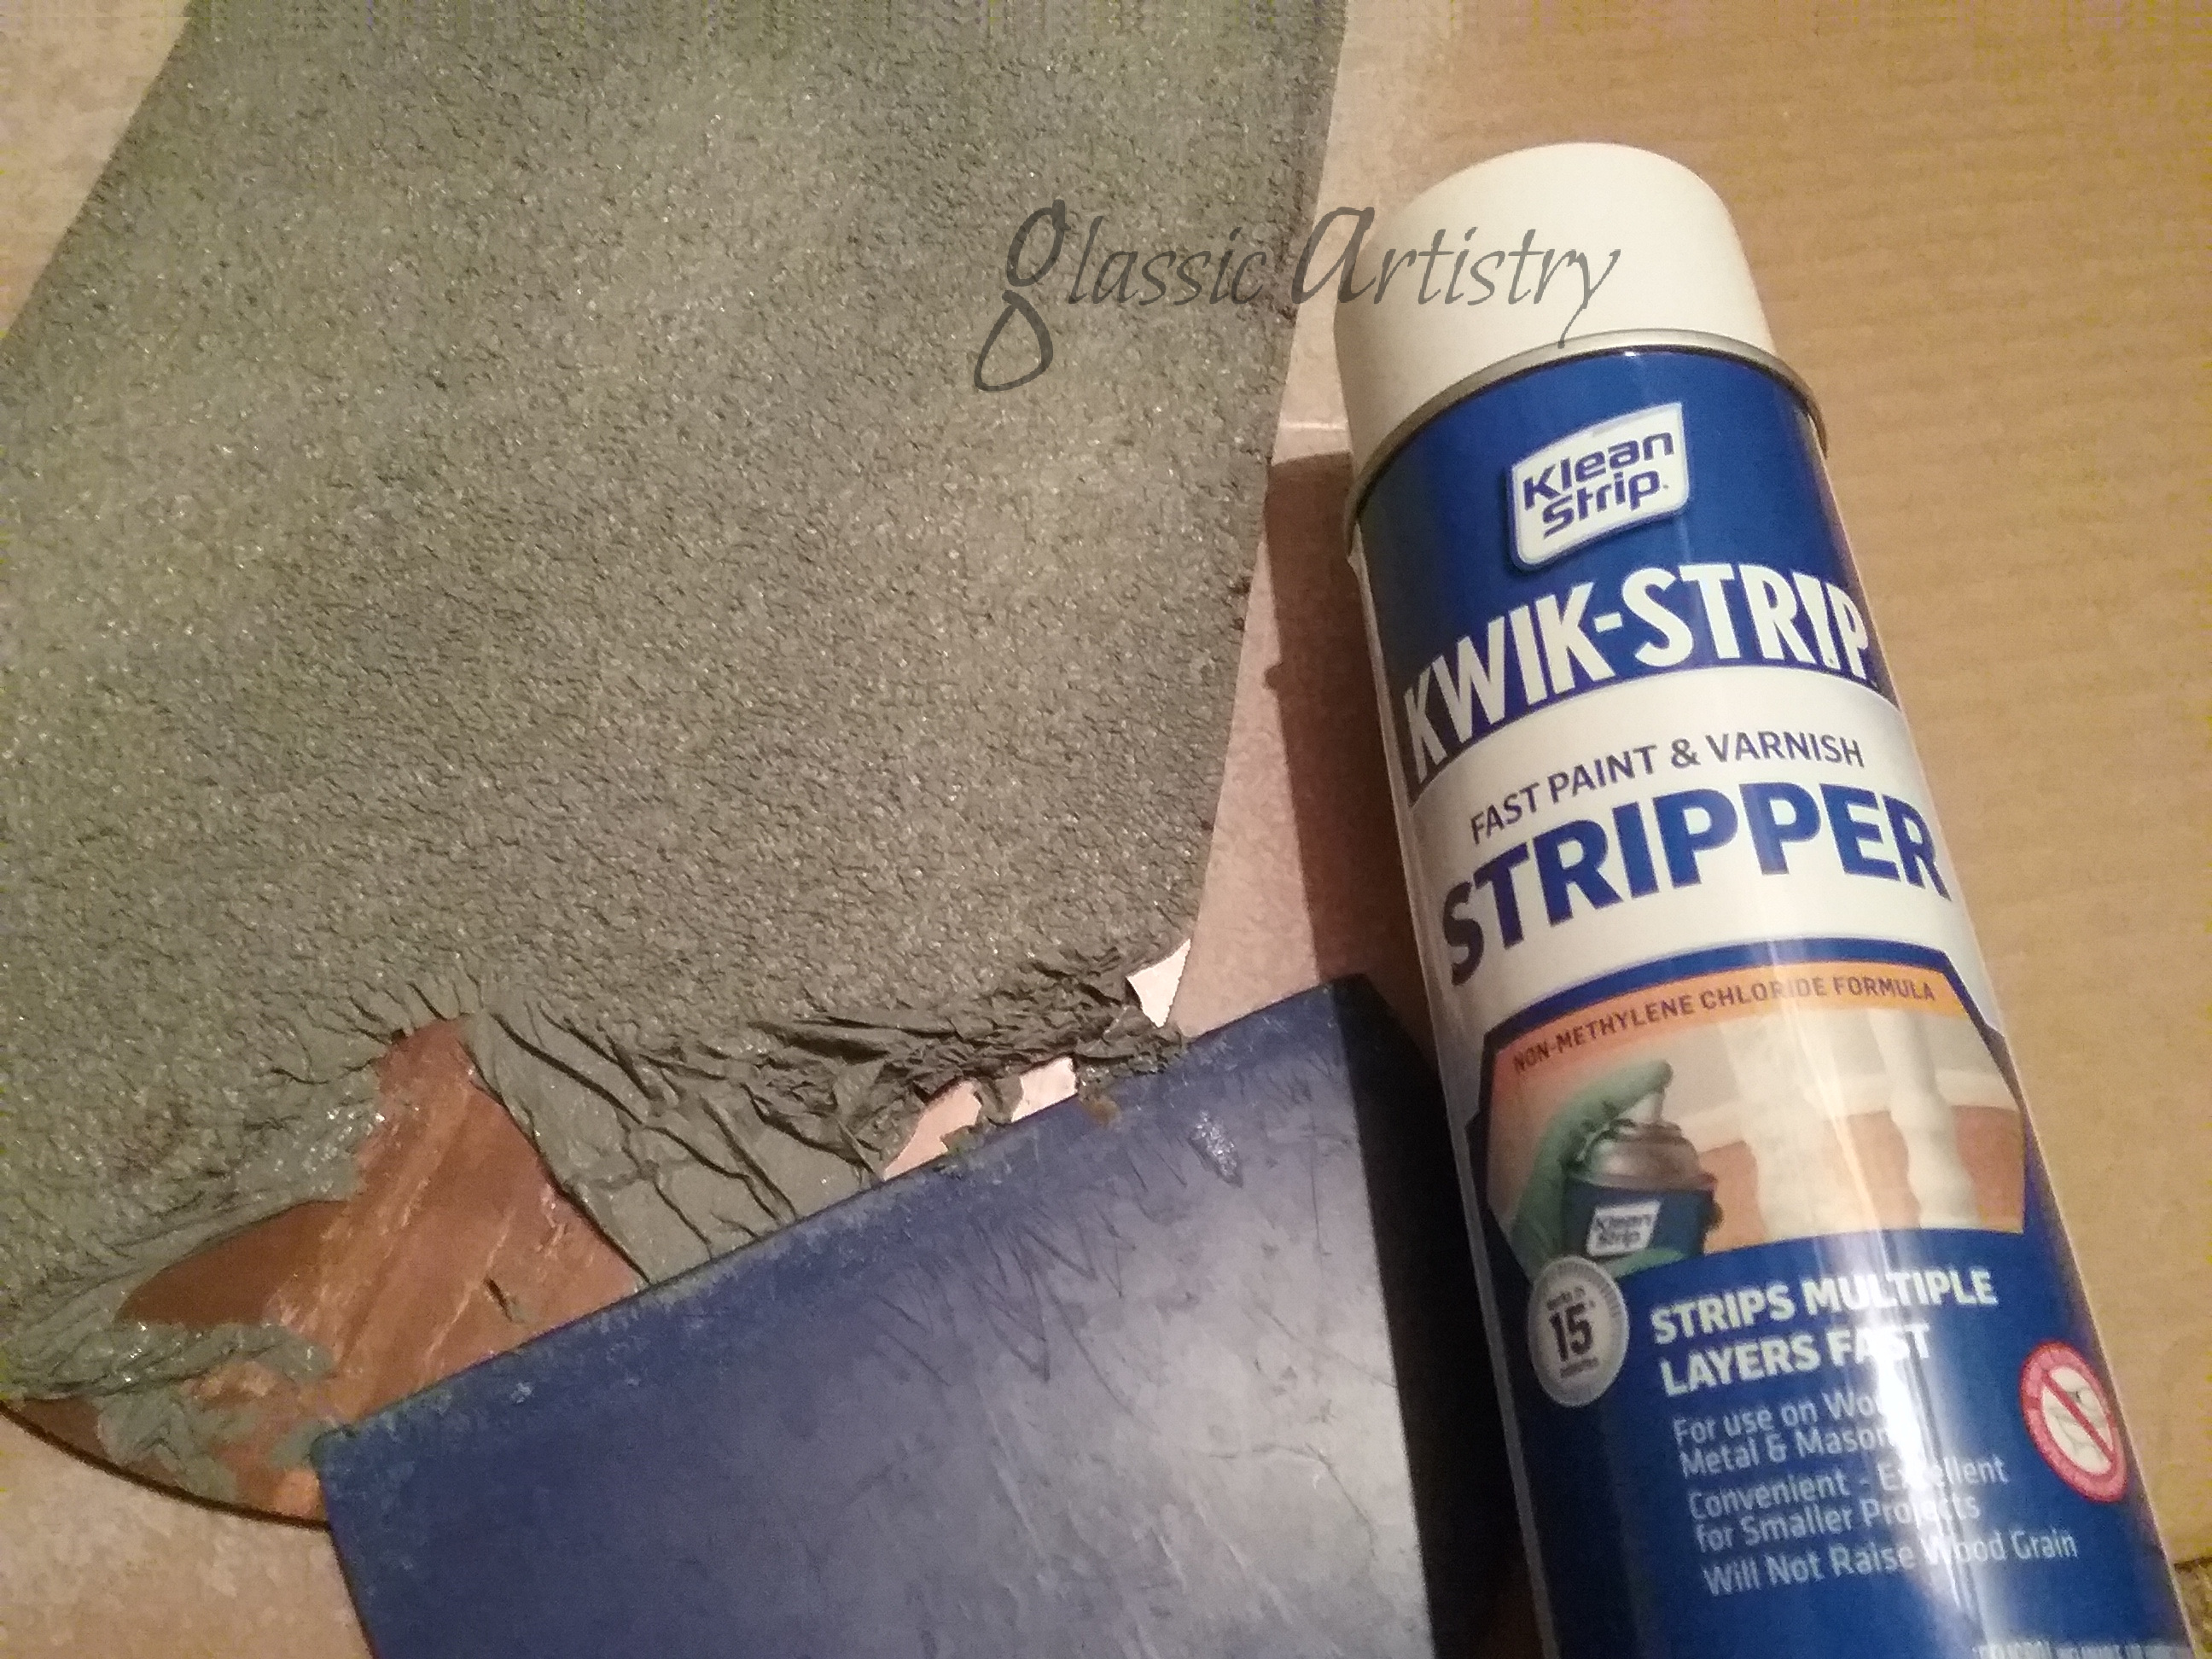
I removed the back of the mirror with a spray stripper, and used a wide plastic putty knife to gently remove it. Spray stripper is pretty awesome; much better than using a brush for this step. Once it was stripped and washed clean, I used bleach to sponge the back lightly in a few places and speckle with a toothbrush splatter. Always protect your eyes and wear gloves when doing something like this. I let the bleach sit for about an hour. After washing off the bleach, you can add black speckling, metallic powders or paint, or vintage papers to show through the mirror, but I left mine plain.

After a few layers of stain, paint, and sanding, the frame was sealed with a coat of clear, satin, water based sealer. After the sealer dried, the cut pieces were inserted in the frame opening, sandwiching the chicken wire between the clear glass and the mirror. Secured with glazier points.
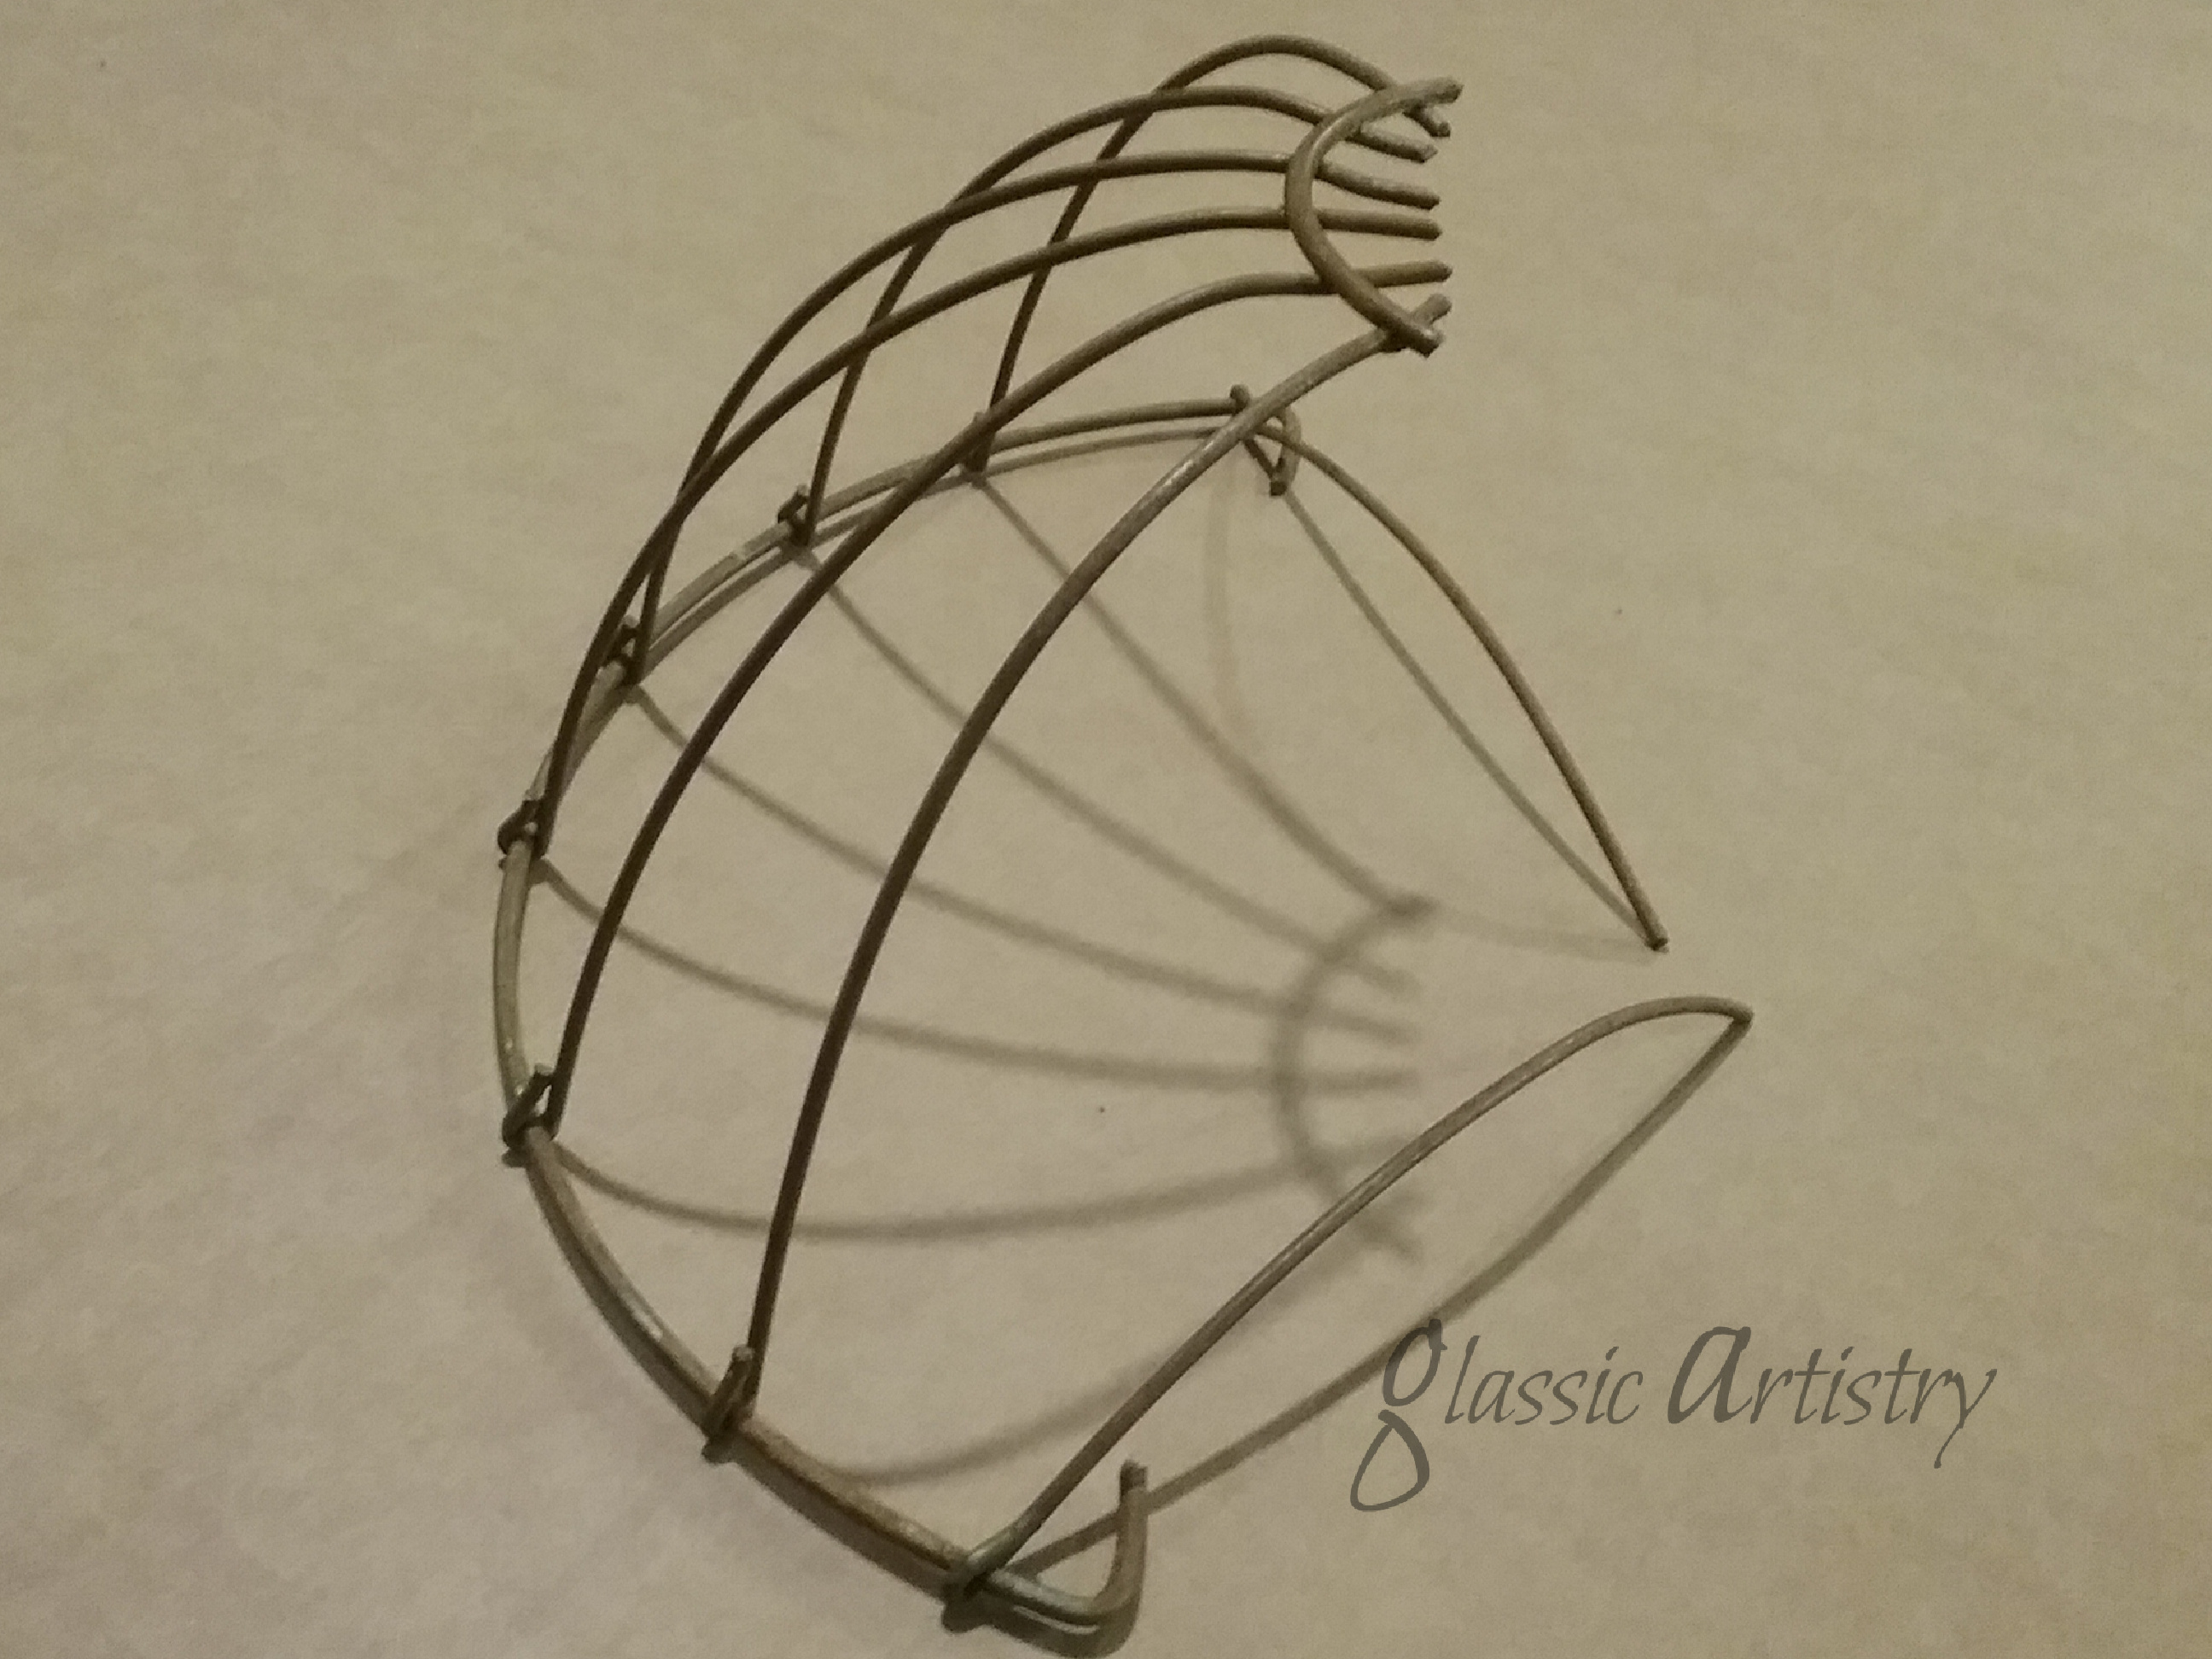
I cut a 10” hanging wire basket in half and laid it on the front of the frame to see what it would look like and figure out where I would need to trim it to fit well. I left extra length on each end of the top rim wire so L shaped corners could be bent. (I had to find a pair of stronger hands to help with bending.) I ended up with two loose side wires and glued them in place to get the shape I wanted. When dry, the glued areas were touched up with a little brown paint.


I found some very simple hardware to hang the basket onto the frame. One is just a cut eye hook, but I’m not sure what the other pieces are. I found them among some of my stained glass hangers so they may have come from a glass supply source; I don’t know. If anyone has a clue what they are, please chime in and let readers know. I wouldn’t mind having a few more myself. 🙂

I attached the two brass hangers to the frame first, then hung the basket to mark where the small hook would go under the basket and before drilling a hole. I removed the basket, screwed in the hook, then painted the hardware to match the frame. When the paint was dry, I replaced the basket and hung the frame on the wall to fill.
A fiber planter liner was cut and fitted inside the basket, along with an old deflated ball for a pliable, leak-proof planter. The ball was turned wrong side out before placing it inside the liner and adding succulents.

I’m pretty happy with my new planter. It has kind of an Old World charm and looks right at home hanging above our tiled tub surround. It hangs almost directly across from a large East window, so I’m hoping with the benefit of the mirror it will get plenty of light.
I hope you found something interesting or picked up a few useful tips from my project. Thank You for visiting my blog. Please, let me know what you think. I love hearing from readers, fellow up-cyclers and re-purposers.
On to the next project —

I thought I would write a quick post to say Hi and give a big, warm welcome to new followers. I hope the new year is off to a fantastic start for everyone.
I’ve had the luxury of being a little lax the last two months.. The added task of homeschooling our two grands last semester prompted me to put my Etsy shop in vacation mode, and step away from my glass work so I could get ready for Christmas. I’m back to Etsy now, but with another semester started, new designs will be minimal for a while.
With the holidays behind us, I’m more than ready to start working on a new upcycled or repurposed project. I’ve pulled some interesting pieces in from the garage, but haven’t had the chance to get going on anything yet. But, very soon!
We framed a large piece of beautiful glass for my wall last week. It’s been one of those things on the “to do “ list forever, so it really feels good to finally see it done. It’s nothing extraordinary, but I like it. It has a little story behind it that offers me at least something to share with you.
My sister spied a large gorgeous piece of glass at an auction we attended a couple years ago and pointed it out to me. As soon as I saw it, I knew who would be taking it home with them. I sat near it so I wouldn’t miss it when it came up; I was going to be a serious bidder. I can’t remember what amount the auctioneer started at, but I waited as he worked his way down to $2.50, then held my number up. I was on the edge of my seat, prepared to keep bidding, and nothing happened. I got that sweet thing for $2.50! It really made my night!
When I got home, I stood it behind a tall cabinet in my work area to protect it until I could get it in a frame. And, LOL, that’s where it has been all this time, until last week. Funny how some of the simplest projects can take the longest to accomplish.
My husband made a long frame from ripped lumber. We screwed and glued the corners because the glass is quite heavy. The frame was painted a pale gray with speckles, but it looks white in the finished picture.


I guess that’s all I have for now. I promise to try and step up my game for the next post. 🙂
Take Care All , I’ll be back …..
Well, here I am, four days out from Christmas, and writing a blog on the easy Christmas sewing project I mentioned in my last post. Guess that pretty much tells you things didn’t go as quickly as I thought they would.
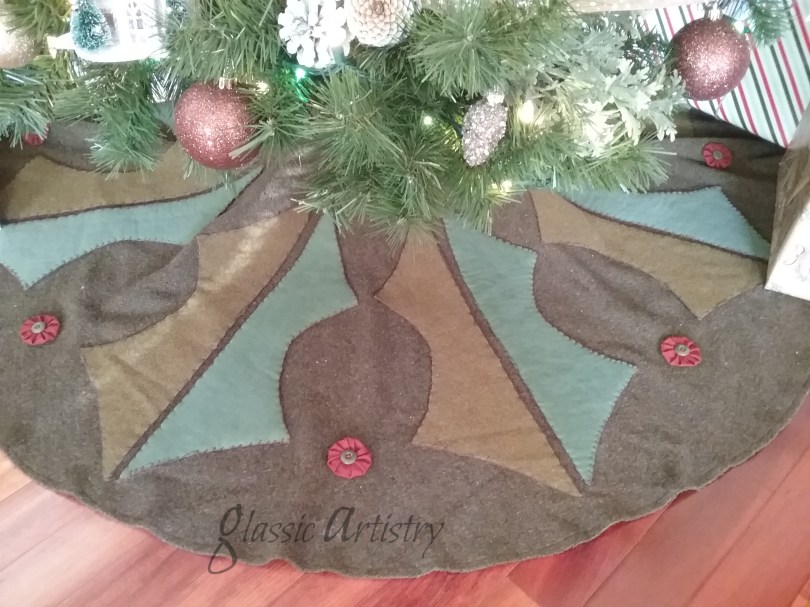
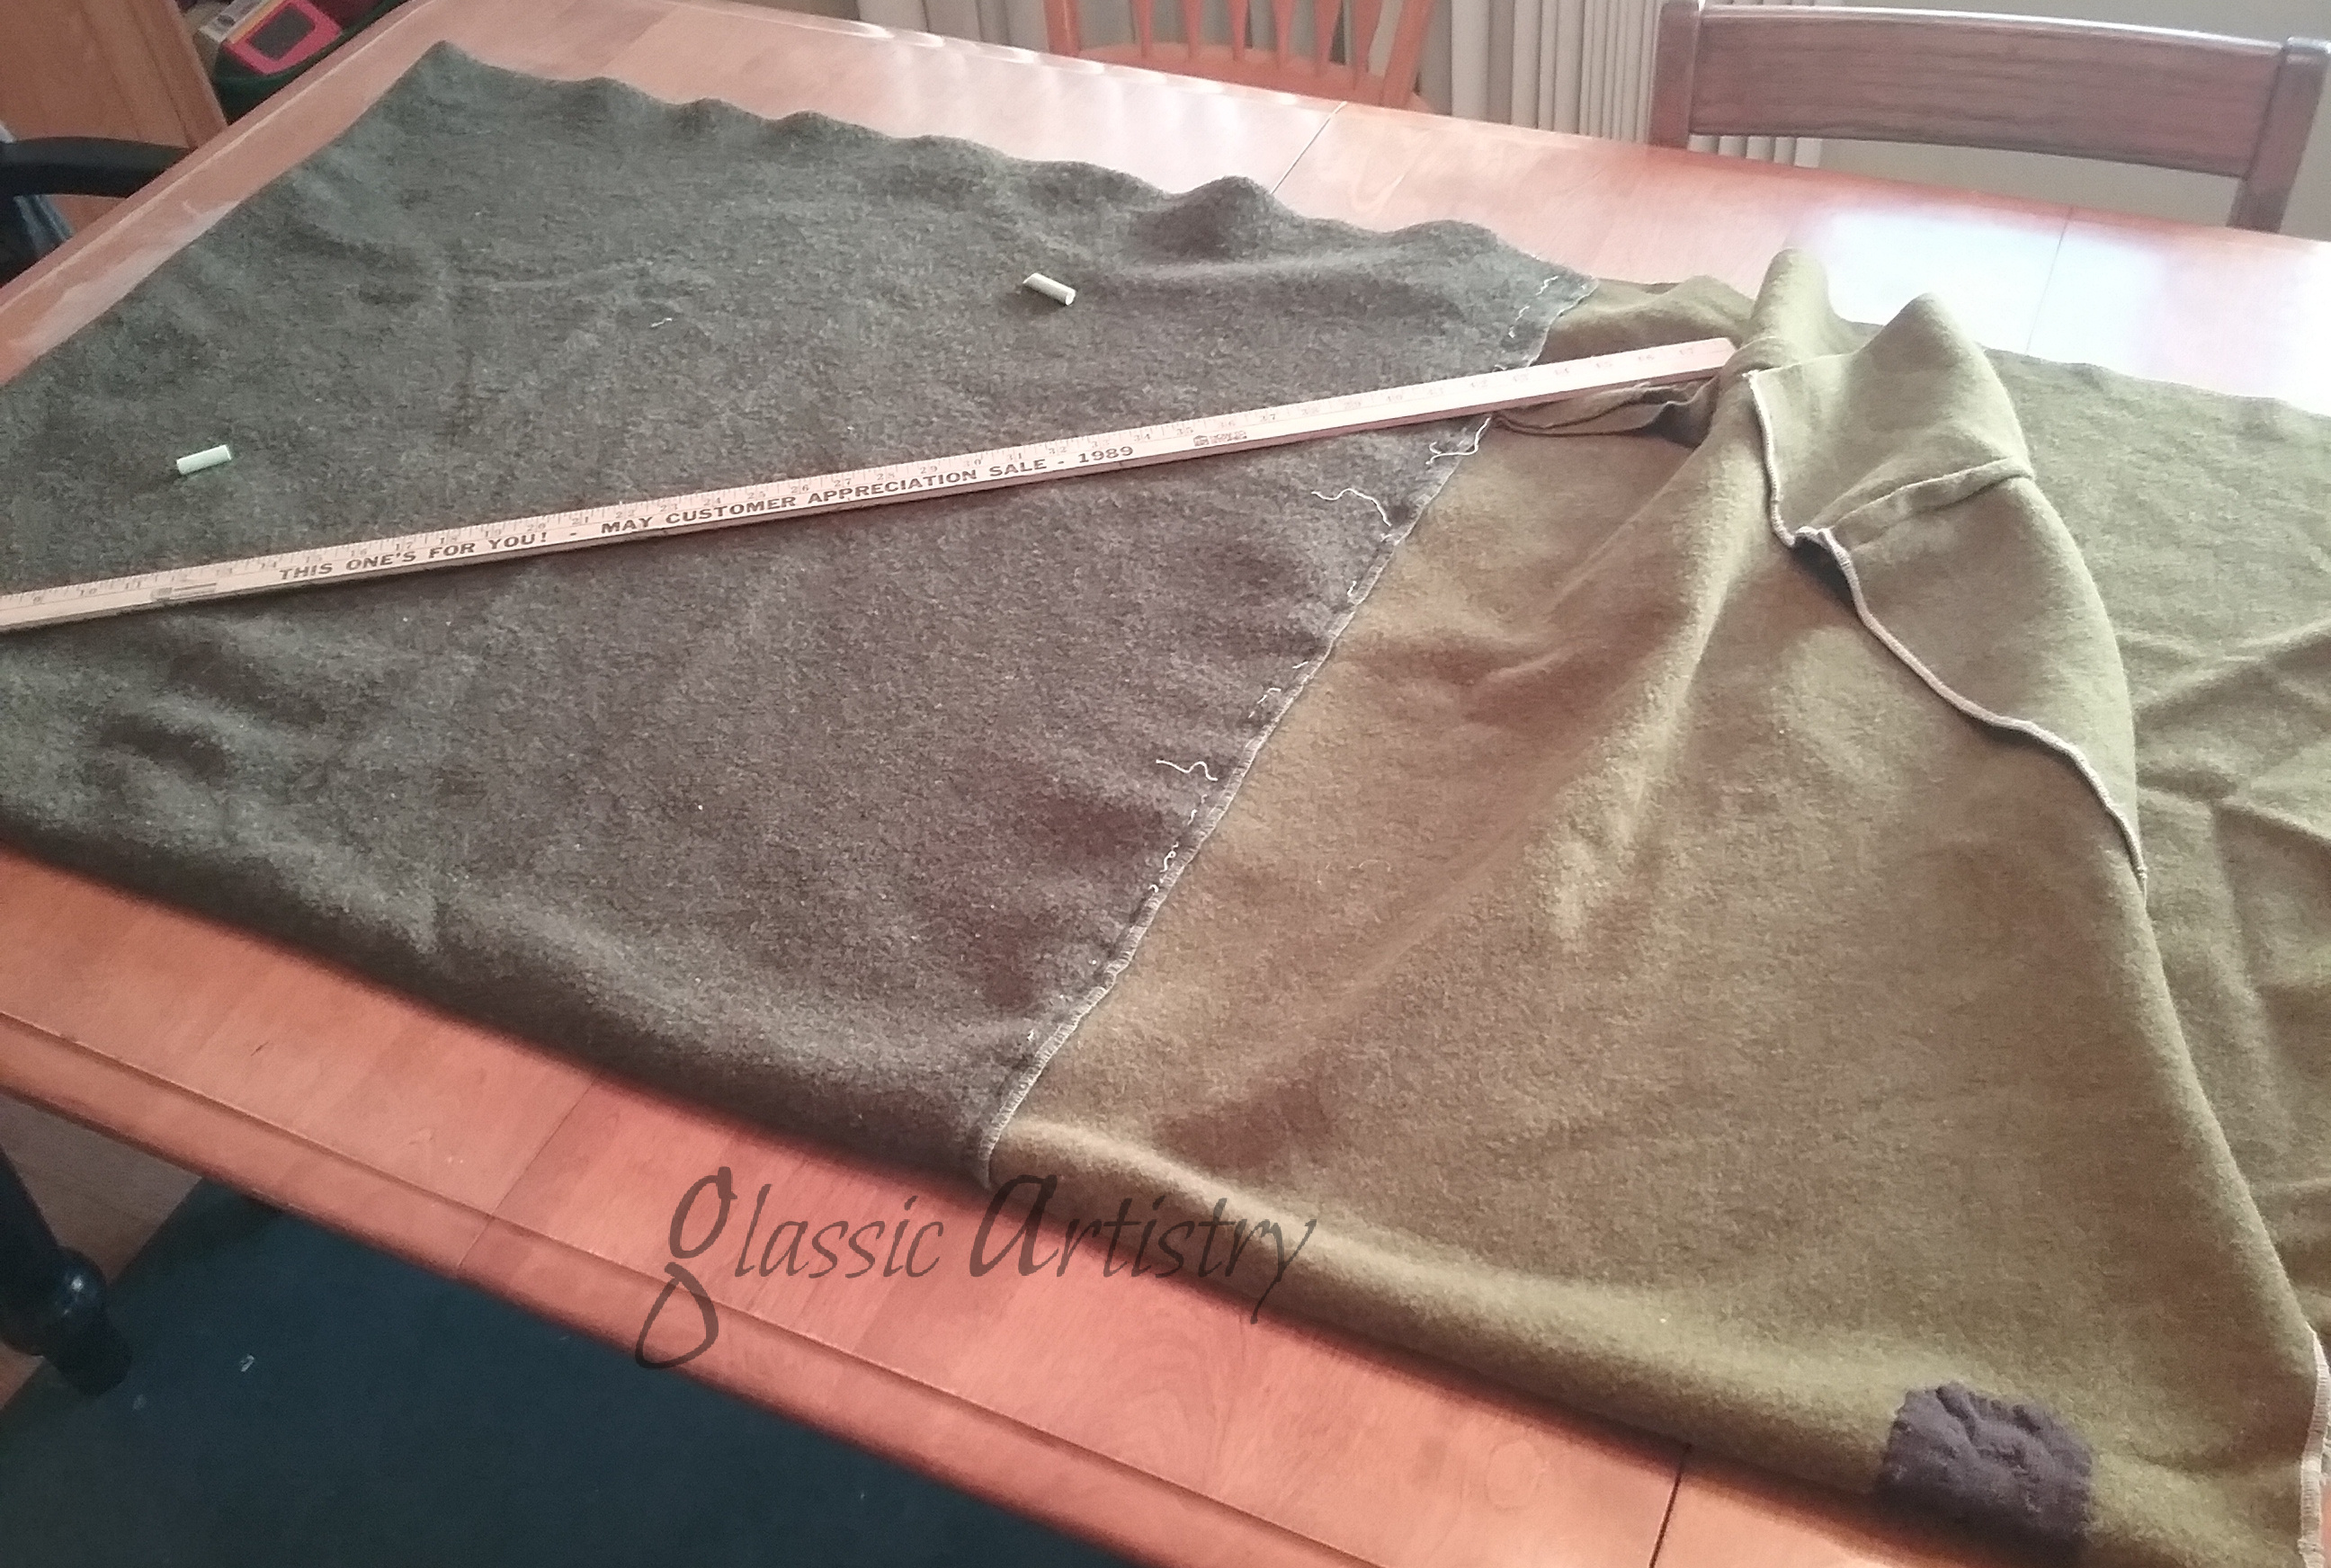
There’s been an old, soft, wool army blanket floating around here since forever. It’s actually two pieces of wool blankets sewn together. It’s been used under our tree many times and has been packed away with the Christmas stuff for the last 30+ years. One Christmas, when my kids were young, I said I was going to make a real tree skirt out of it someday, and it’s kind of been a running joke every year when we pull it out. Well, this is the year, I did it!
I love fabric and textures, but sewing has never really been my thing, I don’t know why. Not having a concrete plan for this project, I decided to approach it like I did most others, use what I have on hand, and visualize as I go.
I was able to fold and cut a 60” circle out of the darkest end of the blanket. There’s all kinds of easy instructions for folding fabric to cut large circles on the internet.
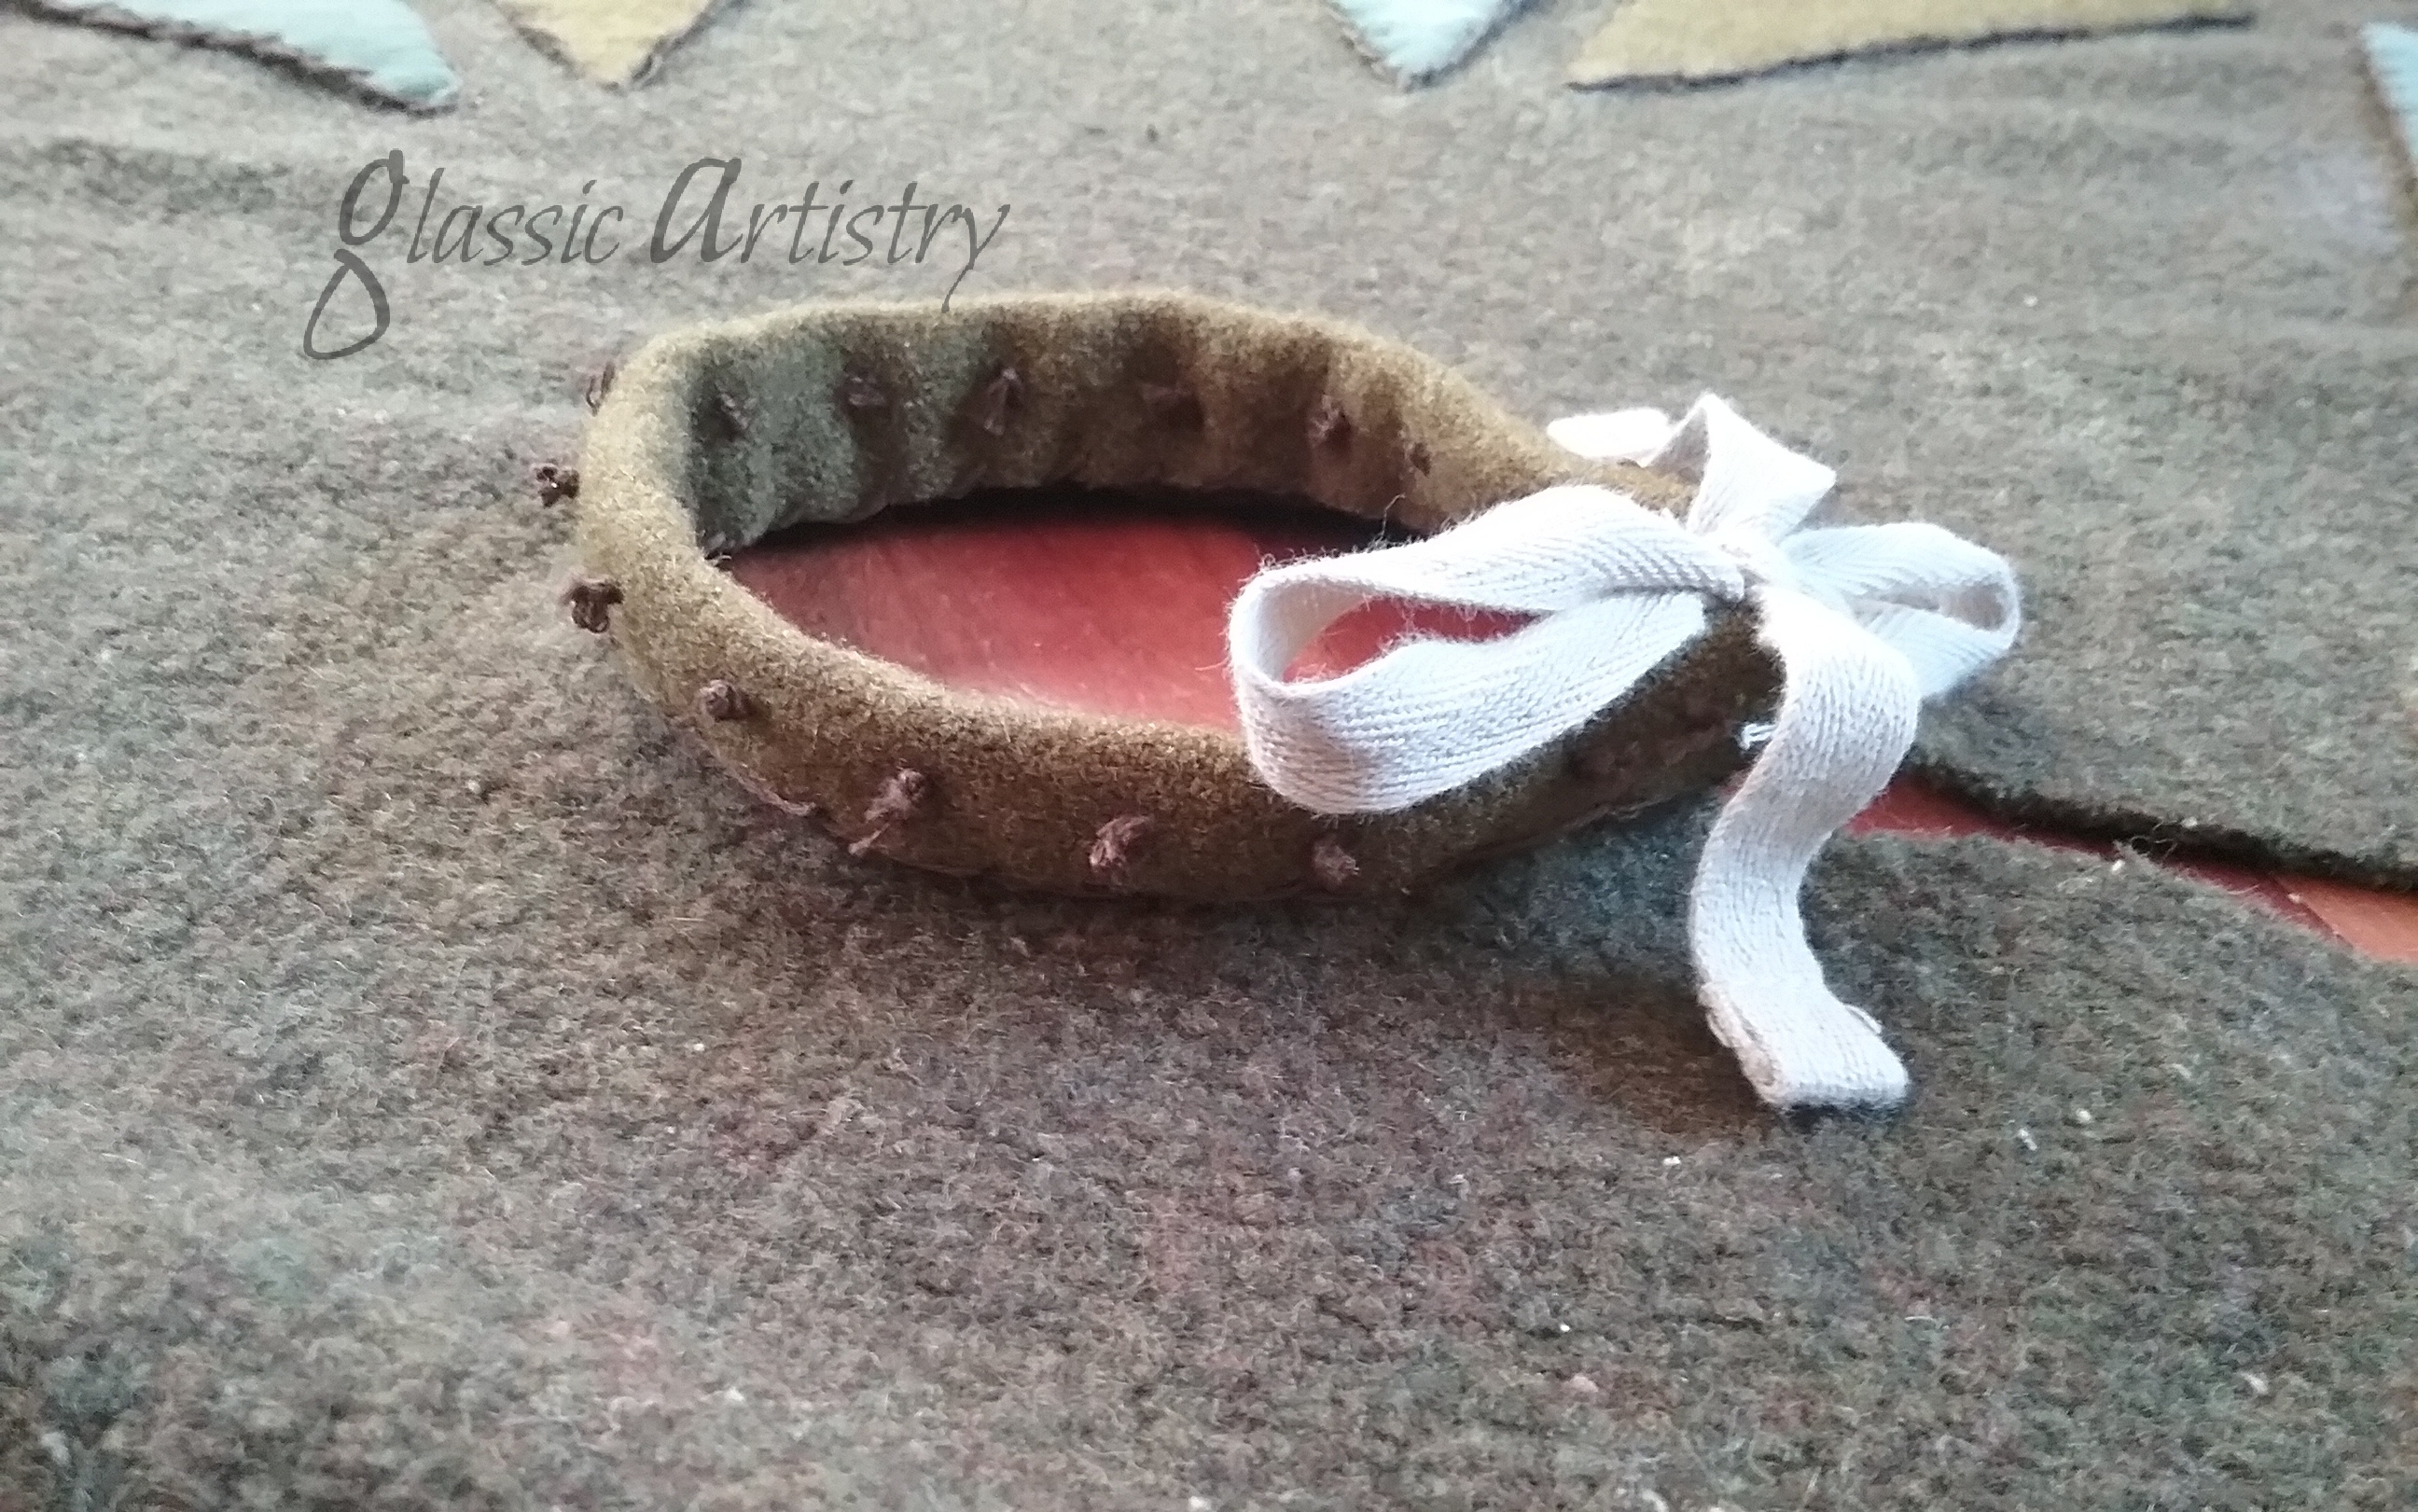
I traced the corner of a cup to cut a small hole in the center of the circle.

My first idea was to cut small holly pieces from the leftover end of the blanket and stitch them along the outer edge of the circle. But then, with such a big circle, I thought a larger pattern would look much better.
I drew a large holly leaf pattern about 20”L and 12”W, then cut eight holly pieces out of newspaper to arrange on the circle and give them a look. Sorry, the picture is a little fuzzy, but I liked the design.
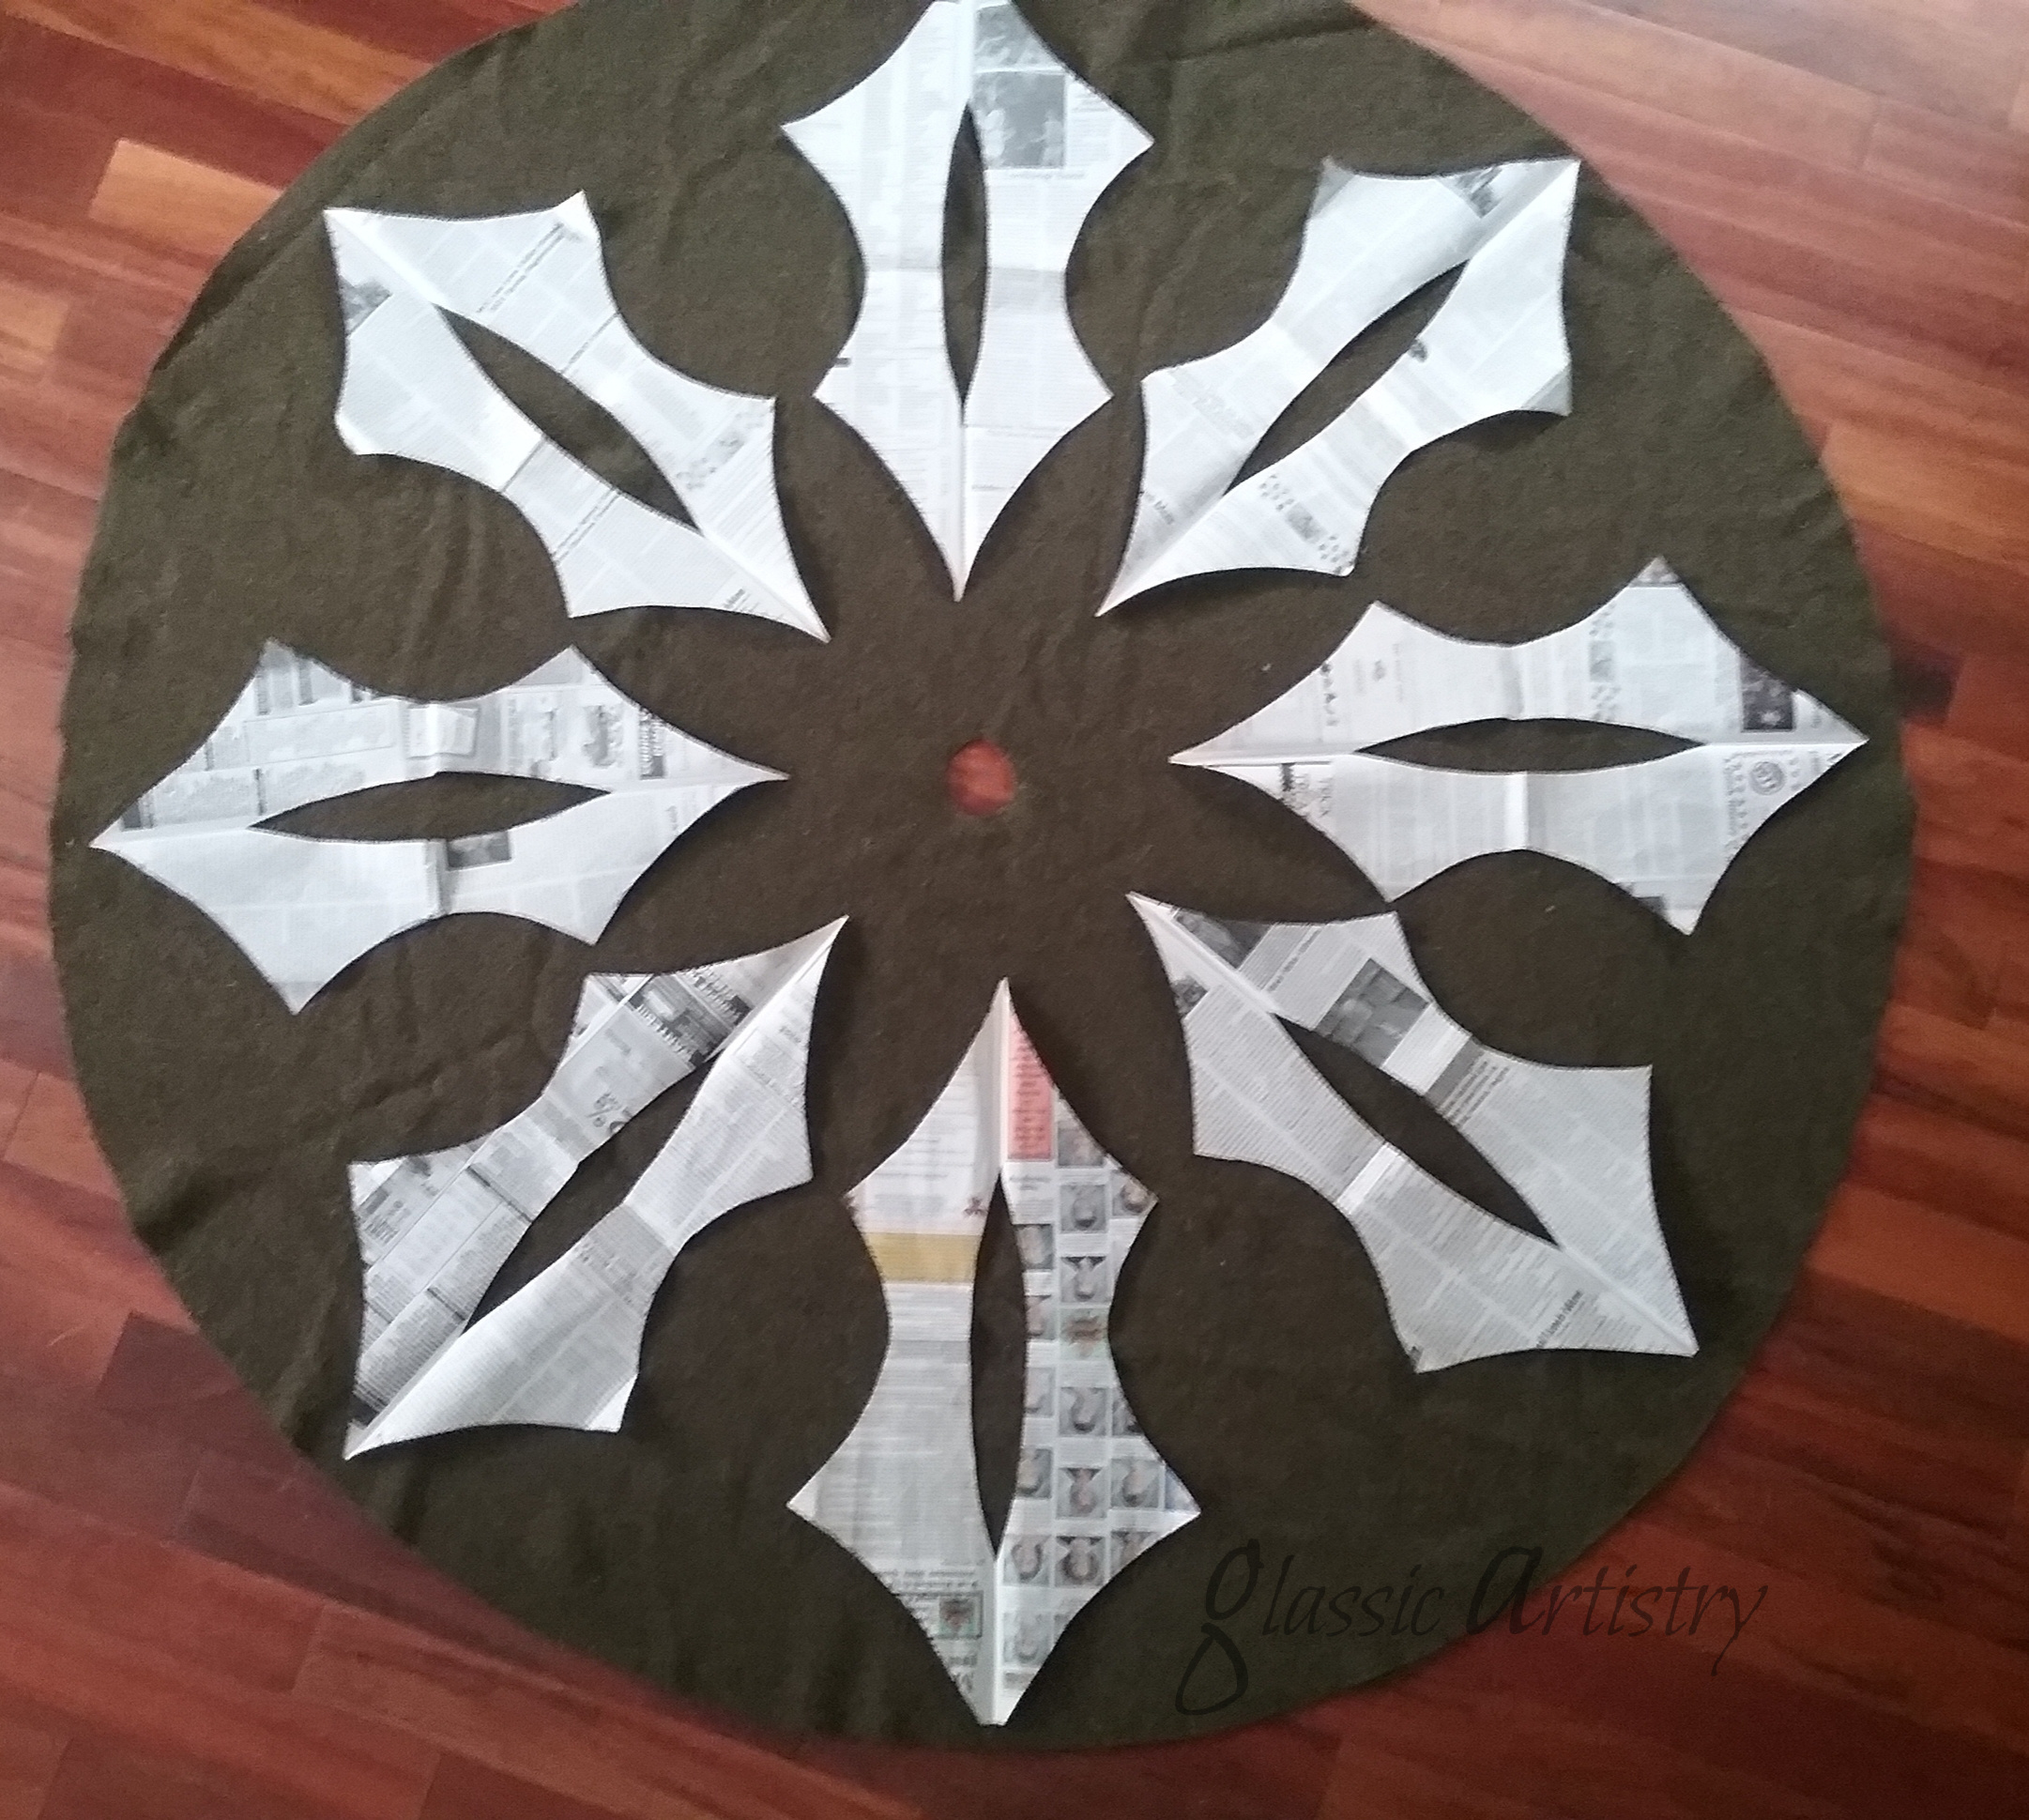
Then, there was a hitch. I laid the holly pattern every which way and there was not enough leftover blanket to get the eight pieces out of. I could have made the pattern smaller, but I liked the big holly.
Just playing around, I cut the holly pattern in half lengthwise. Using two colors on the holly could add more interest. Half of the leaf could be cut from the leftover blanket, and something else could be used for the other half.
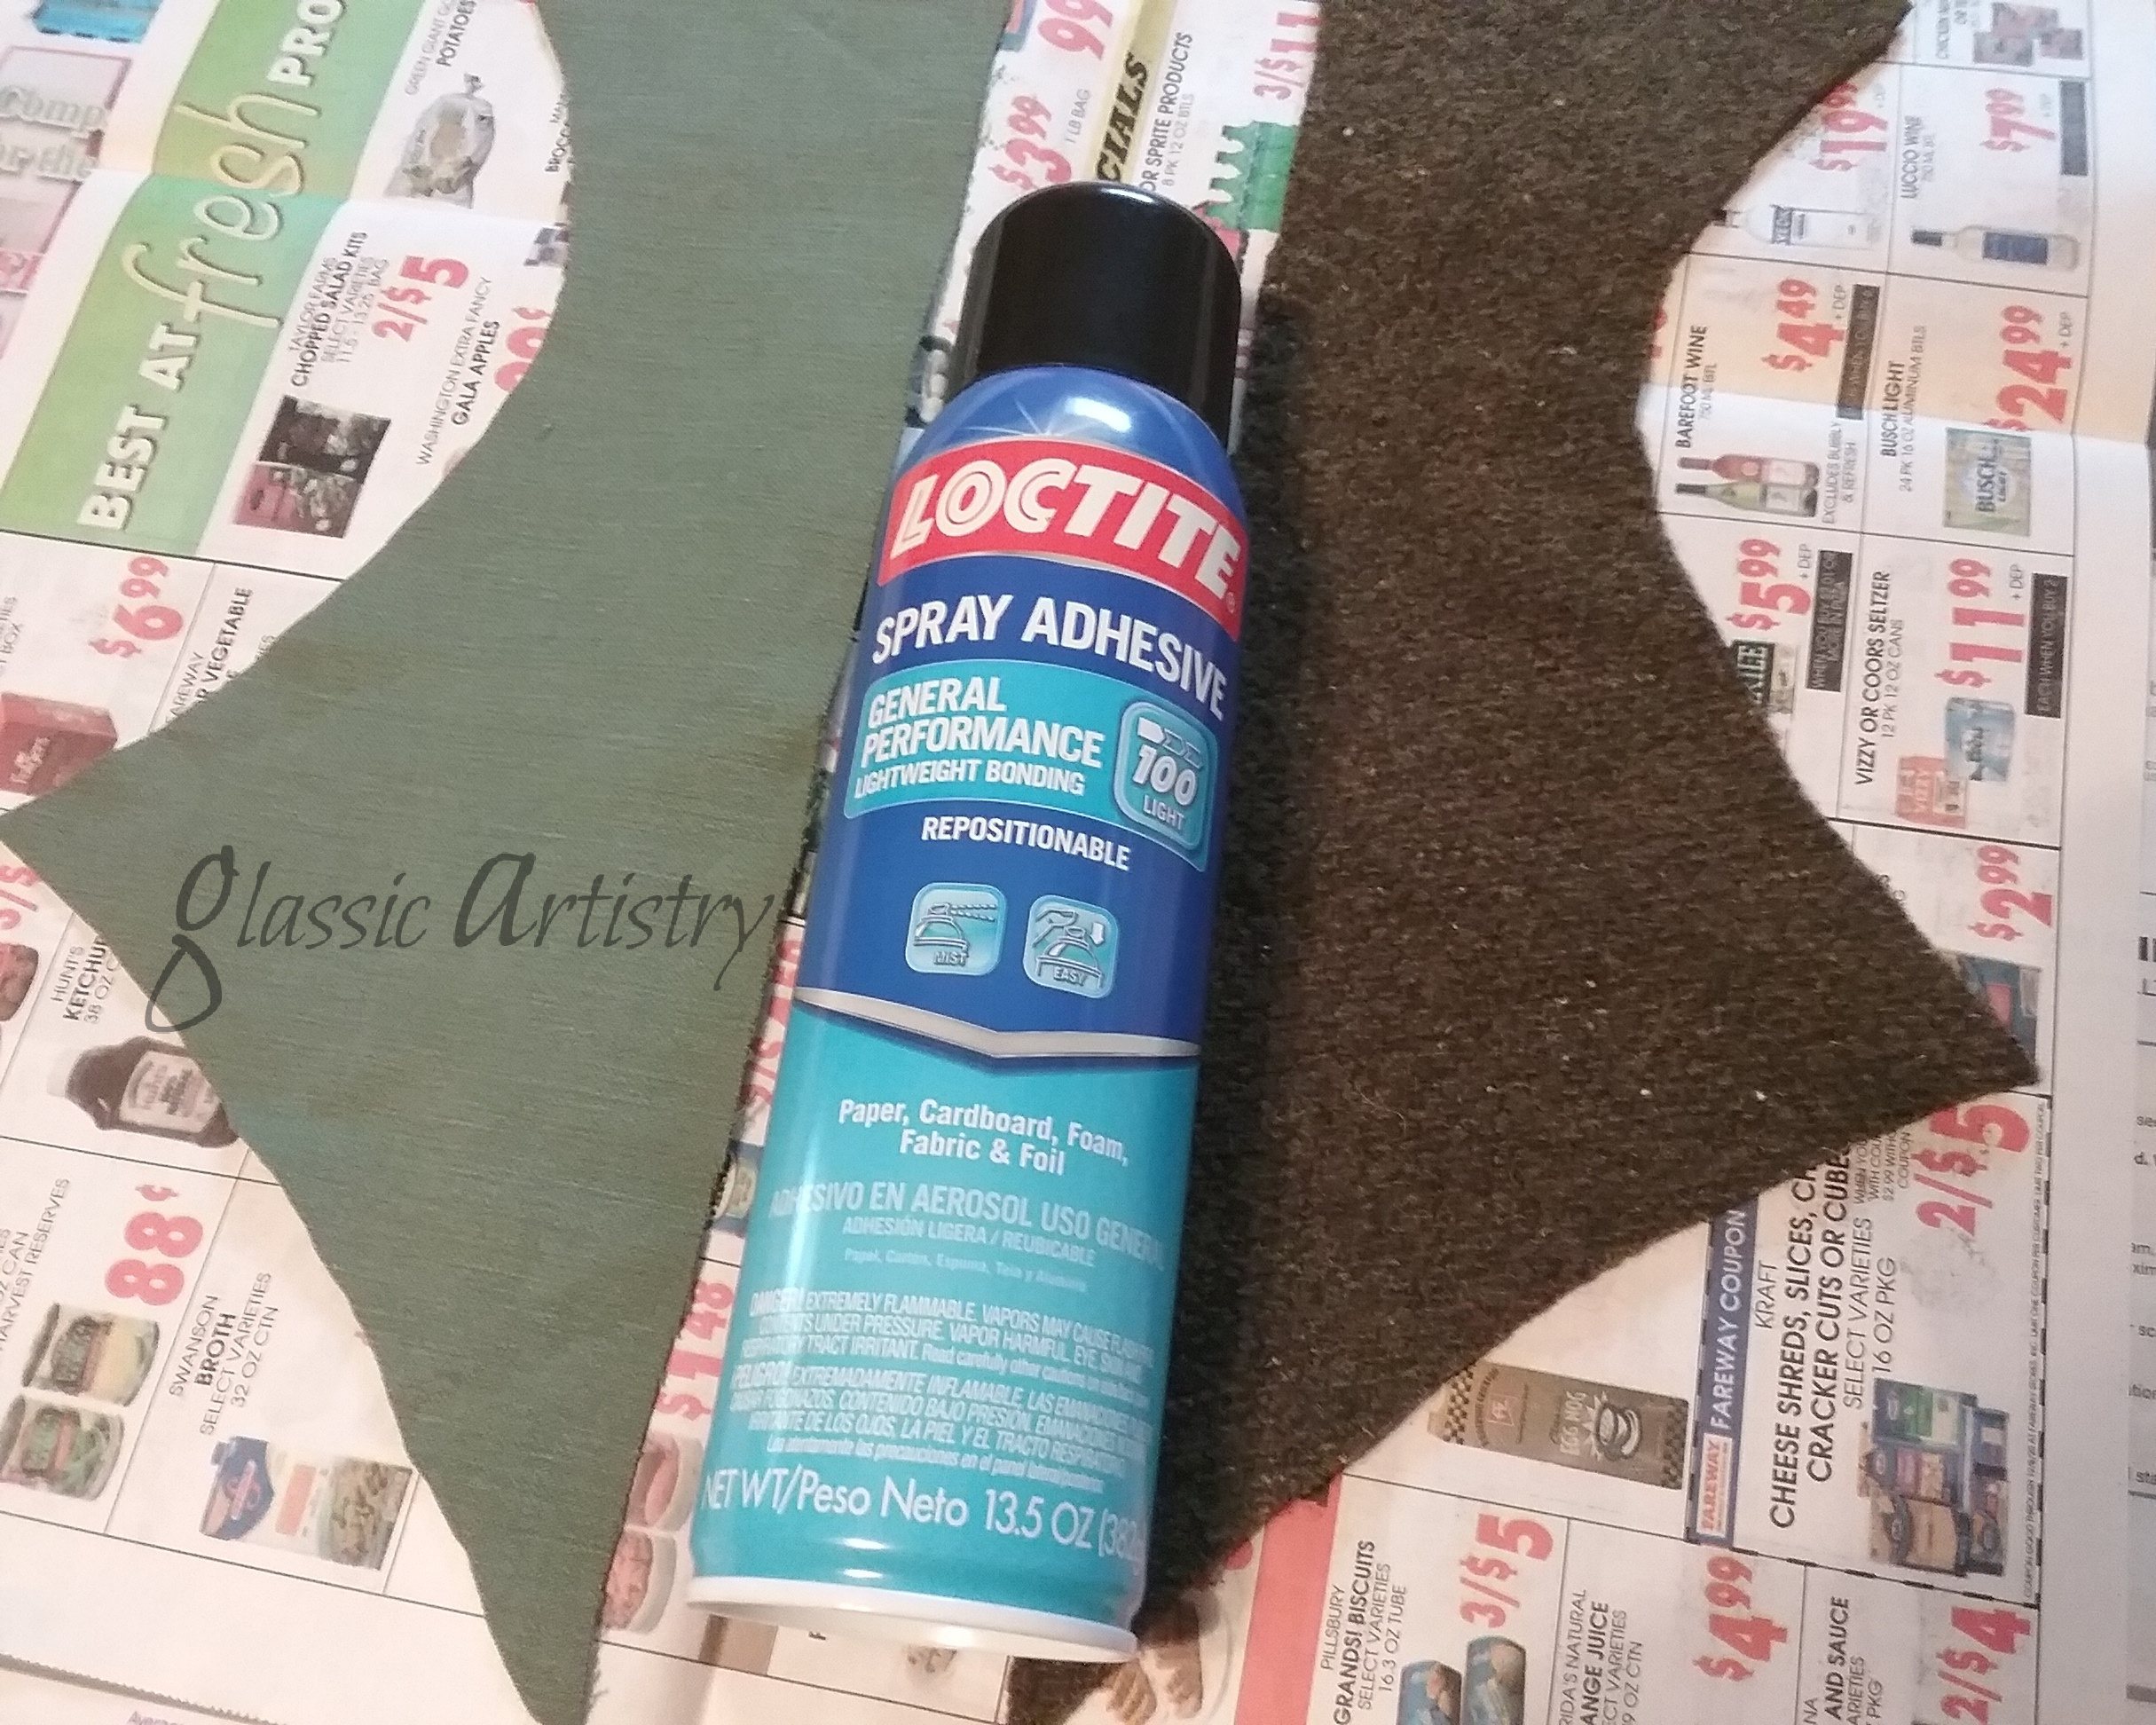
After two days of trying to find something to use, it finally dawned on me that I had the perfect thing all along, a faded pair of green army fatigues. As a saver of buttons, I always have a bag of old clothes waiting to have their buttons removed before they’re tossed, and that’s where I found them. The legs alone offered enough material and I could use the buttons too.

I didn’t have interfacing for the green cotton material. With plenty of the dark wool left, I cut eight pieces of that and adhered it to the back of the green cotton with a spray adhesive. I trimmed a few edges where they didn’t match neatly.

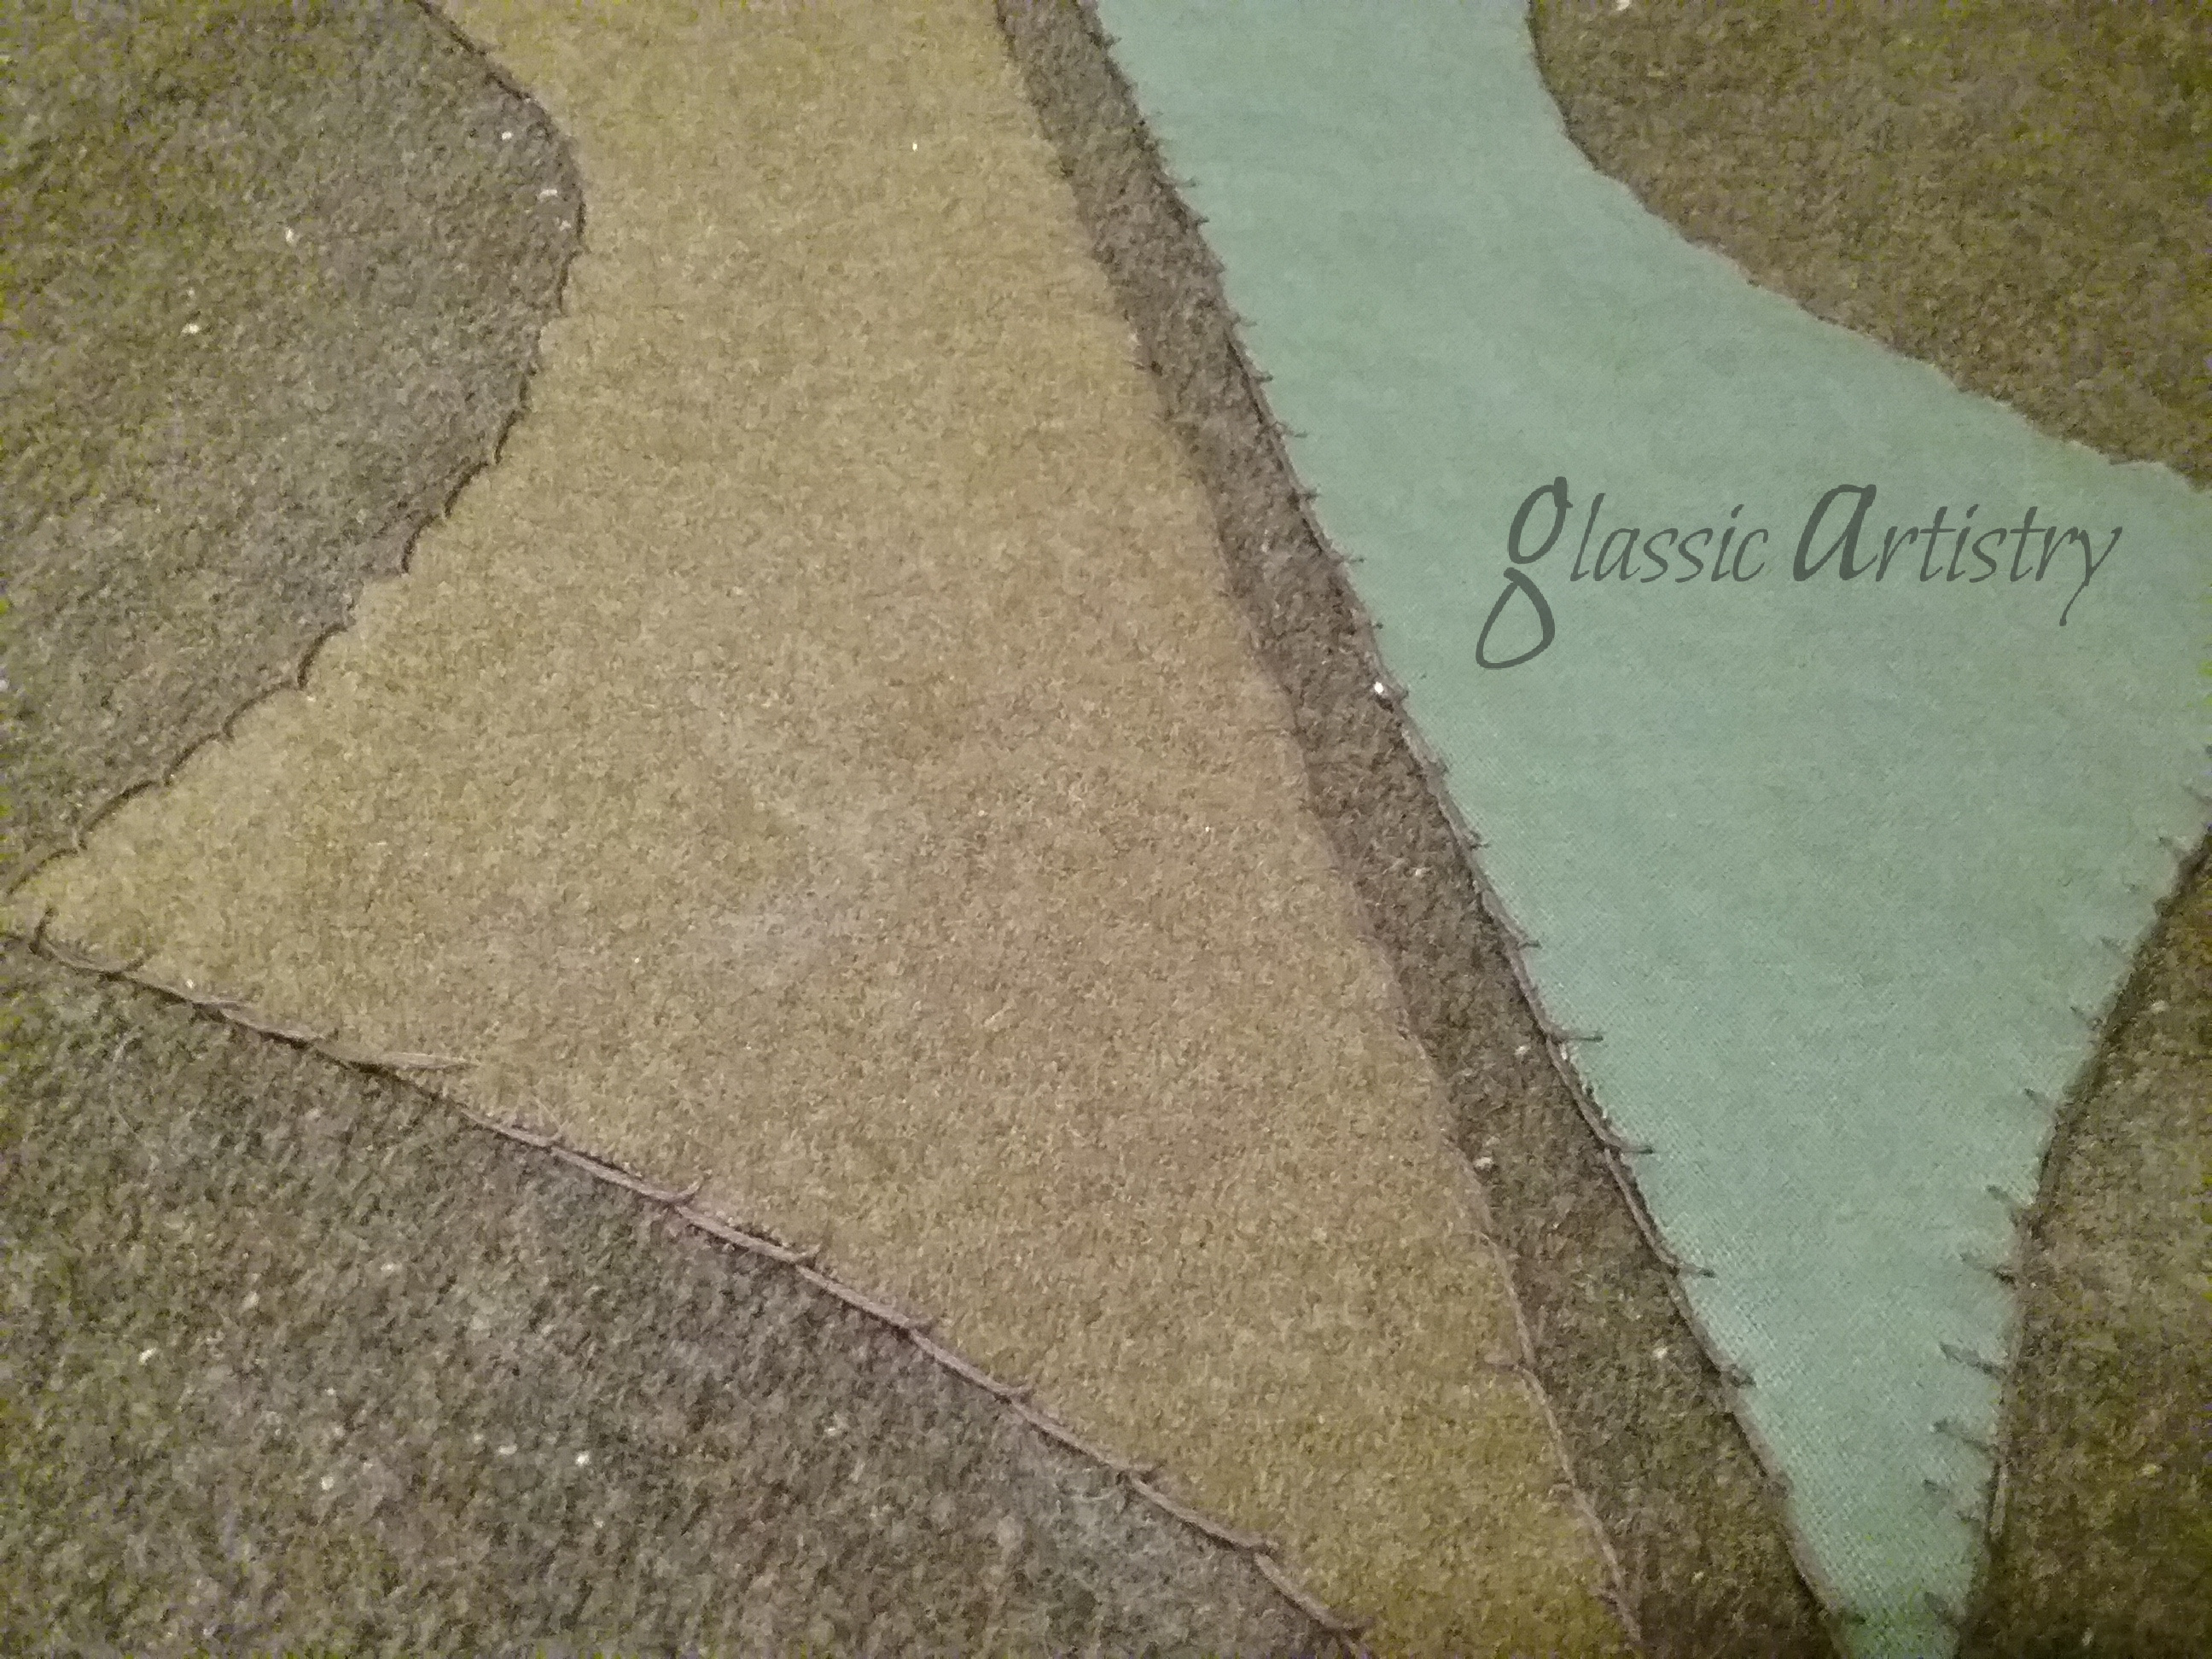
The design was laid out on the floor again and the pieces arranged where I wanted them. A slit opening was cut up through the center of one of the holly pieces. The pieces were adhered to the circle with spray adhesive. After the adhesive was dry, each piece of holly was surrounded with a six strand, dark brown blanket stitch. This step took me over a week to complete, there’s a lot of stitches. I’m sure my lack of experience in this area and only working evenings, slowed the process too.

More was needed, so I chose yo-yos. I cut eight 4” circles from the scrap green cotton material. After stitching them closed, they were painted with red fabric paint, giving them a deep rich red color. The buttons from the fatigues were sewn in the center of each yo-yo, then the yo-yos were sewn to the circle between the holly. I love the little yo-yos.

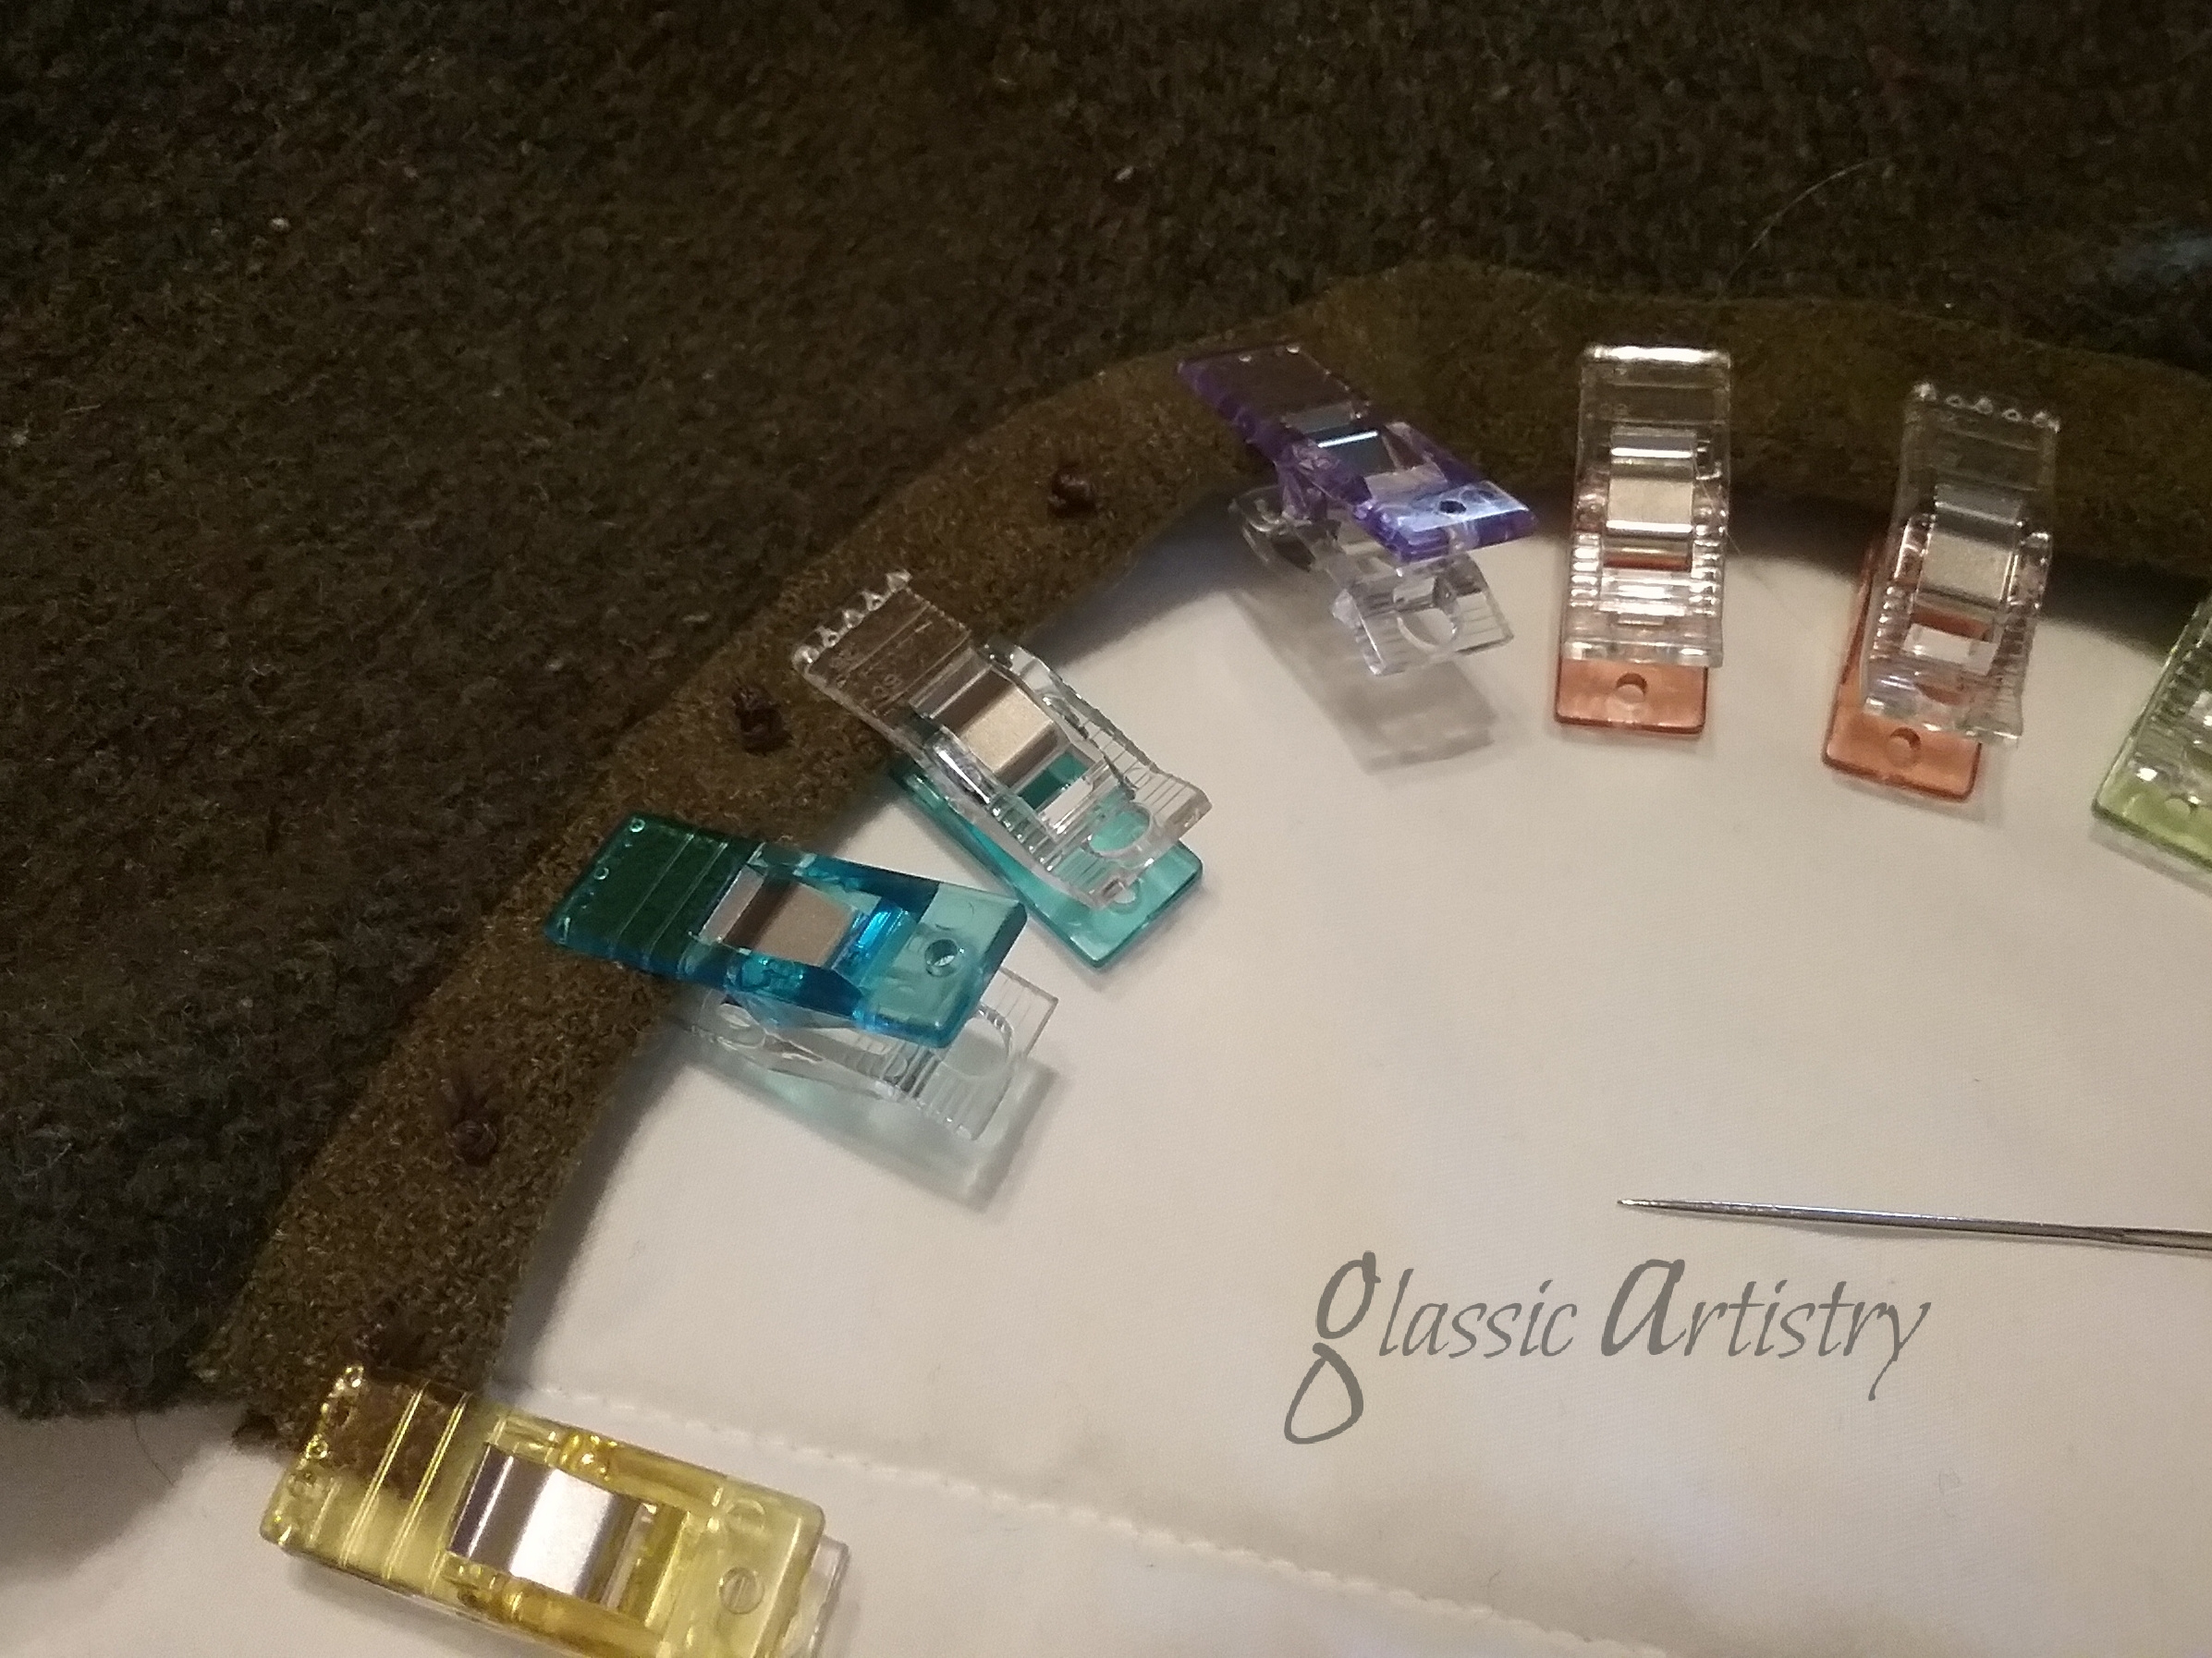
A zig-zag stitch was run around the outer edge of the skirt, and a strip of wool cut to fold over the raw edge of the small inner circle. My daughter, she’s a quilter, peeked in on me as I was pinning the wool strip into place, and offered me her binding clips to use. They’re the neatest little things. I stitched some knots to attach the strip, then ran a blanket stitch along the edge of it on both sides.
I found some tie strips in a craft drawer. I don’t know what they were off of, and they didn’t match, but that’s okay. They were stitched into place on the backside of the circle, along the edge of the slit opening.

And, finally, done. After all this time it feels pretty good to have this one particular project completed. I’m very happy with it.
I moved presents from under the tree to get a picture, then replaced them, covering my new creation. It’s a little wrinkly now, but it can make it’s grand debut Christmas morning after everyone has opened their gifts and Santa’s surprises.


Merry Christmas everyone, and many wishes for a bright, shiny New Year!
Oh, how I love spending long, fun filled Fall days full of junk jaunts and tag sales with my daughters and sisters. With all the virus concerns, we’ve not been out to any all summer, but are hoping to get masked up and maybe squeeze one in next month. While poking around in my overloaded garage, sorting and tossing, I’m discovering a lot of treasures from our past outings, recalling the plans for them, and remembering some of the crazy times we had.
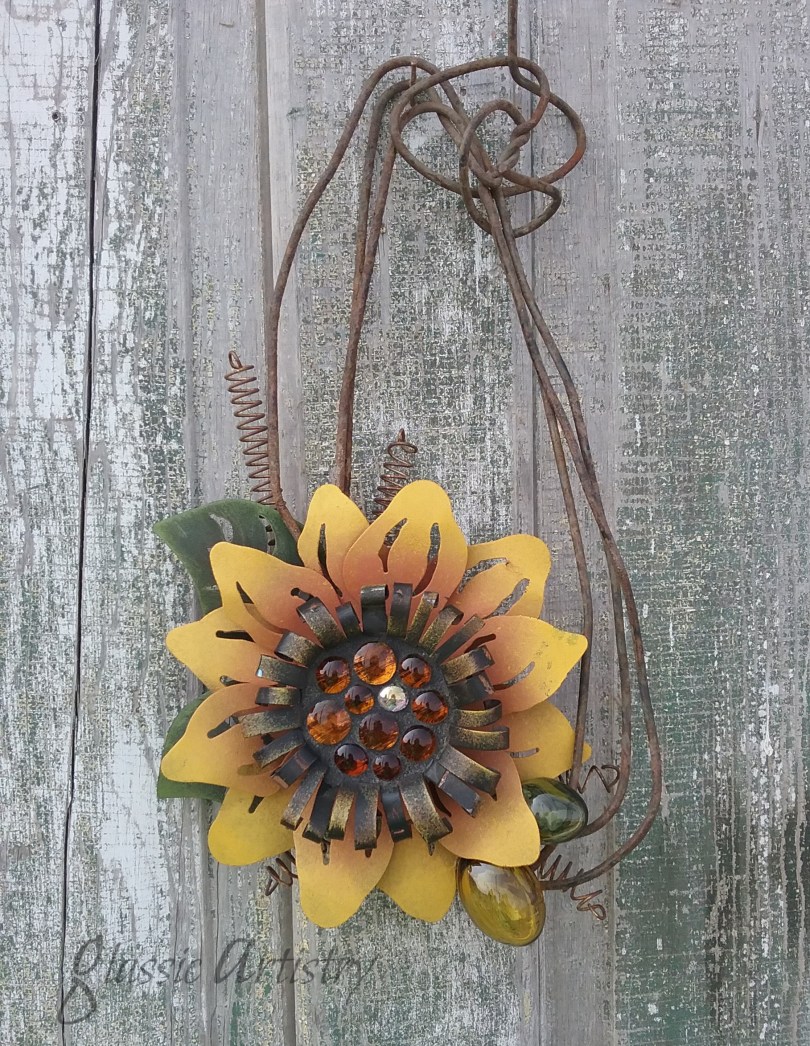
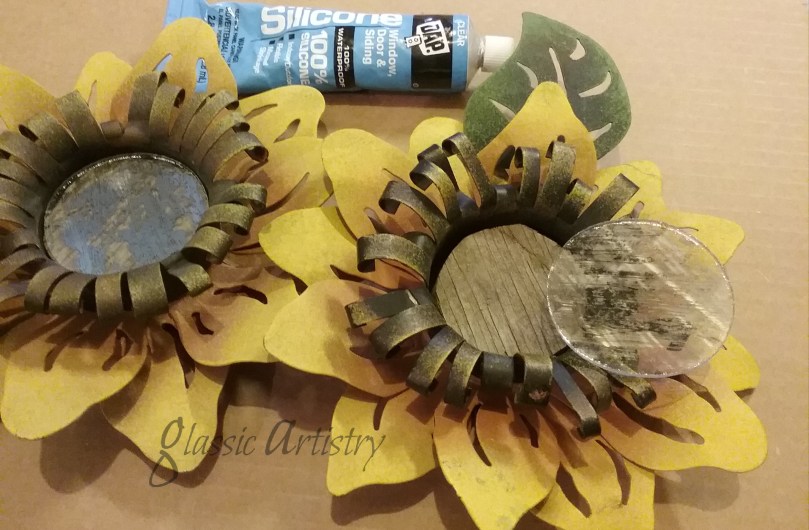
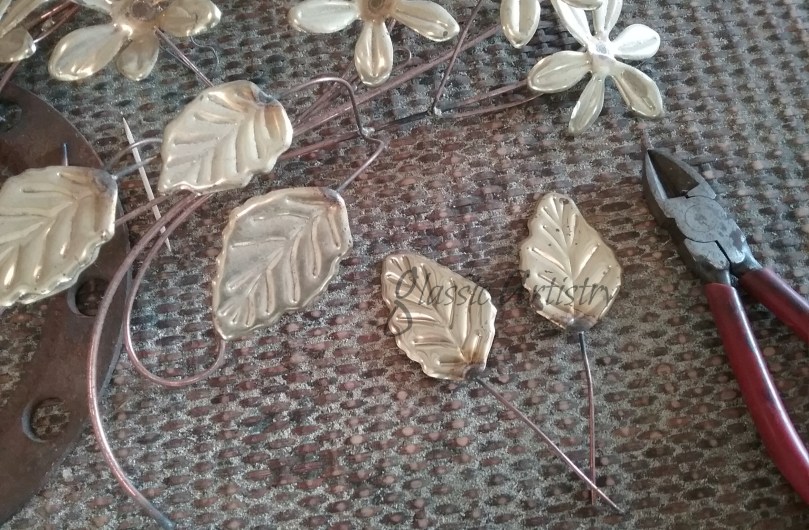
One such past find was a pair of metal sunflower candleholders; perfect for Fall decor. It really makes my day when I find a treasure like this to bring home, repurpose, and play with. When I found them, I knew right away I’d be filling the center with something.
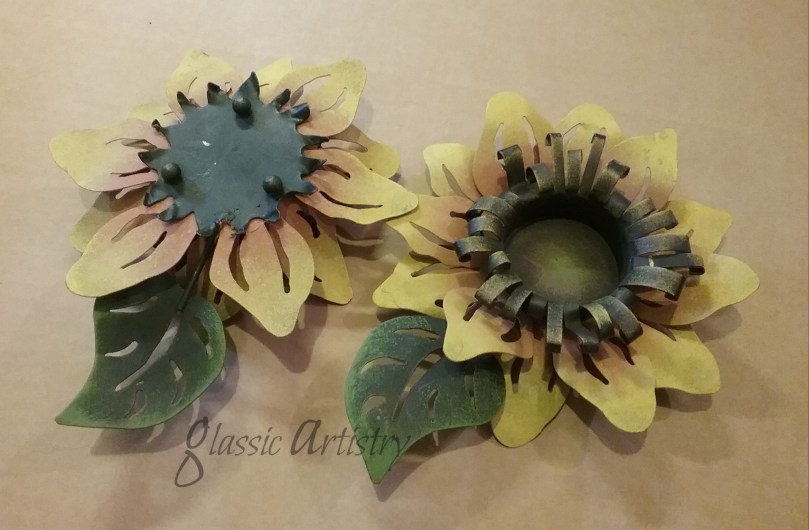
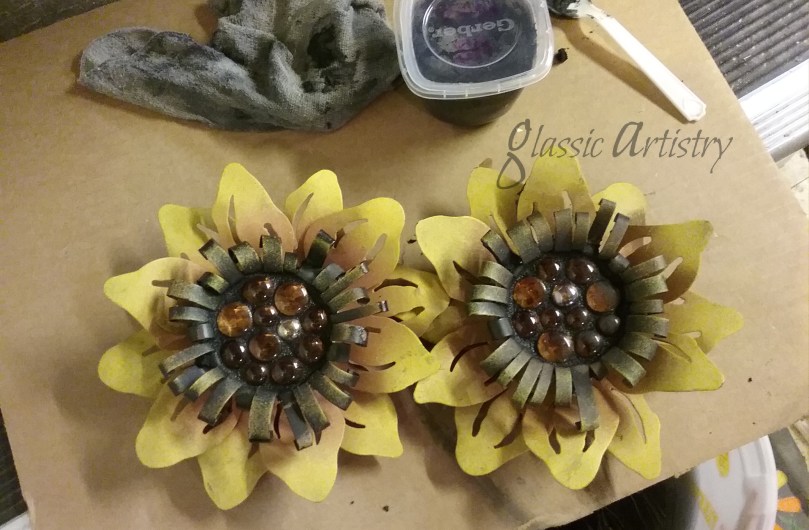
The small round legs popped off easily with pliers. The leaves were removed with bolt cutters, and saved. To build up height in the centers, a small circle of ½” plywood was glued into each one. I wanted some shine to show through the translucent glass nuggets I would be using, so I cut circles from a discarded piece of antiqued mirror to glue over the plywood. Small circles of thin metal could also be used in place of the mirror. Different sizes of amber, brown, and clear glass nuggets were glued to the mirror, leaving a small space around each one. After letting the glue dry 24 hours, the nuggets were grouted with sanded grout. I mixed a small amount of brown paint with my black grout to get the color I wanted. Let grout dry overnight before sealing.

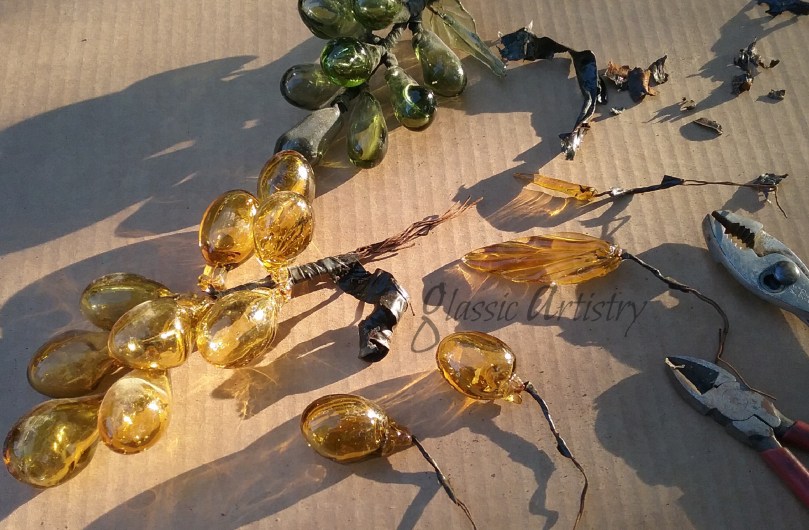
Searching through my stashes, I found an awesome piece of rusted steel wire and some beautiful green and gold blown glass grape bunches. The wire, I pulled from a salvage pile last year, and the grapes were found in an antique mall in Texas several years ago. They had broken leaves, and I paid a bit more than I would usually do, but they were so darned pretty. And now, I’m really glad I did.
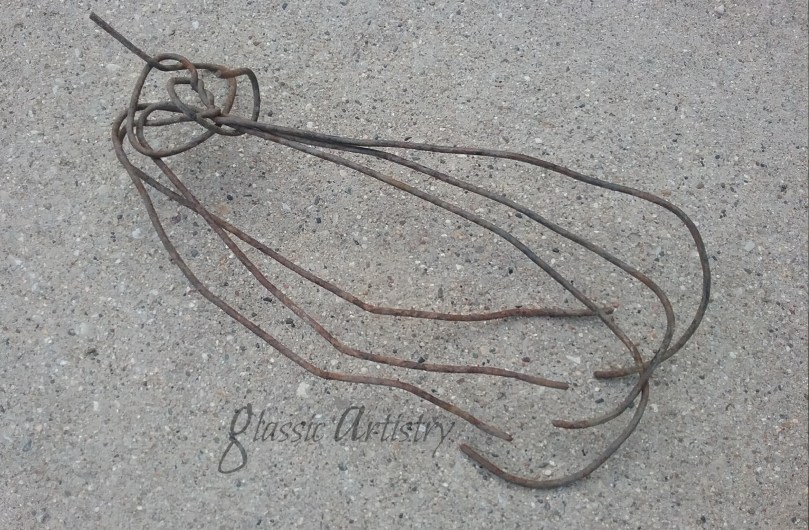
Not being one for flowery, frilly things, the wire piece worked perfectly for my taste; I could use the twisted wire knot to take the place of a bow.
With 22ga, thin black wire, the flower was wired on first, then the leaves, and grapes. I added some rusty springs to give it just a little bit more.

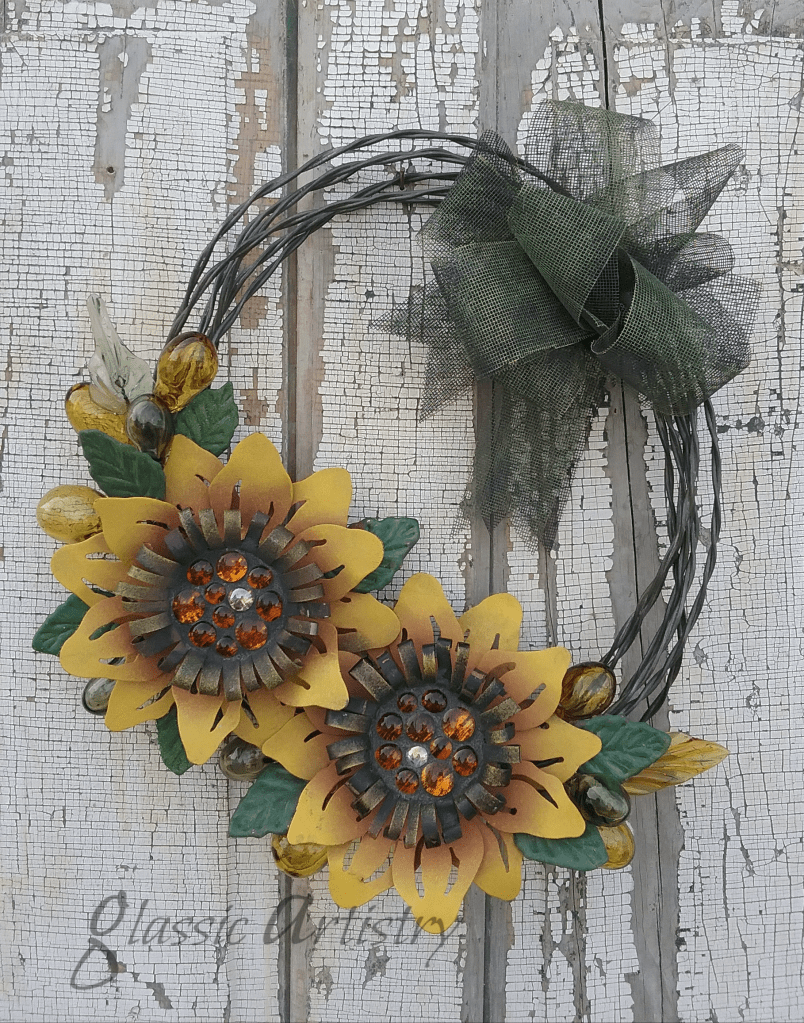
I love the versatility of projects like this. These sunflowers can be attached to just about anything, and used indoors, or out. I did a little playing around with some other ideas too, and thought I’d share them just for fun. You’ll have to let me know what you think ..
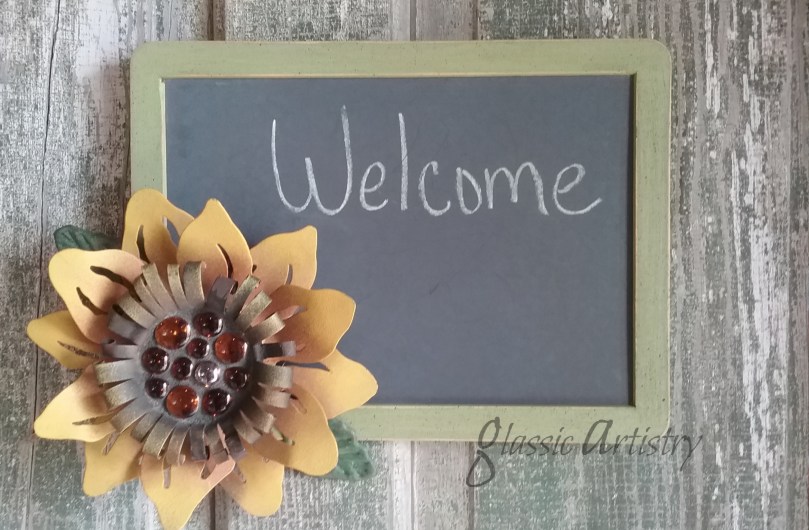
Keep it simple. Paint a couple metal leaves to add around a flower; attach it to a chalkboard, or a welcome sign.
A wire wreath is big enough for the pair. No ribbon for a wreath bow? Cut strips of fiberglass window screening and loop one. There’s easy bow instructions on YouTube.
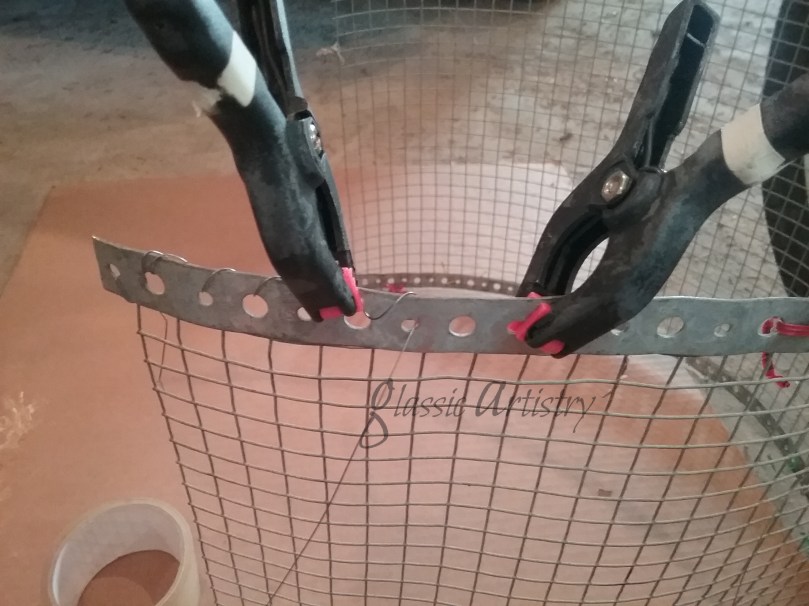
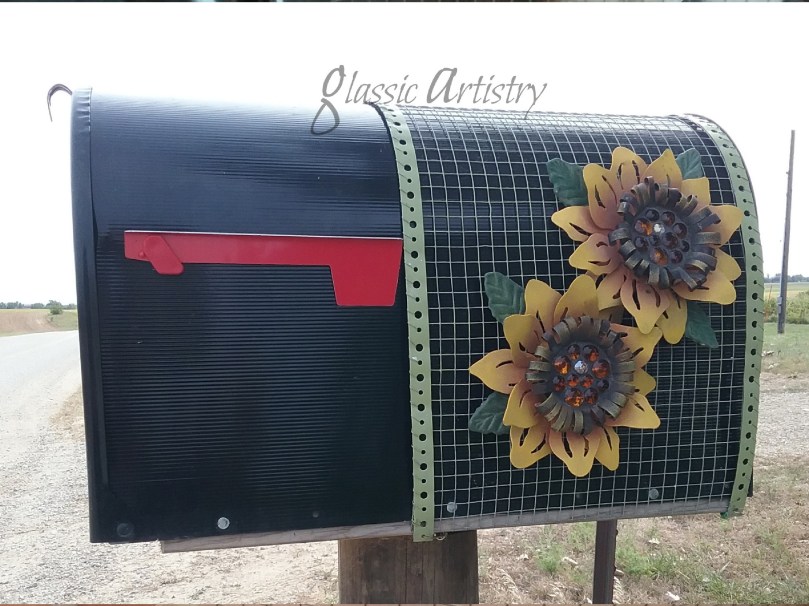
How about a mailbox cover? A metal nail strip was stitched to wire hardware cloth and shaped in an arch. Hold it in place underneath with mini bungee cords.
For an open porch, I think a small arrangement with a sunflower and raffia would look great too, tied around the neck of a milk can filled with tall florals, or ornamental grasses; but I didn’t have time, a porch, or florals to get that put together. 🙂
A wide variety of small, inexpensive metal and glass pieces can usually be found at garage sales, and tag sales, so keep an eye out if you like repurposing and working with salvaged materials. It’s good to get in the practice of looking at a piece and taking it apart in your mind to see how it’s parts can be used in other ways before carting it home.
Please feel free to comment, or share my post if you like. Take Care and Stay Healthy.
