Succulent Wall Planter DIY Tutorial

Spring break gave me the time needed to complete my latest project.

I’m pretty excited about this piece.  Not only do I get something for my bathroom wall, I discovered a nifty new way to make a basket that may come in handy in the future.

I started with a chunky, long, oval wooden frame purchased at a vintage fair a few years back.  It needed a little work to get squared up and made sturdy before a cardboard template could be drawn for the opening.  

Tracing the template, I cut and shaped a piece of mirror, a piece of clear glass, and a piece of old chicken wire.  The mirror was cut from an unwanted, inexpensive, thin, full length mirror I had in the garage, and luckily I found a large enough piece of clear glass in an old window pane. Another option for this planter would be to use chicken wire alone.

I removed the back of the mirror with a spray stripper, and used a wide plastic putty knife to gently remove it.  Spray stripper is pretty awesome; much better than using a brush for this step. Once it was stripped and washed clean, I used bleach to sponge the back lightly in a few places and speckle with a toothbrush splatter. Always protect your eyes and wear gloves when doing something like this. I let the bleach sit for about an hour. After washing off the bleach, you can add black speckling, metallic powders or paint, or vintage papers to show through the mirror, but I left mine plain.

After a few layers of stain, paint, and sanding, the frame was sealed with a coat of clear, satin,  water based sealer.  After the sealer dried, the cut pieces were inserted in the frame opening, sandwiching the chicken wire between the clear glass and the mirror.  Secured with glazier points.

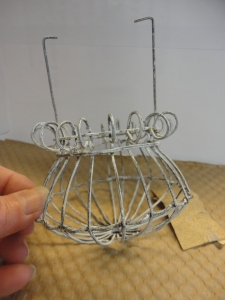
I cut a 10” hanging wire basket in half and laid it on the front of the frame to see what it would look like and figure out where I would need to trim it to fit well.  I left extra length on each end of the top rim wire so L shaped corners could be bent. (I had to find a pair of stronger hands to help with bending.)  I ended up with two loose side wires and glued them in place to get the shape I wanted. When dry, the glued areas were touched up with a little brown paint.

I found some very simple hardware to hang the basket onto the frame.  One is just a cut eye hook, but I’m not sure what the other pieces are.  I found them among some of my stained glass hangers so they may have come from a glass supply source; I don’t know.  If anyone has a clue what they are, please chime in and let readers know.  I wouldn’t mind having a few more myself. 🙂

I attached the two brass hangers to the frame first, then hung the basket to mark where the small hook would go under the basket and before drilling a hole.  I removed the basket, screwed in the hook, then painted the hardware to match the frame. When the paint was dry, I replaced the basket and hung the frame on the wall to fill.

A fiber planter liner was cut and fitted inside the basket, along with an old deflated ball for a pliable, leak-proof planter.  The ball was turned wrong side out before placing it inside the liner and adding succulents.

I’m pretty happy with my new planter.  It has kind of an Old World charm and looks right at home hanging above our tiled tub surround.  It hangs almost directly across from a large East window, so I’m hoping with the benefit of the mirror it will get plenty of light.

I hope you found something interesting or picked up a few useful tips from my project. Thank You for visiting my blog.  Please, let me know what you think. I love hearing from readers, fellow up-cyclers and re-purposers.   

On to the next project —

A Little Wire Easter Basket

While out snooping around sales last summer, I paid a whole quarter for an old, wire downspout guard. It was a little bent, but the wire was good and not brittle from rust. I’m always attracted to, and compelled to buy wire objects and it looked like something I thought I needed.

DSC00920

I caught a glimpse of the dusty and forgotten object on a shelf in my workroom last week. With Easter right around the corner, I thought it would be fun to make a little basket for my “gathering” buddy, Jean. She’d get a kick out of it.

I cut the wires down about 1 1/2″, except for two (opposite each other) which I left for handle arms.

The cut wires were coiled down to form a basket rim. The long wires were bent, about 1/4″ down, to form L shapes and then wired securely in place.

DSC00937  DSC00991  DSC00995

A short piece of weathered, 1/4″ wooden dowel was cut for a handle. Drill a small hole in the center of each end of the dowel piece, at least 1/4″deep. Age the fresh cut wood ends with thinned, gray paint, and sanding. Hook dowel between the handle arms.

DSC00965  DSC00975

You could simply leave the basket it’s original color here. I would suggest touching up any plier scratches and marks with a black patina.

I chose to lightly dry brush my basket with white, craft paint, then gave it a sanding.

DSC01021  DSC01027

I had a gorgeous vintage twist on earring and I couldn’t resist adding some bling to cover the knot of the tea stained strip of vintage fabric tied under the coiled rim.

I waxed, then speckled, a small dried egg gourd to nestle in the shredded, brown paper beside a small, metal, bunny candy mold.

Done!  I can’t believe how easy this project came together .. a quick afternoon upcycle if you have all your supplies handy.

1061 watermark

Happy Easter!


A Little Something For Fall!

We’ve had a couple very windy days, but, there’s no complaining about the excellent Iowa harvest weather we’ve been enjoying so far this month.

Windy conditions can play havoc on seasonal yard decorations, however.  With the exception of pumpkins and gourds, I’ve wired and tied things down, to still see them blown across the yard, or disappear all together.  So now, I opt to add a bit more seasonal flair with small wreaths inside my home.

An abundant crop of egg gourds, dried, and stored in my basement, has been on my mind a lot since summer.  I’ve been wanting to make something with them for a long time.  I got to thinking that, some of them, a few of my favorite things, and what Mother Nature had to offer, would make for some pretty fall décor.  Simple and inexpensive, just my style!

8284 watermark8235 watermark8204 watermark

I’ve never been able to decorate a wreath when its lying on a flat surface.  I like to hang a prepared wreath on a paper covered board, and work on it at eye level.

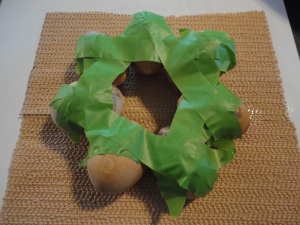
Gourd Wreath – Choose seven egg gourds of similar size and shape.  Soak overnight in bleach water and scrub clean.  (A small plastic basket, used for holding baby bottle rings and nipples in a dishwasher, works great for this step.  It will hold the gourds and its easy to weigh down under the water).  Dry gourds. Wax and buff with Briwax or any furniture wax. On a non-skid surface, arrange the gourds in a circle, and secure together with painter’s tape.  Gently turn them over and mark with pencil where they meet each other.  Remove the gourds from the tape, one at a time, drill holes with a Dremel and 3/32″ bit, then replace gourd on tape.  When done drilling, turn gourds face up and remove tape.

DSC07859 DSC07863 DSC07871

Measure and estimate the diameter of the wire ring you will need.  Pre-shape a length of 16 gauge wire around a container of the same diameter.   Mine was about 3 1/2″.

String gourds on to the wire.  Cut off excess wire and twist ends together.  Turn over, face down, and attach a push-in hanger with Gorilla Glue.  Let dry.

DSC07887 DSC07934 DSC07940

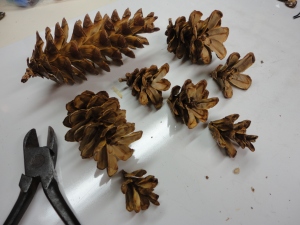
With side-cutters, cut a few long, bleached pinecones, to form flowers.  Spray pinecone pieces and False Baptisia pods with Clear Matte Sealer.  Attach the prettiest pinecone pieces with hot glue.  Embellish with pods.

DSC080508285 watermark

Pear Wreath – I like pears and couldn’t resist when I found smaller egg gourds that resembled their shape.  Always remember to soak and scrub the gourds.

I mixed a small amount of white and green wall paints for the palest of green color.  For a special touch, I used a small slender glass leaf I had, but, you could trim down an artificial leaf, or use no leaf.

After soaking a 6″ grapevine wreath overnight, slide two thick rubber bands around it’s center to form a more oval shape.  Let dry 24 hours. While the wreath dries, give the gourds 2 or 3 coats of paint, one side at a time, and sanding lightly between coats.  Be careful, they like to roll!

DSC07924 DSC08004

Cut the rubber bands from the dry wreath and lay it on a wire rack, over a bowl.  Water down a small amount of dark brown craft paint and lightly brush it over the wreath.  Let dry.  Speckle the wreath, lightly, with black craft paint.  Let dry and seal with Clear Matt Spray.

DSC07969 DSC08163

Using a Dremel, I drilled a small hole to accommodate the base of my leaf, and glued it in with a small dot of hot glue. Spackling was used to fill in around the leaf.  Once dry, it was sanded smooth and repainted.  Small indentations were drilled in the top of the gourds to hot glue apple stems in place.  Touch up paint around the stems.

After gluing the pears on the wreath, two leaves and some berries, saved from past projects, were added.  The pretty green, dried Astilbe, tucked in and around, was cut from the bush outside my backdoor.

8237 watermark

Egg Basket Wreath – I have a thing for collapsible wire egg baskets, they’re cute!  And, so easy to decorate!  I found a flower sprig and feather sprigs for 50% off last month … a total of $3.00, YEAH!  I cut and reconfigured my flower sprig a little, but you needn’t.  Simply arrange your sprigs the way you like them, cutting off the long stems if needed, and add a raffia bow for a quick colorful wreath!

DSC08155 8204 watermark