This project actually began last November when I was looking for a storage box for the pear gourd wreath shown in my October 2015 blog post. The dried flowers were pretty fragile and I was a little leary about packing it away. That’s when I thought of a shadow box. Why not frame it as wall art? I could make a box .. something eclectic… maybe a combination of scrapbook paper and aged mirror.
The biggest dilemma was finding a suitable box. Who knew finding a 10 x 10 x 2.5 inch box, with a lid, would be so hard? I was even willing to buy a fancy box of chocolates, had the box been right. Sometimes, I get a bit antsy when I’m itching to do a project and can’t find just that certain thing I think I need. But, I’ve learned that a little patience goes a long way, and if I just wait, something always seems to show up.
My daughter and I were checking out the clearance aisles at Burlington Coat Factory last month. I wasn’t really shopping for anything, just entertaining my toddler granddaughter in the cart, when I saw a pile of magnetic clasped boxes on the shelf. So unexpected, and more than PERFECT! A clasp option would make the box easily accessible to switch out whenever you wanted. I was reenergized, this was going to be fun!

With the clasp at the bottom, I measured in 5/8″ from the top and bottom of the lid, and 3/4″ on each side, to cut out a frame opening. Cut nice straight lines by running a sharp utility knife along a ruler’s edge. Seal the box with gesso. Let dry.


A 1/4″ sq. craft stick was mitered for the frame opening.

Trace the box on a piece of foam core board, and draw an arch at the top. Lie flat, on padding or cardboard, and cut out with a utility knife. Fill in rough edges of foam board with lightweight spackling. When dry, sand lightly to smooth. Seal board with gesso. Let dry well.


Paint the box, frame pieces, and foam board with black primer or craft paint. No need to paint where the box and foam board will be glued together. The second picture, below, may look a little strange, but the foam board will curl when painted. I laid mine over a container, weighing each end down, past center, to dry. Once dry, I turned it over, laid it flat on my worktable, and weighed it down to flatten again. Trust me, please, it works.


I knew I had been saving a cool, striped C.J. Banks clothing sack for a reason. After smoothing it out with a warm iron, it covered the long foam board with no seams.
Place the foam board on top of the striped paper to center the stripes, and trace it with a pencil. Hold the paper up to a bright window, face down, and retrace your line on the back of the paper. This pattern line will help keep your stripes centered when gluing. Cut your pattern out larger, away from the line about 1 1/2″. Do not cut on the traced line.


Paper may stretch when wet. Wanting to achieve the smoothest surface possible, I glued and dried small sections at a time, using a plastic gift card and brayer to work out air bubbles.
Lay foam board face up. Beginning at the bottom, brush on a light, even coat of thinned white glue, going up about 3 or 4 inches. Turn the glued foam board over, and position it face down on the backside of the striped paper, within the retraced pattern line. Press it firmly in place, turn it back over, face up, and smooth out air bubbles. Weigh down to dry. Continue to glue until covered.


Use a fid, or paper folding tool, to wrap paper tightly around edges before gluing. Trim away excess paper for neat corners, and cut some darts around the arch. Glue and weigh down to dry. Glue may seep at edges, as a precaution lay a sheet of wax paper over the glued area before weighing down. A piece of light weight brown paper was added for a finished look.

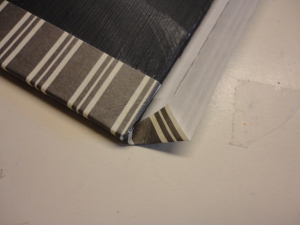


Fortunately for me, my youngest daughter downsized recently, and stored a treasure trove of scrapbooking paper in my basement. I chose three patterns I felt would compliment each other and my wreath. Pieces were cut to the appropriate sizes to cover the surfaces of the box.
A little black and metallic gold craft paint was mixed together to match the papers. The mixture over the black base paint almost created an olive green tinge, an added plus! I painted the front and back of the lid, the folds of the lid, all corners, edges, and frame pieces.


I love the look of aged mirror. I had a few pieces I had aged, with some of the backing completely gone, and thought bits of the decorative paper would look awesome peeking through them. I cut two pieces for the outer sides and a square for the inside.
The paper pieces were glued on with a thin layer of white glue. After they were smoothed and air bubble free, I clamped the mirror pieces and spare foam board pieces over them to ensure they would dry flat and stay smooth. Glue the paper accent on the arch and weigh down to dry.


Cut a thin piece of clear glass for the frame opening. Stand the box on it’s top and fold lid down flat. Position the glass on the inside of the lid, covering the opening. Slowly, lower the box down over the glass to make sure it fits inside the box and doesn’t hinder closing. Use small dabs of E6000 to glue the glass in place. Be careful not to use too much glue or it will seep to the front and you’ll have some cleaning to do. For cushion, and to help even out weight, lay a couple pieces of foam board across the glass before weighing with books to dry. I squeezed small dabs of E6000 on the backside corners and edges of my mirror pieces, and clamped them on the papered sides while the glass was drying.


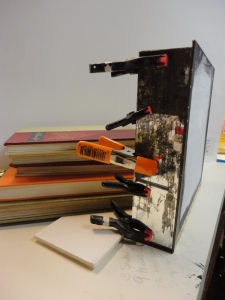
Gorilla Glue was used to adhere the foam board to the back of the box. Gorilla Glue swells as it dries, be careful not to apply it too close to the edge, it will seep out and get ugly. Apply it to the backside of the box, in a thin line, at least 1/2″ away from the edge, and a few swirls in the center. Remembering to keep the clasp at the bottom, position the box very near the bottom of the striped foam board piece, leaving about 1/16″ of the stripes showing.
Squeeze small dabs of E6000, on the backside corners and edges of the square mirror piece and glue it to the inside of the box. Weigh it all down to dry. I found a smaller box that fit in, on top of the mirror, then weighed the box down. Let dry overnight.

I’m going to rely heavily on Gorilla Glue to hold prong hooks for hanging. I bent the tops of the hangers out a little, before gluing, to accommodate a nail head. A sheet of wax paper was laid over the glued areas, before weighing it down to dry, so nothing got stuck and damaged the brown paper.
The frame pieces were held in place with painter’s tape. I removed them, one at a time, brushed on thinned glue, and clamped them down to dry. They shifted easily, so I waited until one was secure before moving to the next. You may have to touch up a little paint where you used painter’s tape.


To complete the look, an old drawer pull was added to snazzy up the arch.
The wreath was laid in the box, with small dabs of E6000 in a few places on it’s backside, where it touched the mirror, and left to dry overnight.

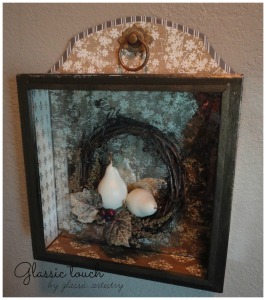


I’m pretty sure that shadow box making has just nudged it’s way onto my favorites list. I think the hanging element can be improved with a little more forethought, but, I am so pleased with the way this project turned out. Although it was time consuming with all the gluing and drying, I believe it was worth it. Any time you can learn a little, have fun, and have something to show for it, is time well spent! Don’t you agree?


