
“May abundance and joy fill your home this Thanksgiving Day”.

“May abundance and joy fill your home this Thanksgiving Day”.
Thought I’d hop on to check in and wish everyone a very early spring greeting although it’s hard to feel springish while there’s blizzard conditions blowing and snowing in our part of Iowa today. A few days ago robins were hopping around our yard and today I’m worried about where all those poor little things went to stay safe and warm.
I’ve been in a bit of a funky mood since Christmas and haven’t done much creatively. But, with winter on its way out, I think I’m getting my mojo back.
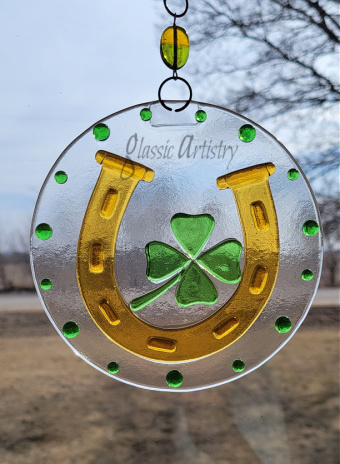
I started getting back in the groove last week with a new St.Patrick’s Day suncatcher (shown above), and there’s a shamrock piece waiting on my workbench to be finished.
Last summer I cut a lot of vintage glassware into interesting pieces to create something special with but didn’t follow through. They are next on the agenda along with 4 or 5 other unfinished crafting projects that are taking up space in my work area.
Every year I make quite a few stained glass, peace sign suncatchers. I’m ready to put those aside for a while and put my energy into more new pieces and ideas. The last of my peace sign suncatchers are listed in my Etsy shop https://www.etsy.com/shop/GlassicArtistry and pictured below if anyone has an interest.


Well, I guess that shamrock piece isn’t going to finish itself, I’d better get back to work. Stay well and stay safe friends, and Think Spring!

I just love this little heart!
After noticing the beautiful texture in a chipped relish dish, I couldn’t resist doing something with it. And, since it’s February, a heart seemed like the perfect thing to do.
I cut a heart shape pattern before doing any glass cutting and held it on the underside of the dish to move around and choose what portion of the dish I wanted to use.
The handles of the dish broke off easily with a wheel cutter and I used my hand held glass cutter to score across the middle and break it in half. I marked an area beyond where my pattern would go and removed excess glass with the wheel cutter so the section I wanted to use would flatten nicely in the kiln.
The heart pattern was traced onto the smooth side of the glass and the tracing was then etched with a pencil scribe. The etched line was filled with black marker to dry. This is a step I like to do when I’m using a glass saw. When the marker is wiped off, it remains in the etched line so you can see it as you cut. In this case though, the black marker was still hard to see with the texture of the glass, so I went over it again with a red china marker and that did the trick. (This works great for dark glass too, just use a white marking pen). I removed all the glass I good around the tracing before using the saw.

After grinding the edges to smooth, the top edge of the heart piece was rounded slightly at the grinder to remove the high textured ridges before firing it again.
The glass was thick so a wide foil was needed. I used two widths of 1/2″ foil and overlapped them on the side of the heart. Then it was soldered up and finished. Completed, it measured 6″L x 4″ W. Surprisingly, it only weighed 4 oz.
I’ll be using this glass some more. I’m thinking a blue version would be nice for Mother’s Day.
I’ve enjoyed making hearts lately and hope to get more made for my Etsy shop and FB page as soon as time allows. 🙂


If you’re new to my blog, Thank You for stopping by. Please feel free to like, comment on , or share this post. Happy Valentine’s Day Everyone!

Hi All! I know, it’s been quite a while, hasn’t it? No worries though, nothing major happened after my last post; I just got busy with glass work, wrapped up with the grand kids and their activities, and just got out of the swing of things, I guess. You really have to give a lot of credit to those that do blog regularly, it’s a lot of work. I don’t know how they manage it. I love sharing on my blog, but think I may have to be content with only posting occasionally. I want it to stay fun and not something I feel I have to do.
Anyway, with that out of the way, I’d like to know how everyone is doing? This virus business has sure created a strange and crazy time over the last three months. I hope everyone and your families have been staying safe and doing well.
Like many, we are still staying home, social distancing, making essential trips only, and doing curbside pick-ups. We’ve opted to stay put at home this summer, and not plan any weekend road trips or junk jaunts. That plan is what prompted me back to my blog. I was looking around my garage the other day, taking stock of what projects I might work on over the summer, when I realized I already had plans for many of the treasures I have gathered. I took that as a sign to get refocused and get stuff done. Not sure what I’ll be starting with yet, but I’m anxious to get going.
With no tutorial to share today, I thought I’d just do a big pictorial of pieces made for the vintage market last year, and some of my glass work and what’s been keeping me busy since last fall. Hope they arouse some inspiration …
I’ll start with one of my market favorites. Remember the painted window screen poppies?
A piece of aged and painted mirror was glued into the bottom of a 25 cent garage sale find before wiring poppies to the front. Isn’t it the cutest? I love the colors.


My daughter had some beautiful pieces of scrap lumber from putting in new windows. They were the perfect length to put together a big mudroom shelf with Chicken Wire Brackets.


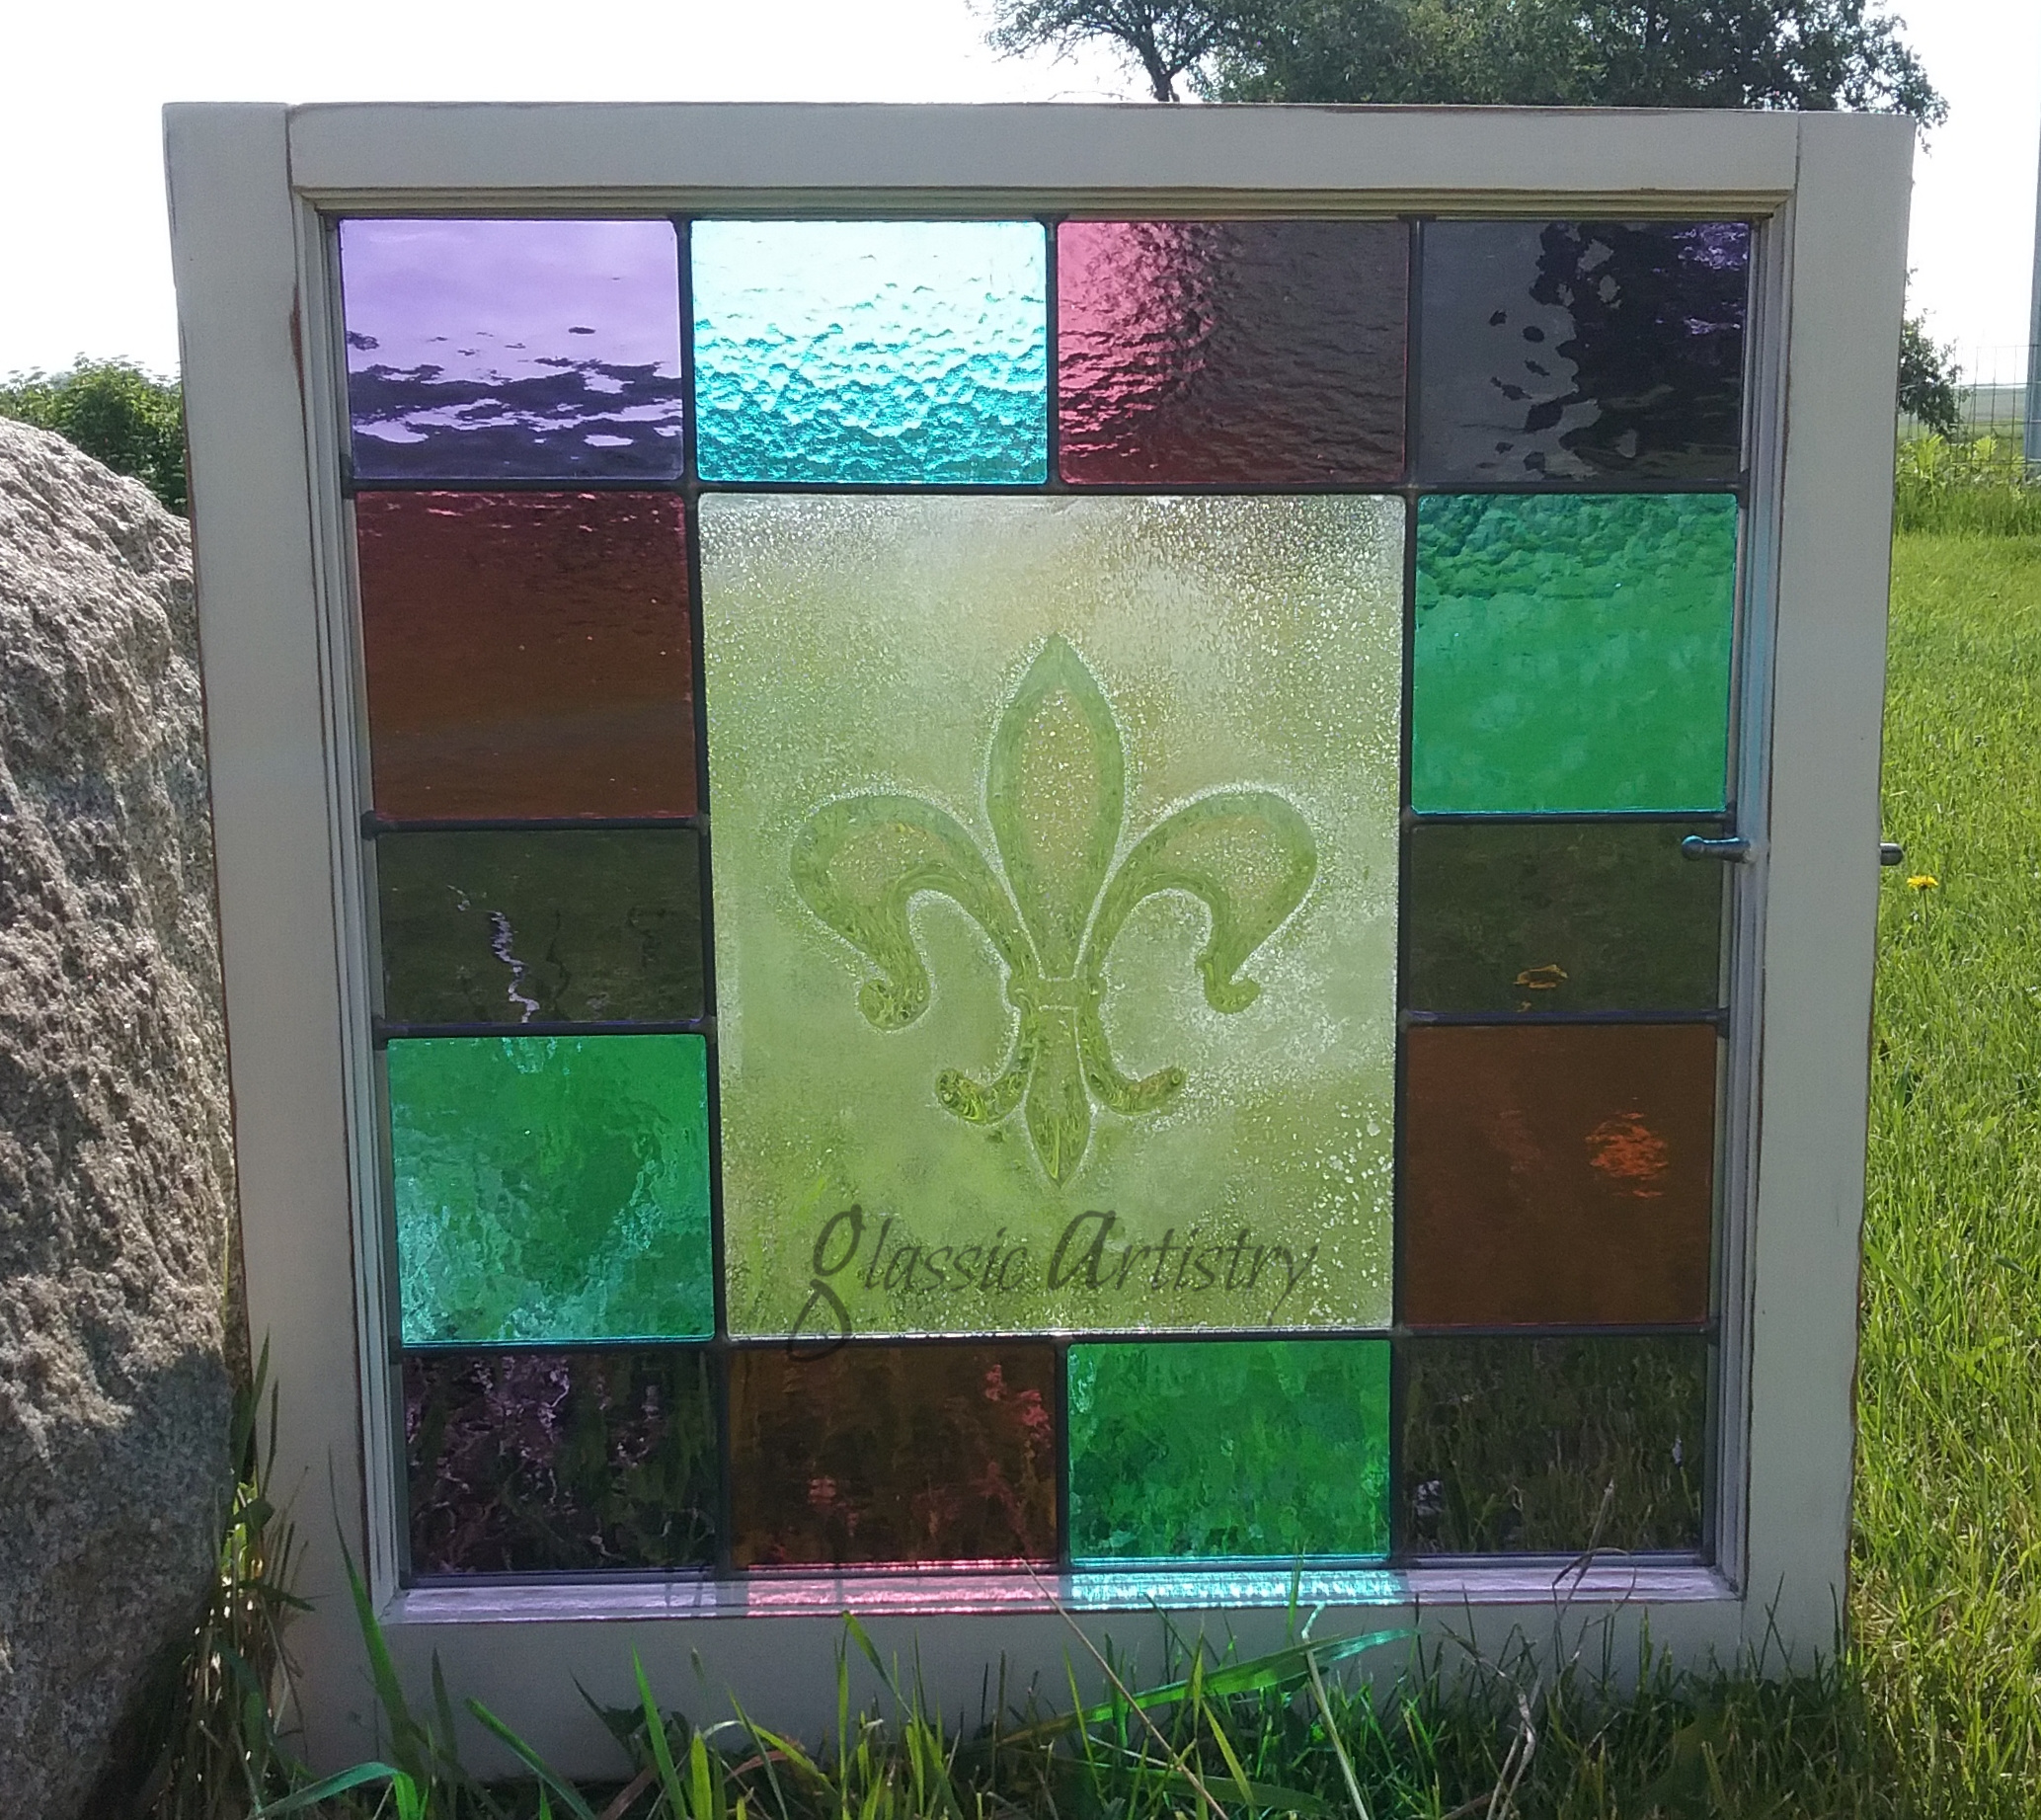
A large vintage, embossed Fluer de lis glass tile was rescued from an old medicine cabinet, surrounded with leaded glass and inserted in an empty window pane.
Wooden cabinet doors were up-cycled with glass inserts and hung on open backed, vintage style wall curios constructed with scrap and pallet lumber.


Pretty textured glass, an old cabinet door, and a piece of door molding came together nicely for a decorative shelf.


In my glass world –


")


Oh! And last, but not least, are these two. They own me heart and soul, brighten my days, but can really keep me hoppin’.

That’s it, all I have for now. Thank You for hanging in there with me and continuing to follow my blog. Please stay happy and healthy. I’ll be back …
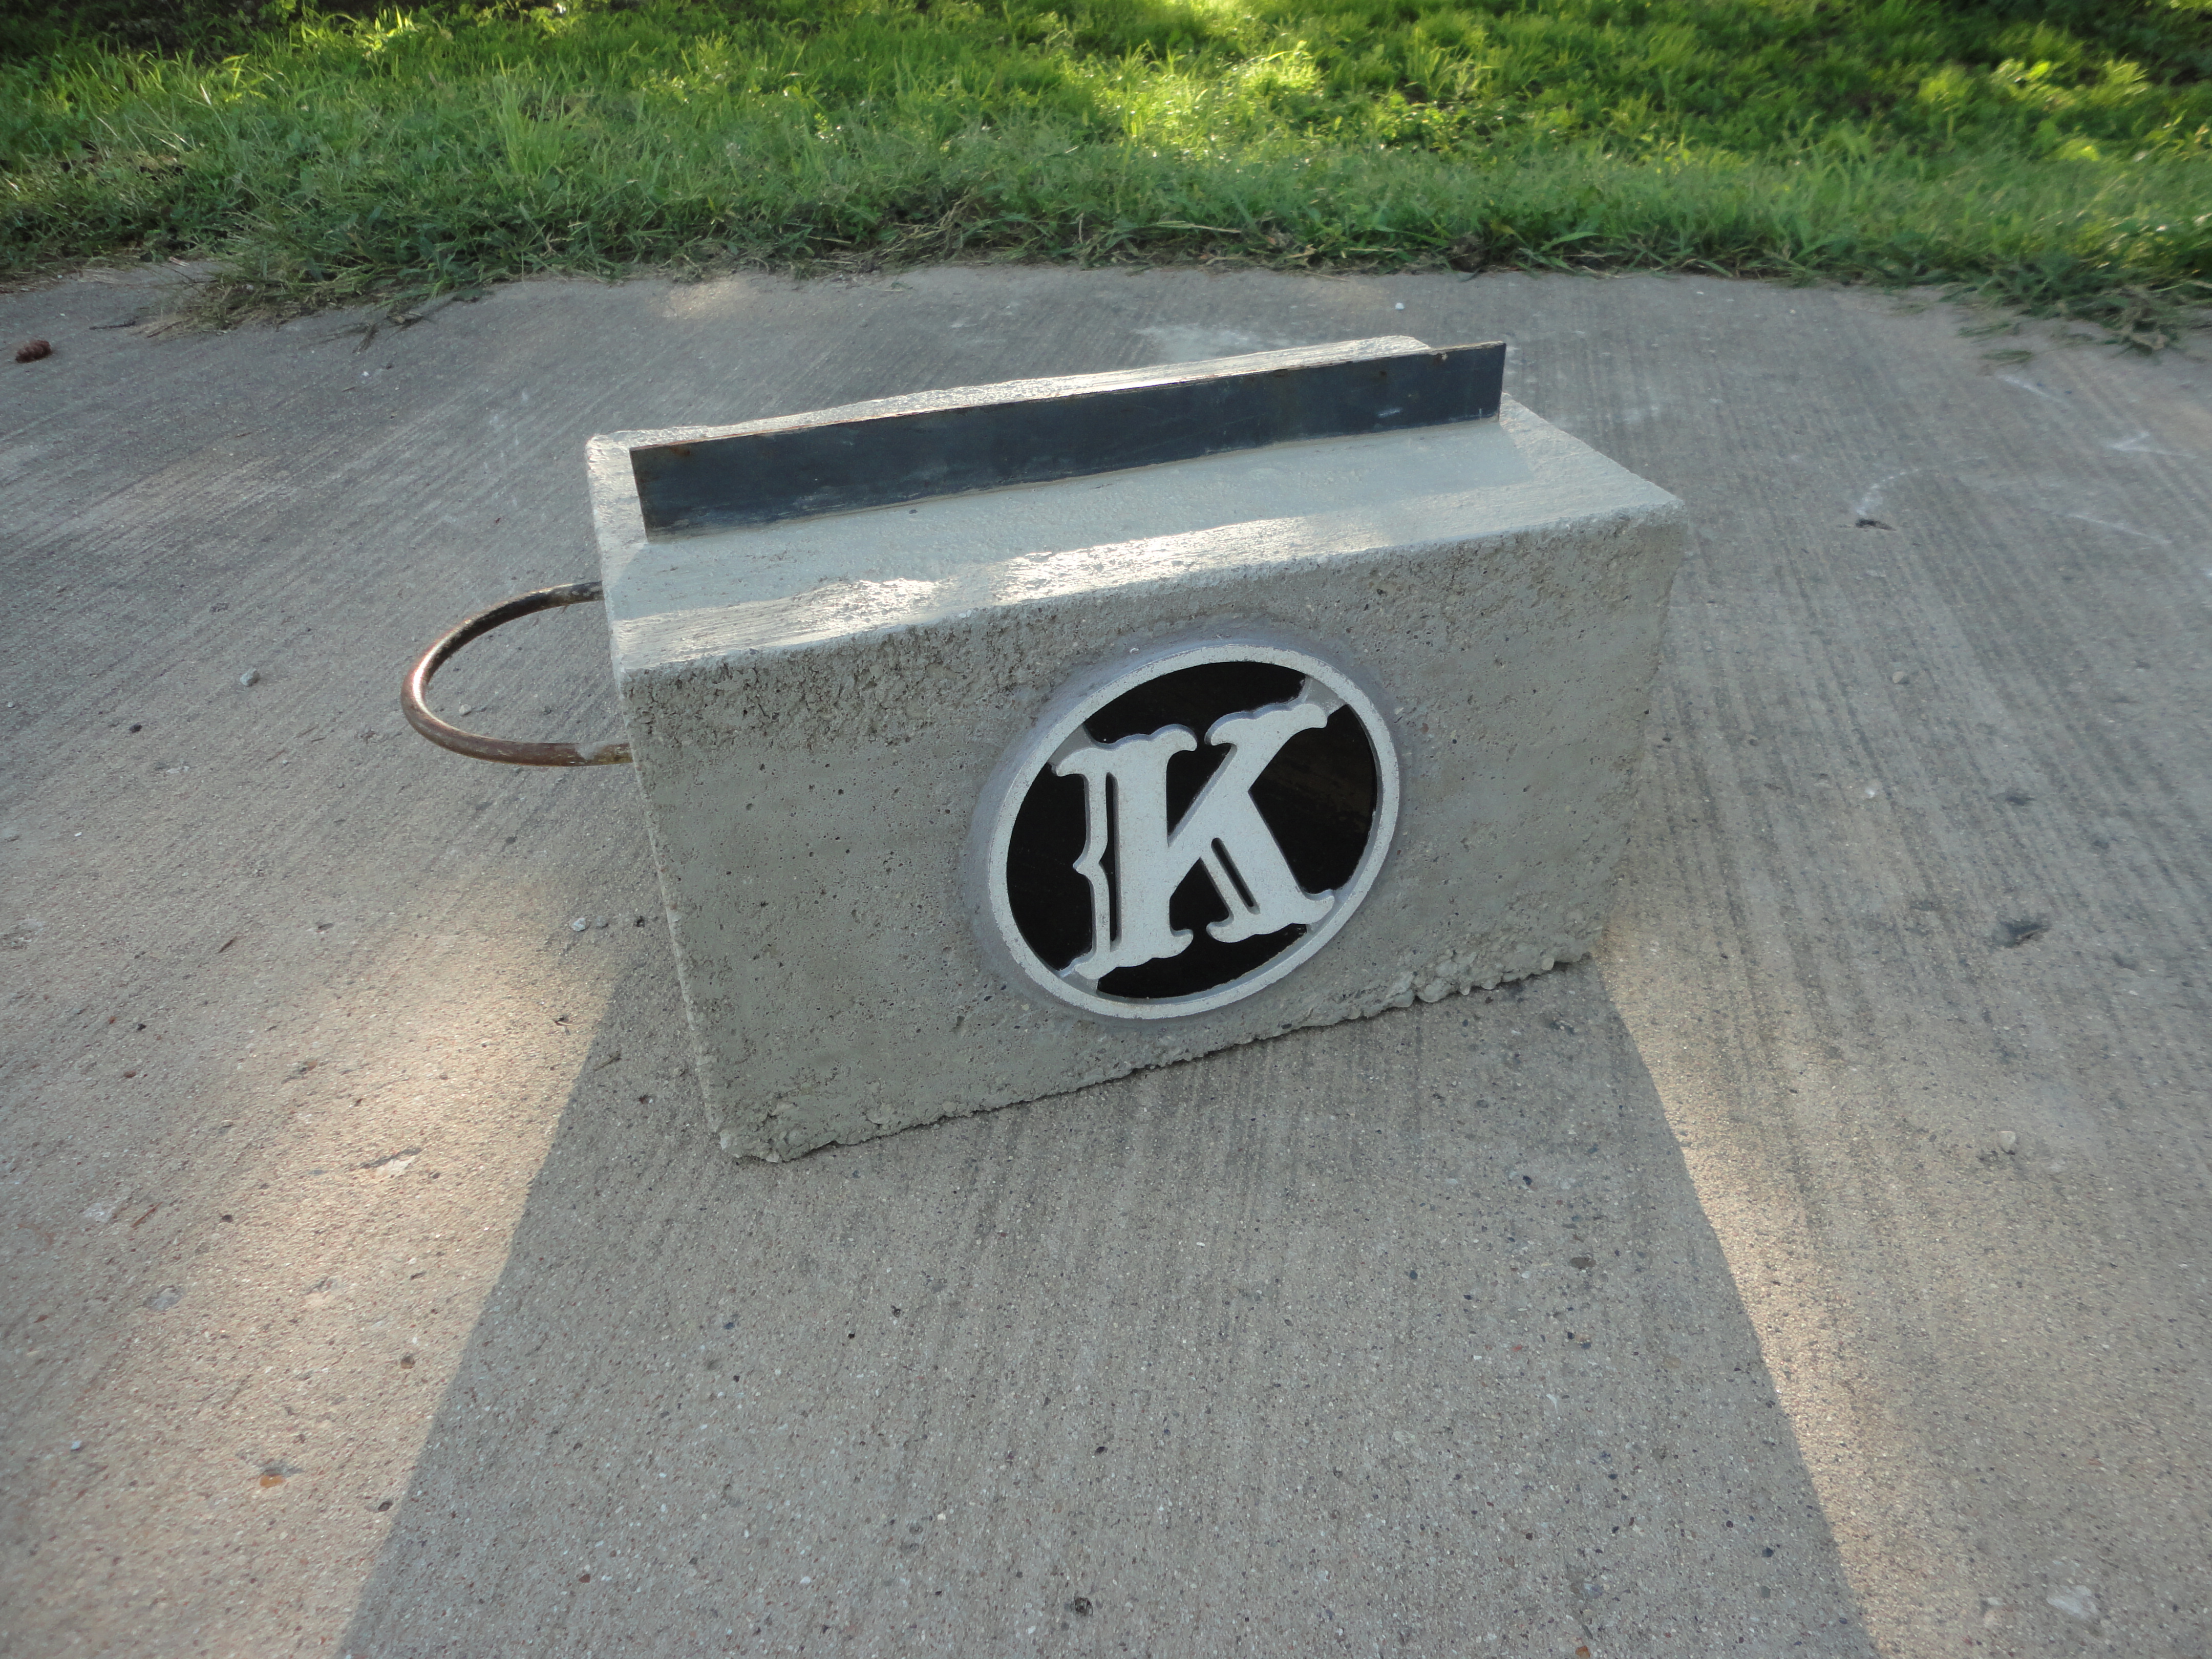
It was a few wet days, last month, that spurred an unexpected project. After admiring many creative and inspiring concrete/hypertufa boards on Pinterest, I was so dreaming of designing garden pathways and stones, as my first concrete endeavors, but instead… it was a boot scraper.
Our old boot scraper was already settled comfortably by the back door when we moved to the family farm over 25 years ago.
It found it’s way here in a load of salvage long before our arrival. It has scraped many boots and shoes, propped boards to be painted, secured papers, and dog leashes. No one ever gave it much thought until we were trying to wipe mud from our shoes, in wet grass, before entering on the other side of the house. That’s when I said, “We should make one of those mud scrapers for over here.” My husband replied, “Wouldn’t take much, just a box of concrete and a piece of steel.” It took me a minute to absorb…. “Hey! I think I got something we can use!”
I’ve always had a tendency to save pieces and scraps when remodeling or updating, like the wainscoting used to build our bird feeder, in my previous post. I find it fun to integrate the old with the new. It’s like letting something catch it’s breath to start a whole new story.
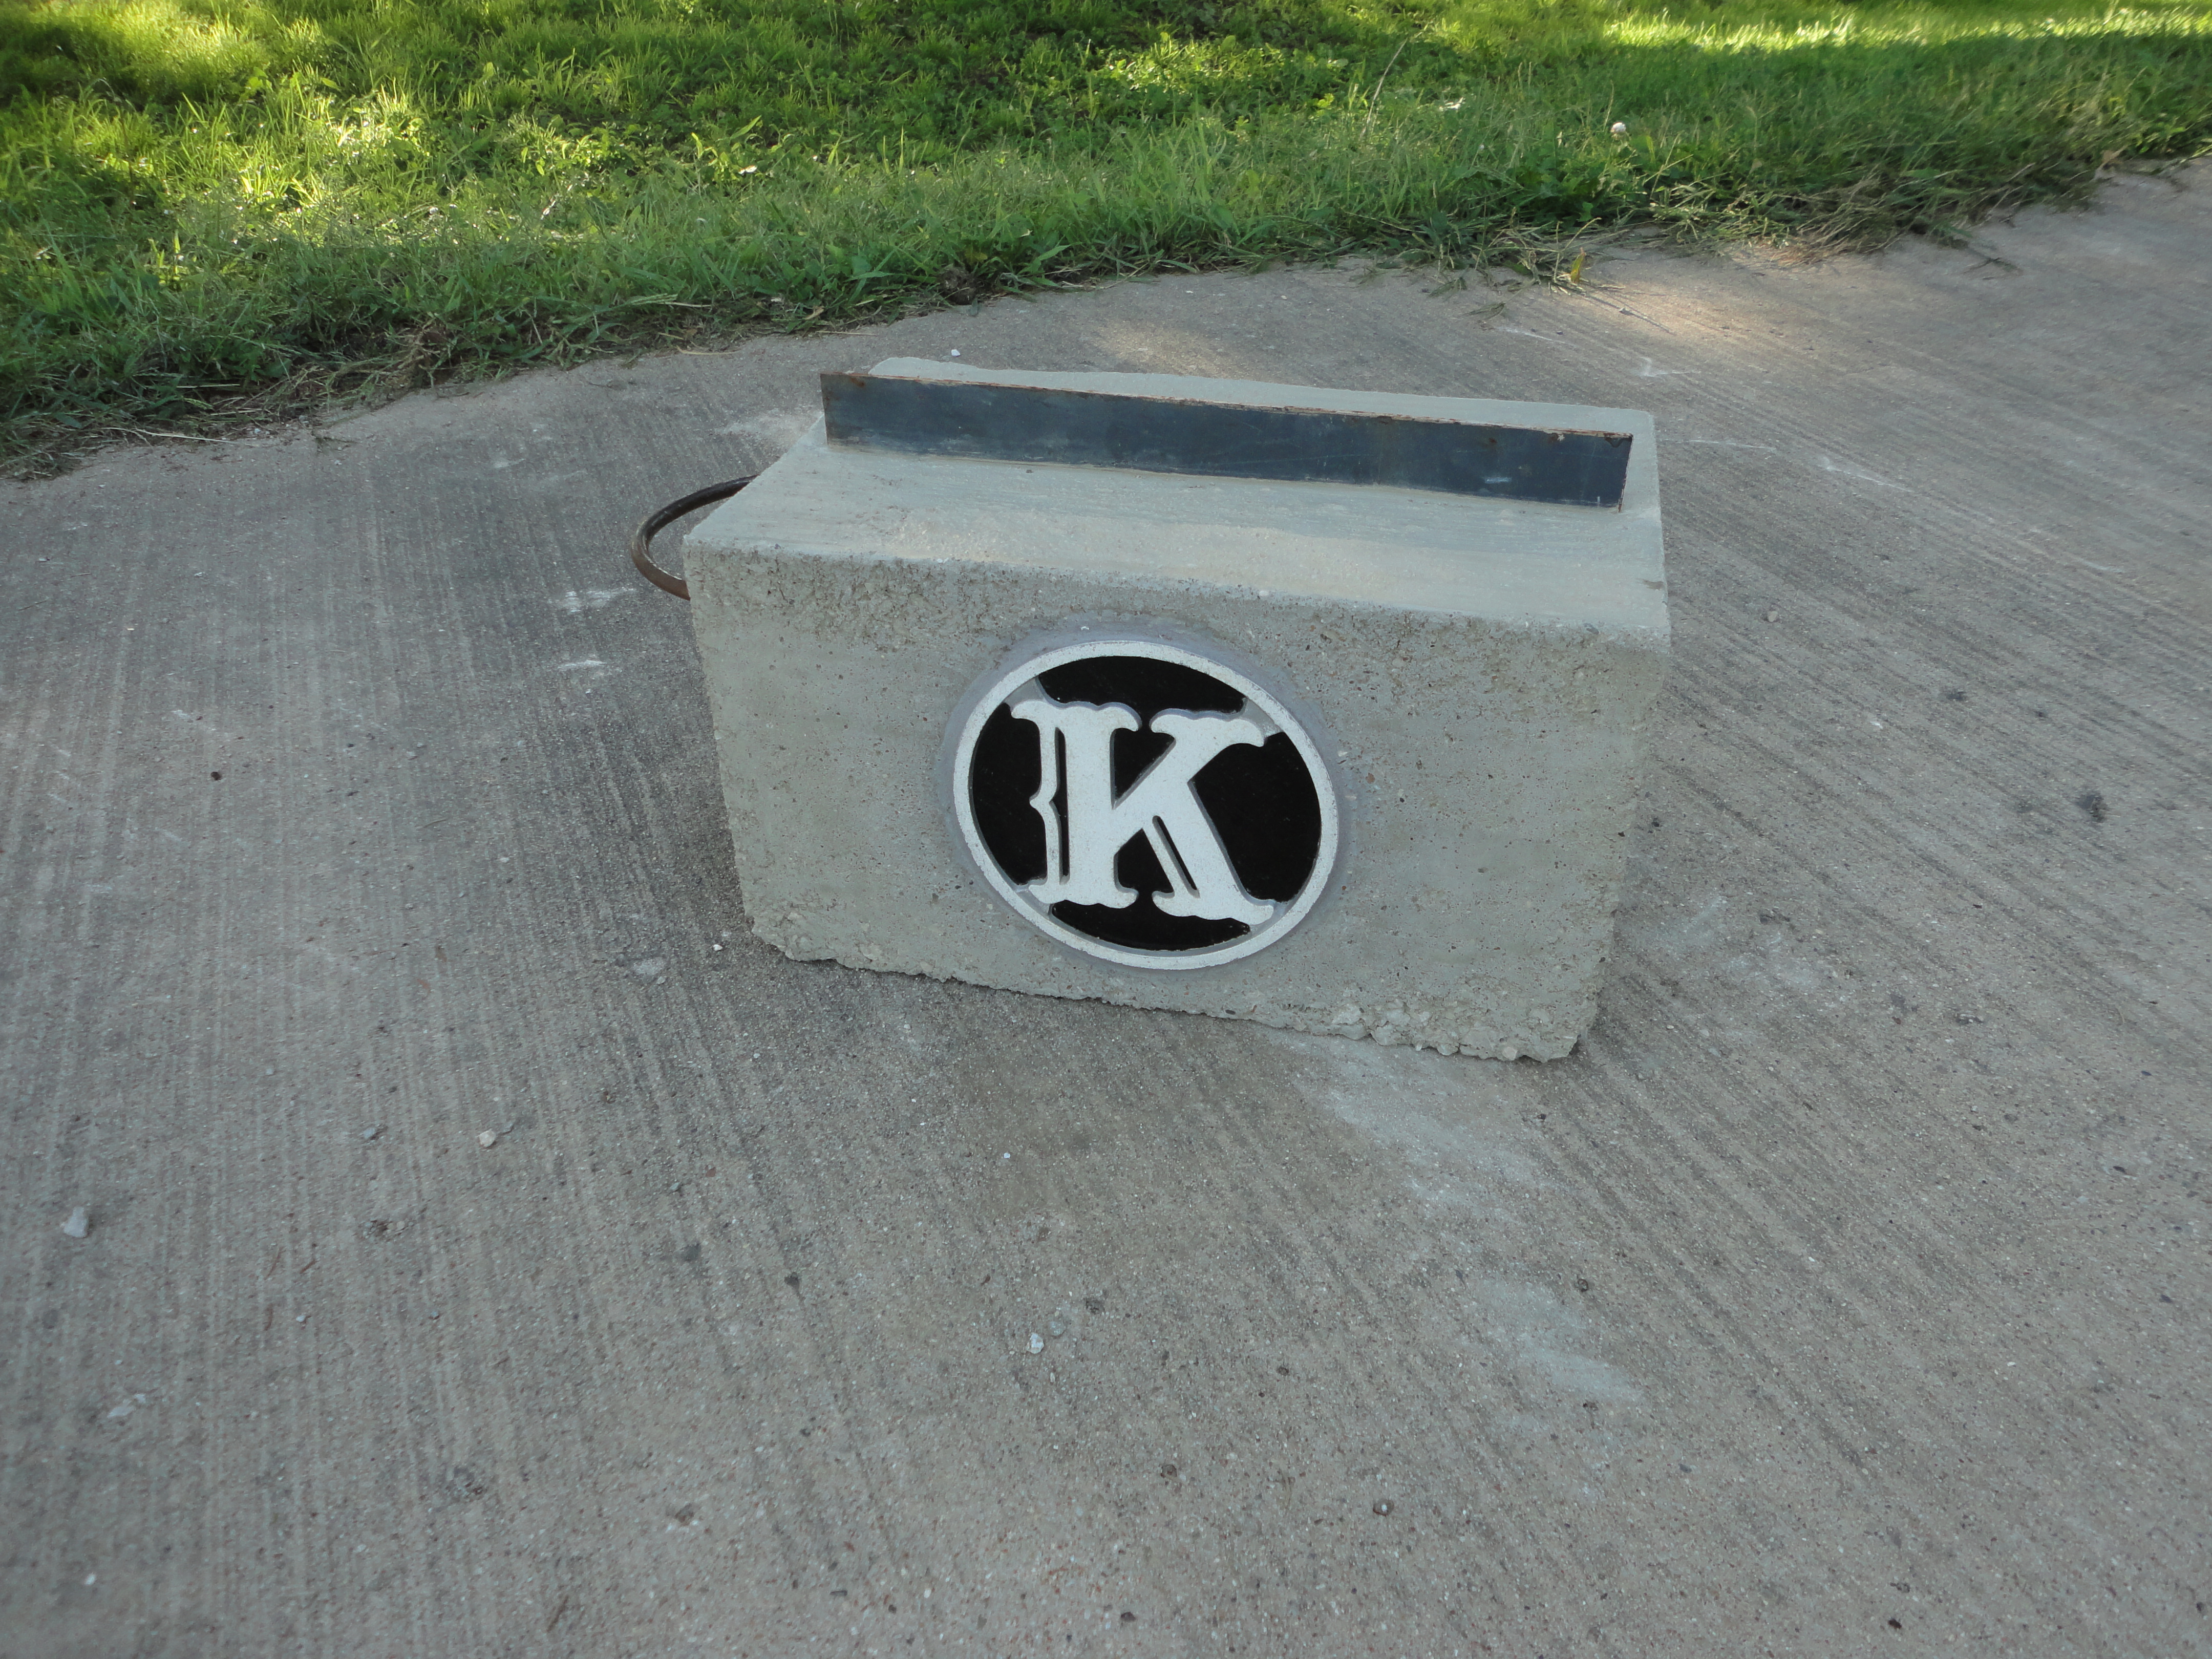
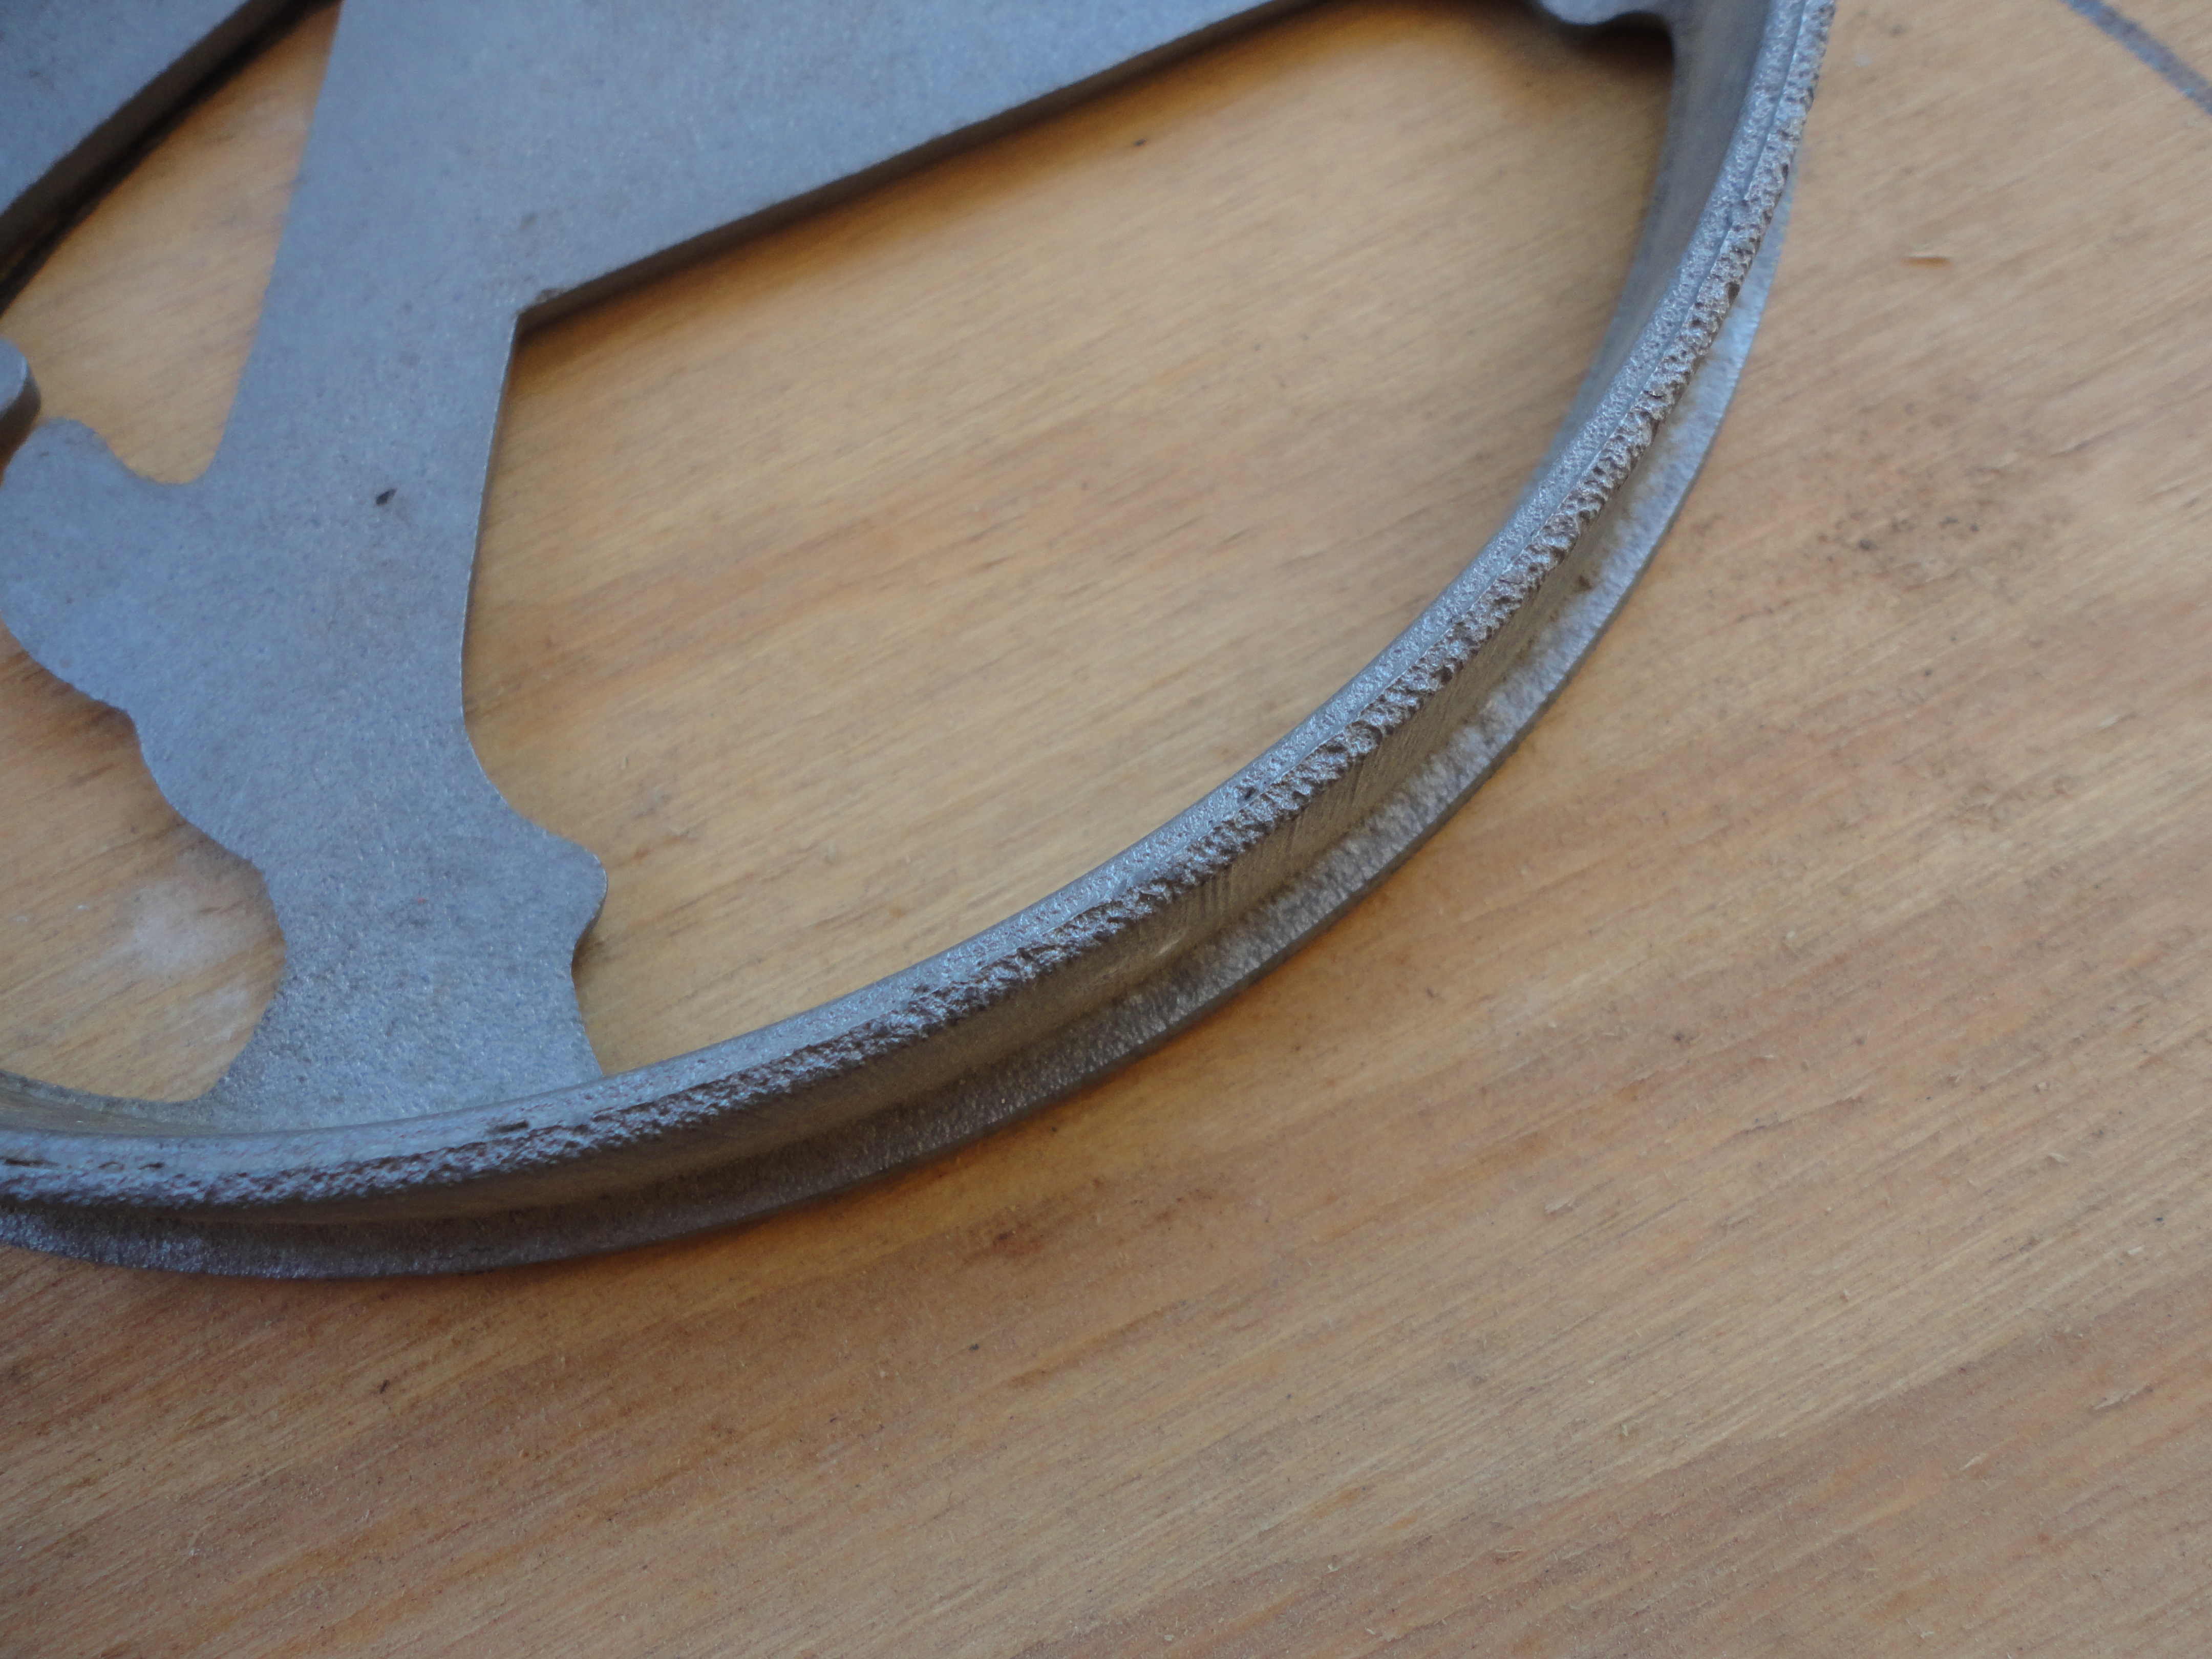
A cast aluminum “K”, from one of the first doors we replaced, has rested on a nail in my garage for a very long time. I’ve often looked at it as I pulled in, and thought, “I’m gonna find a good place for you someday.” That day finally came … it was the perfect “glassic touch”.
We began by tracing the inside rim of the aluminum piece on 1/2″ plywood, and cut it out with a band saw.
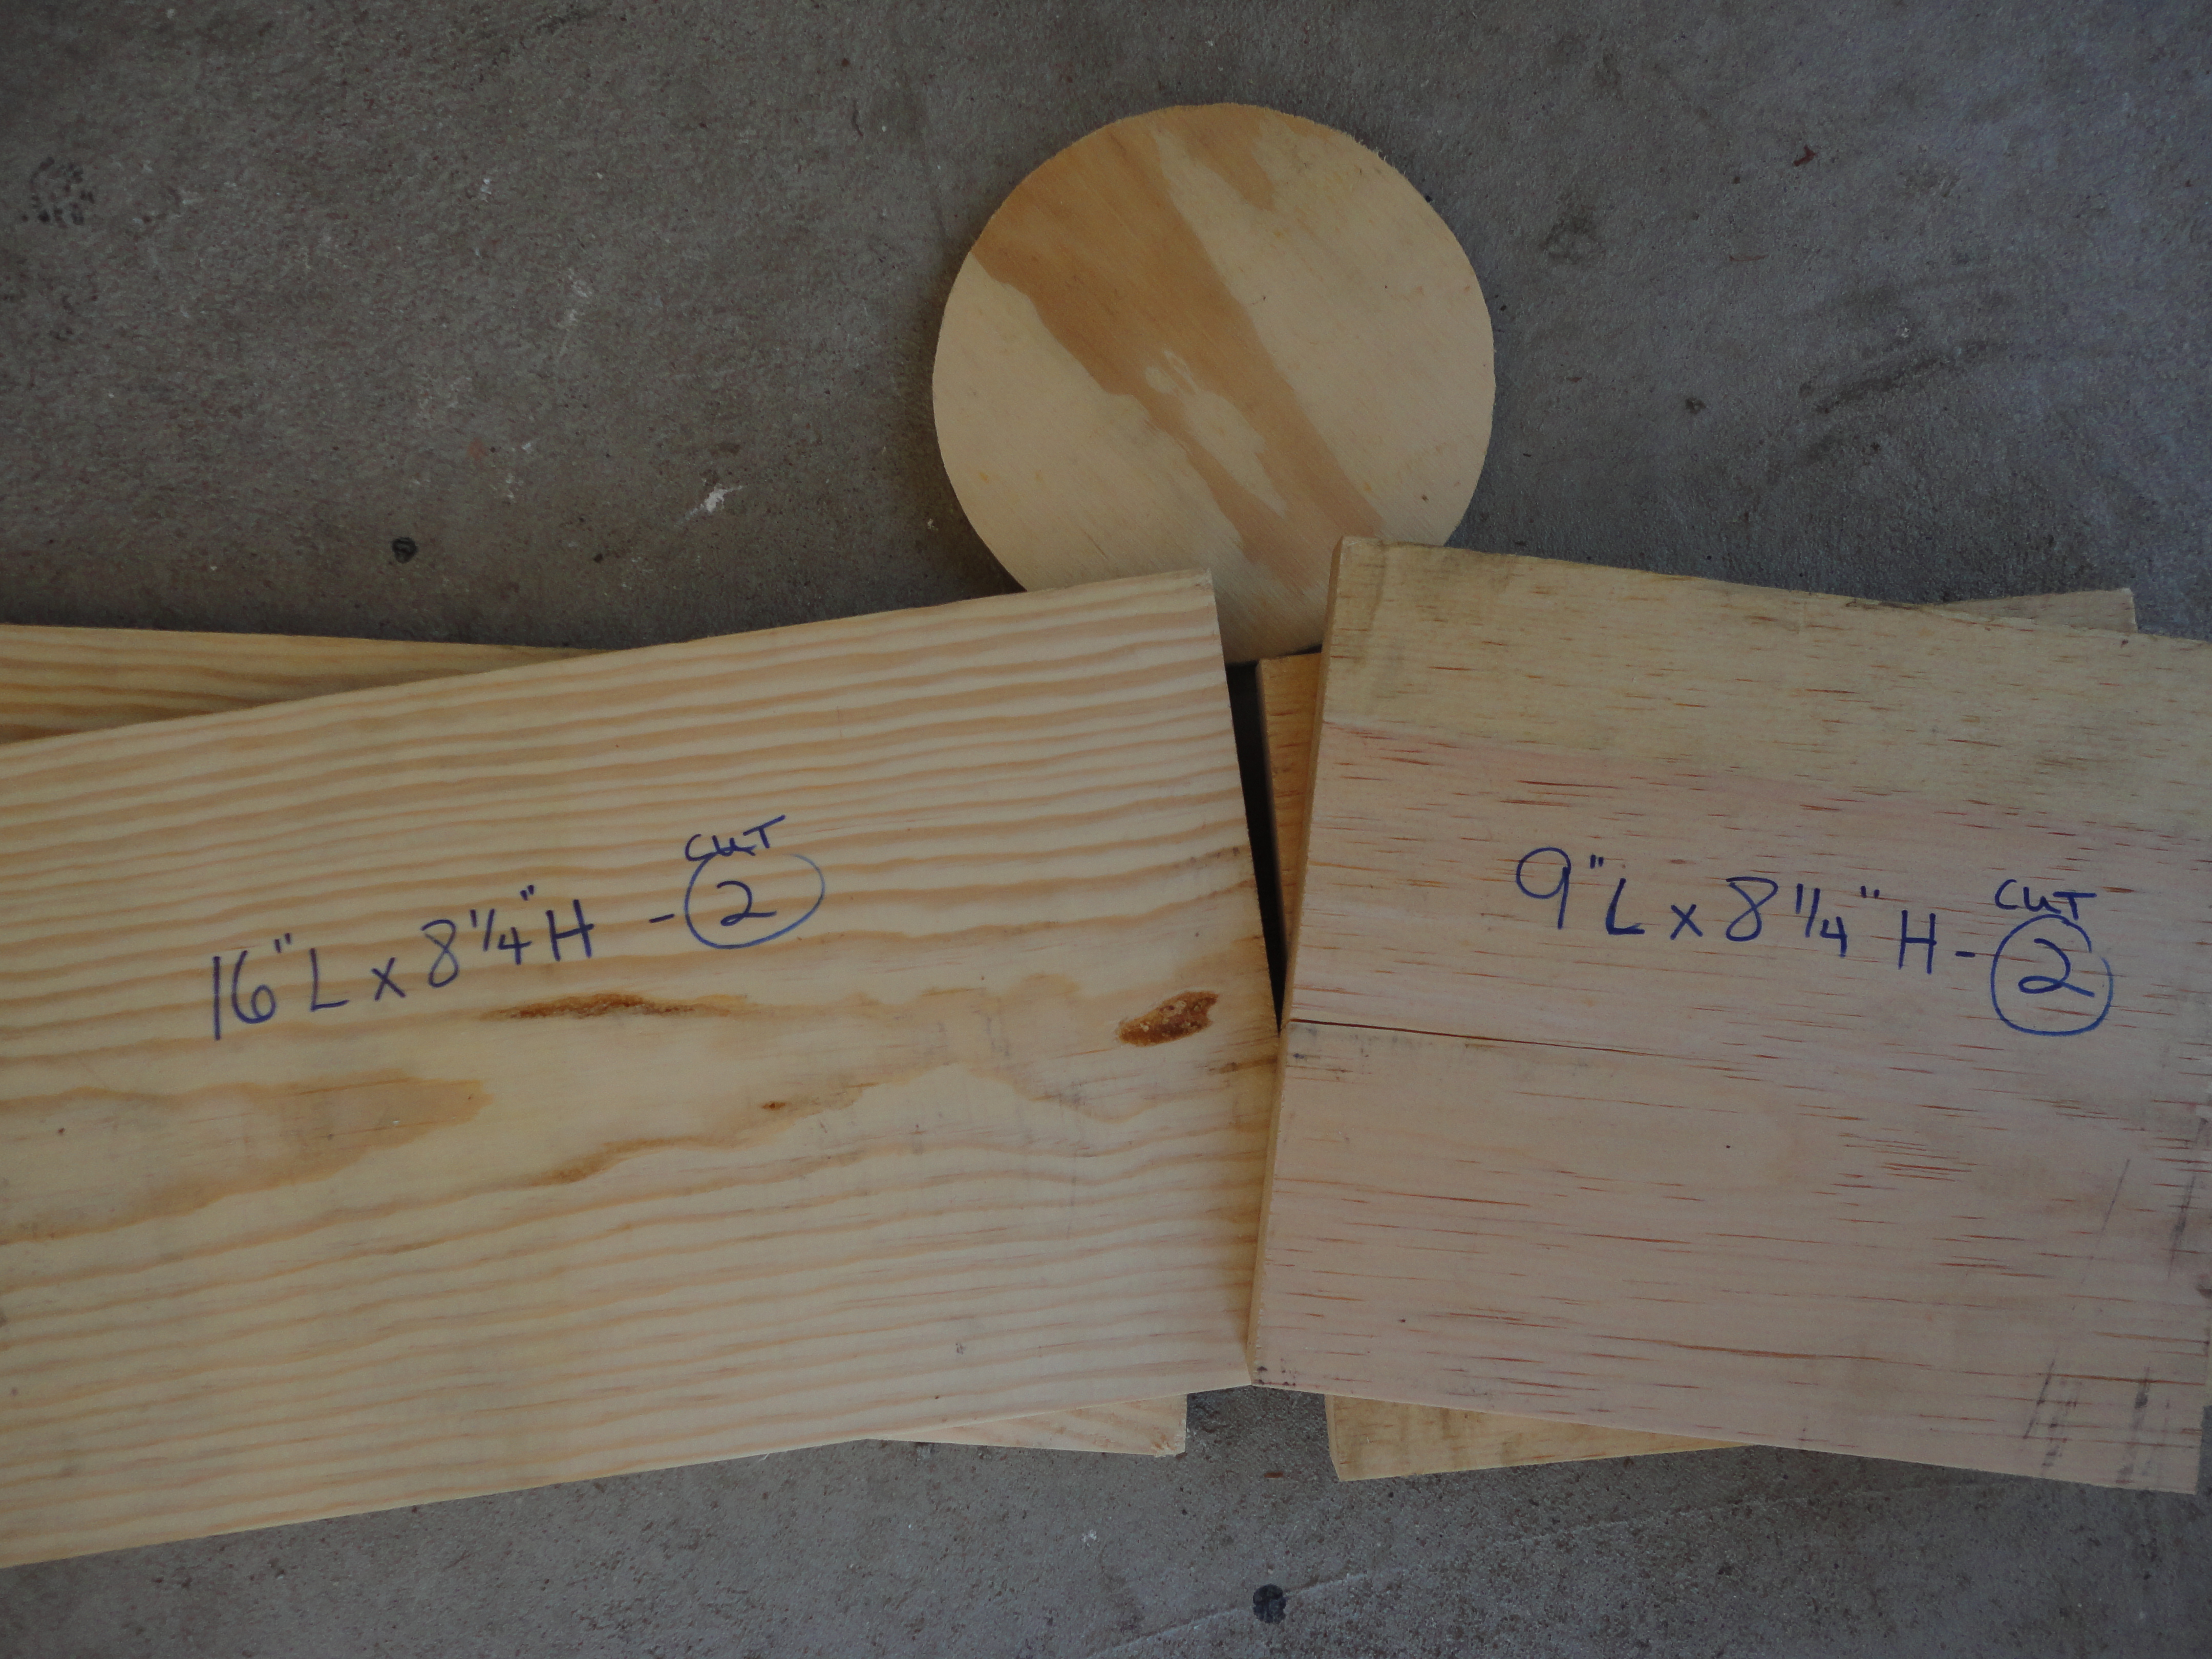
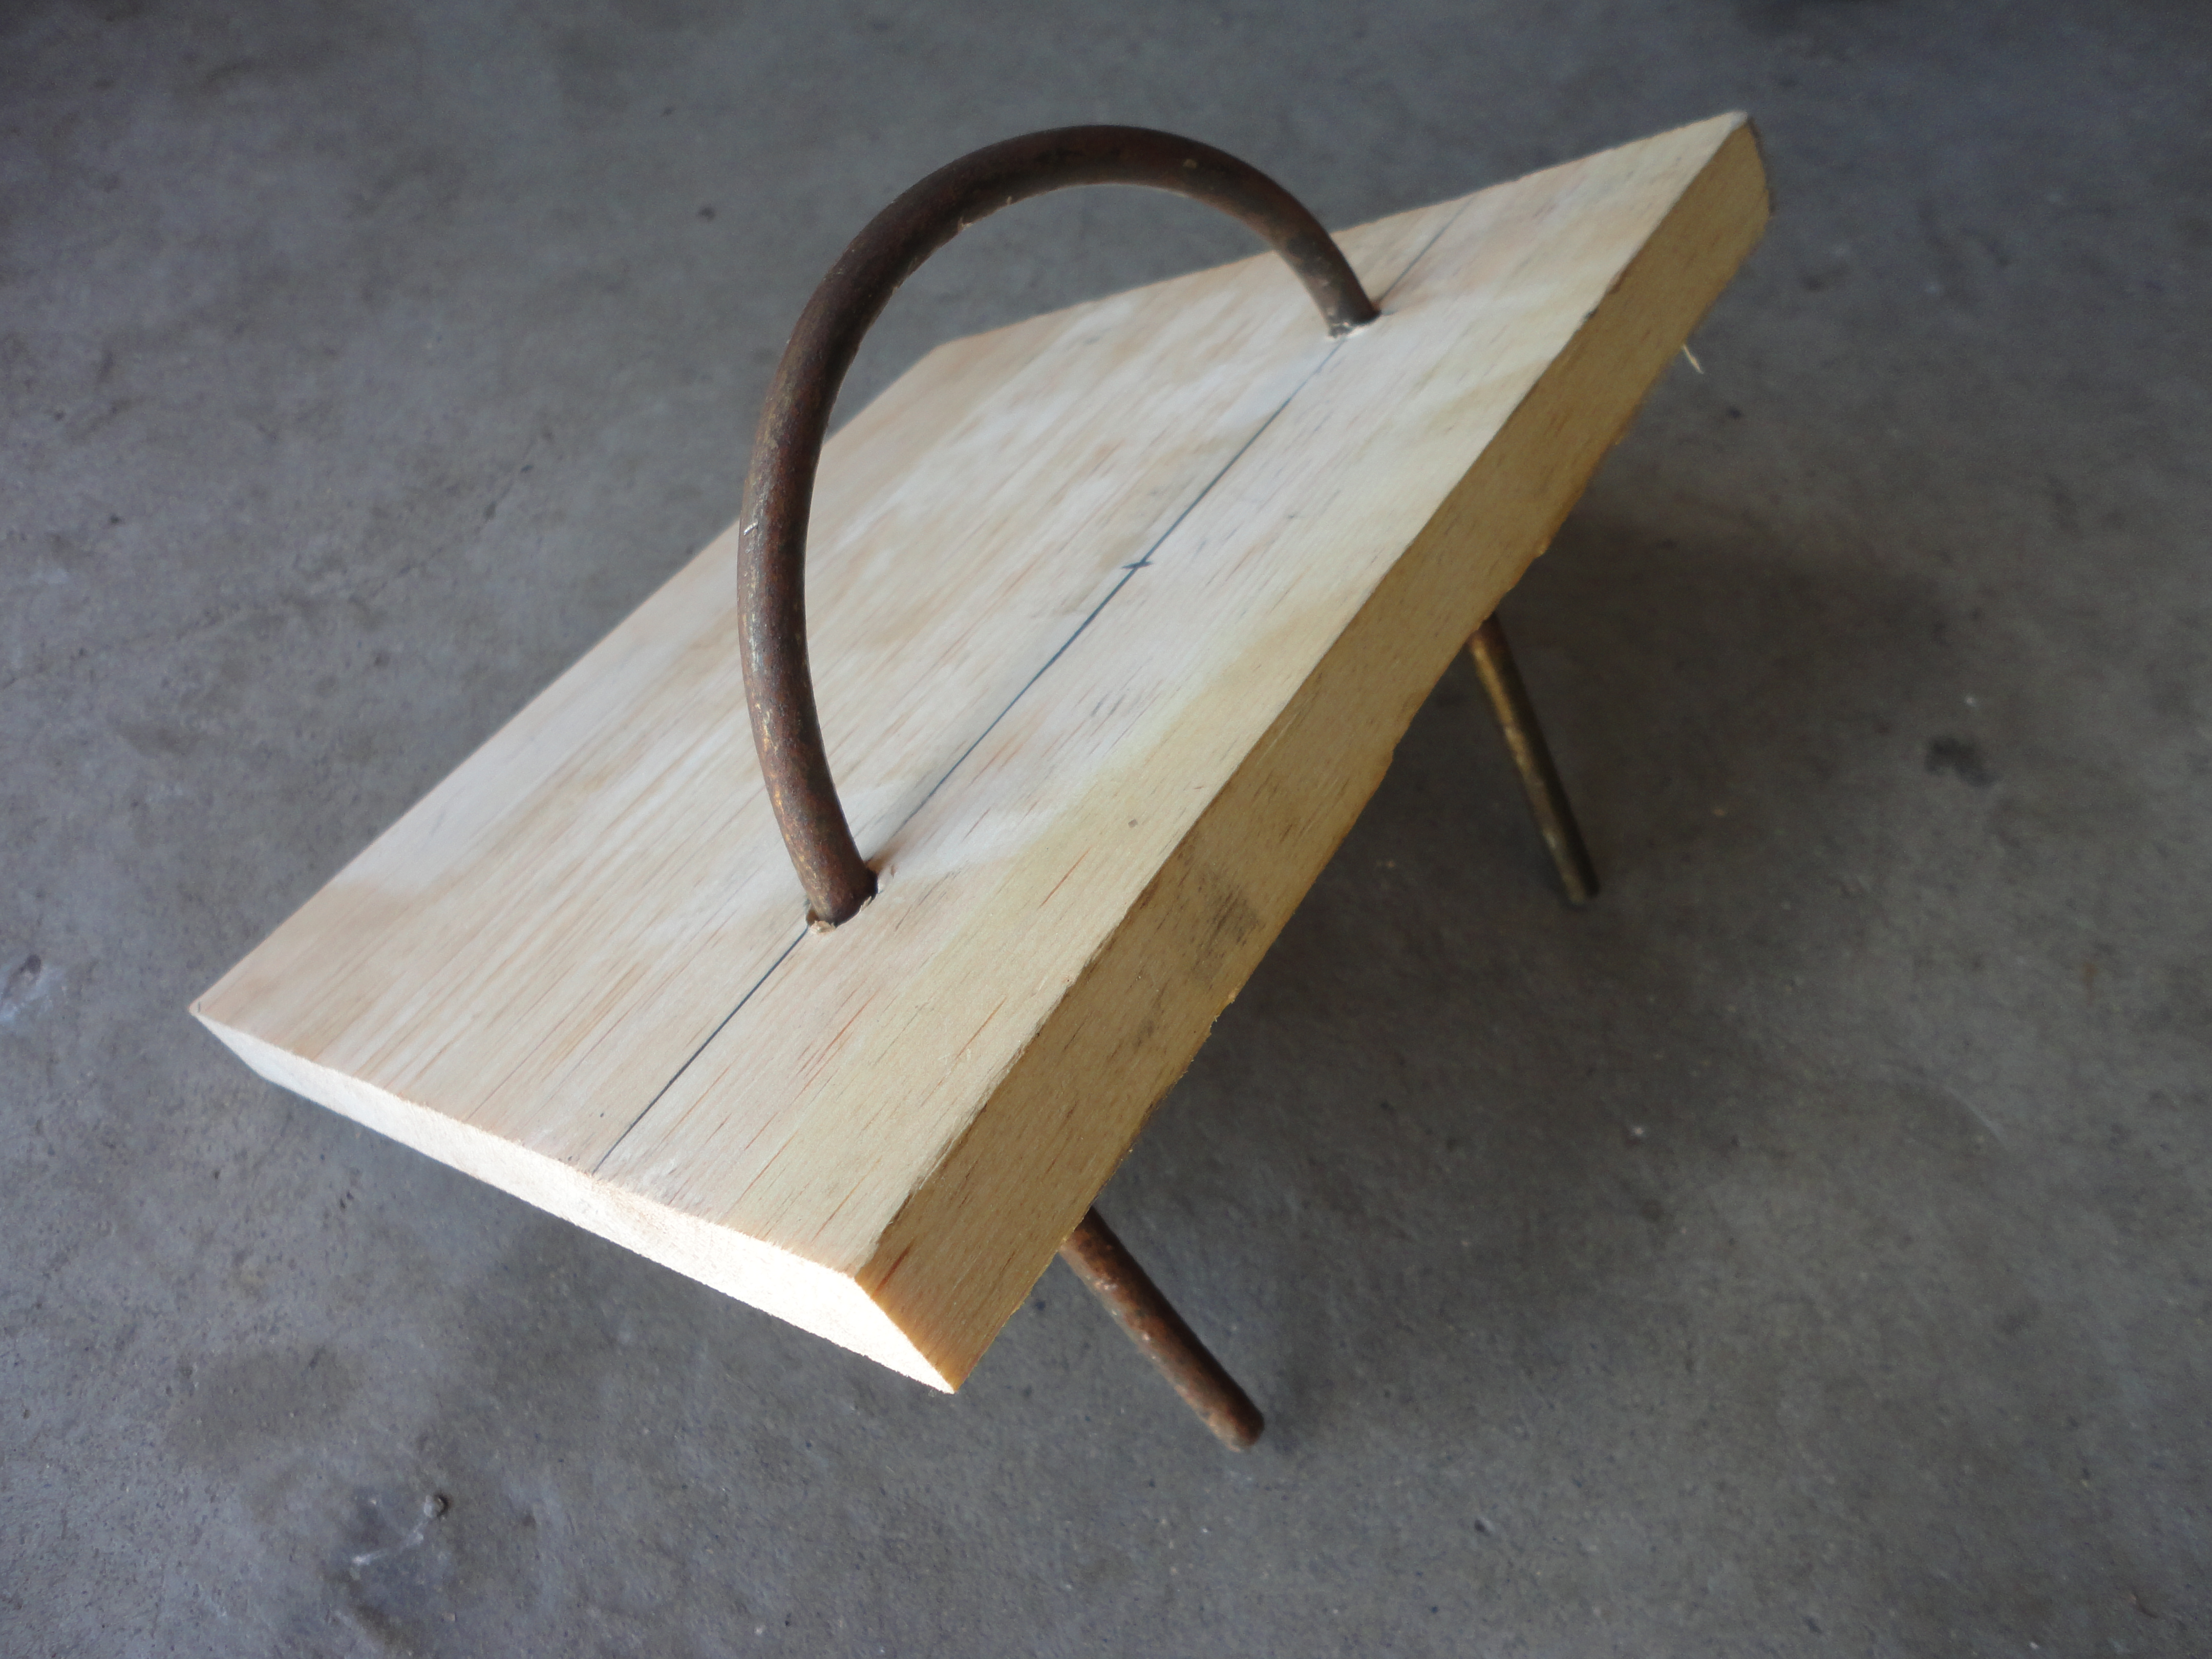
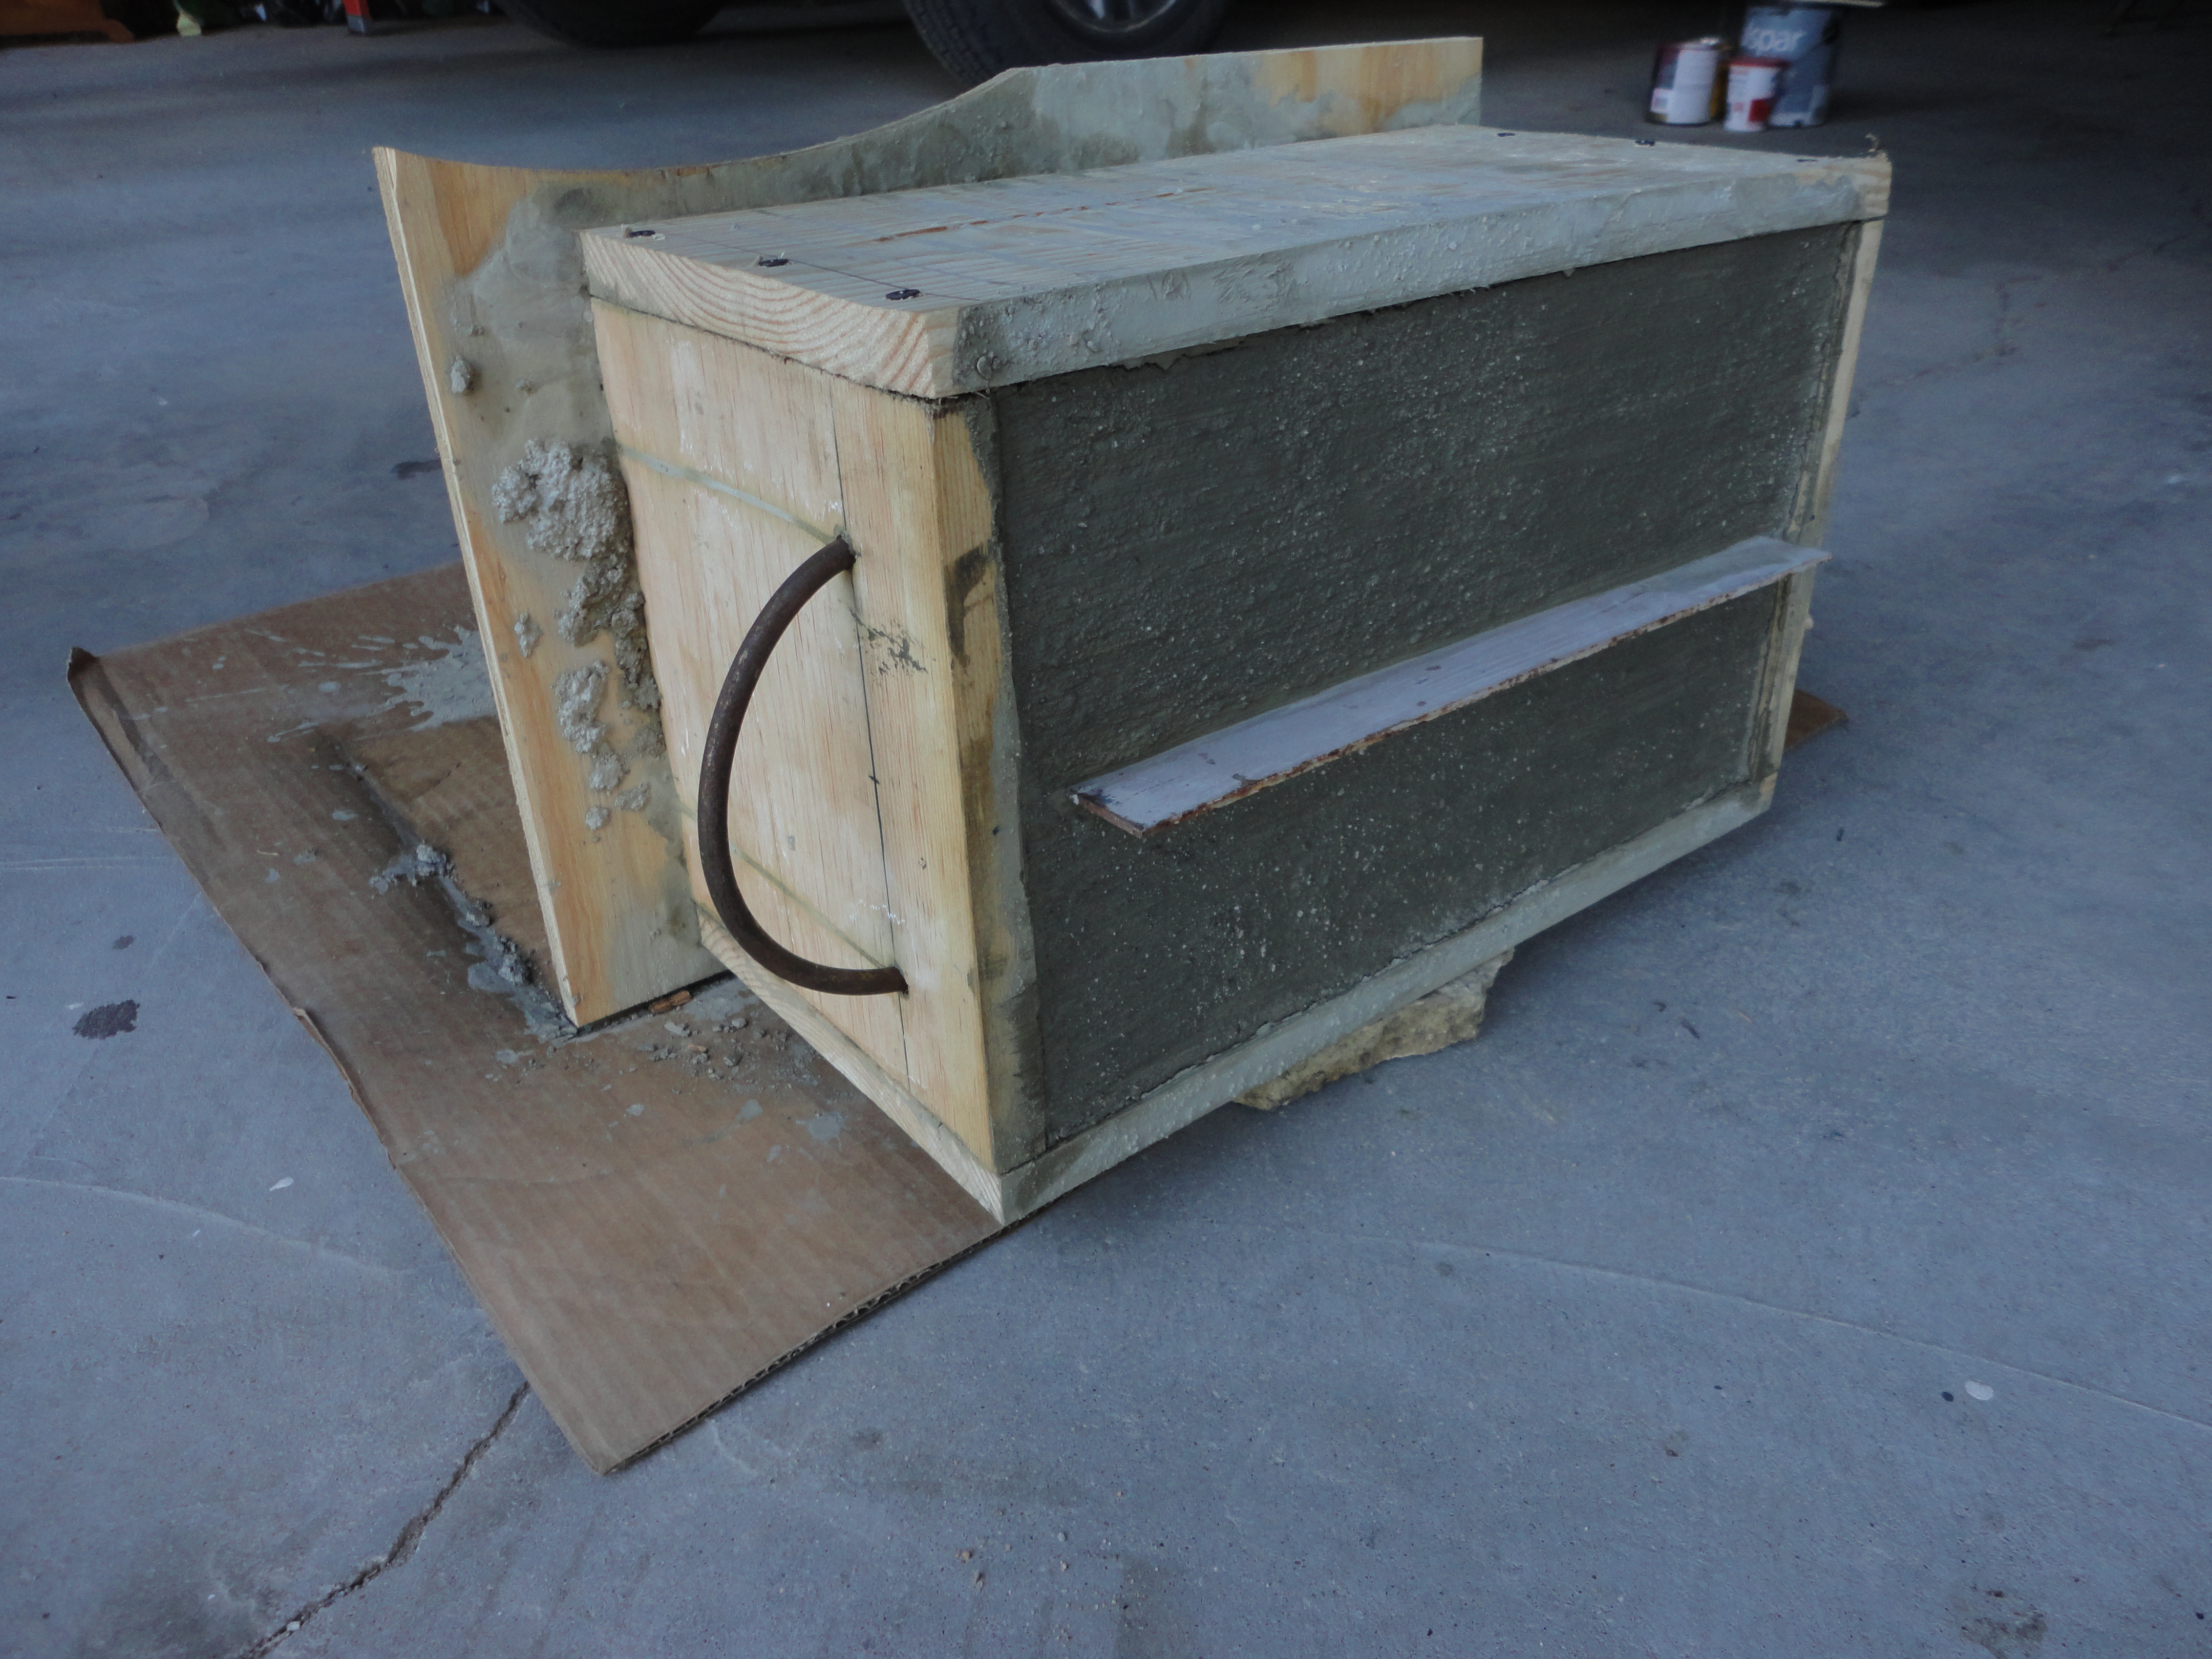
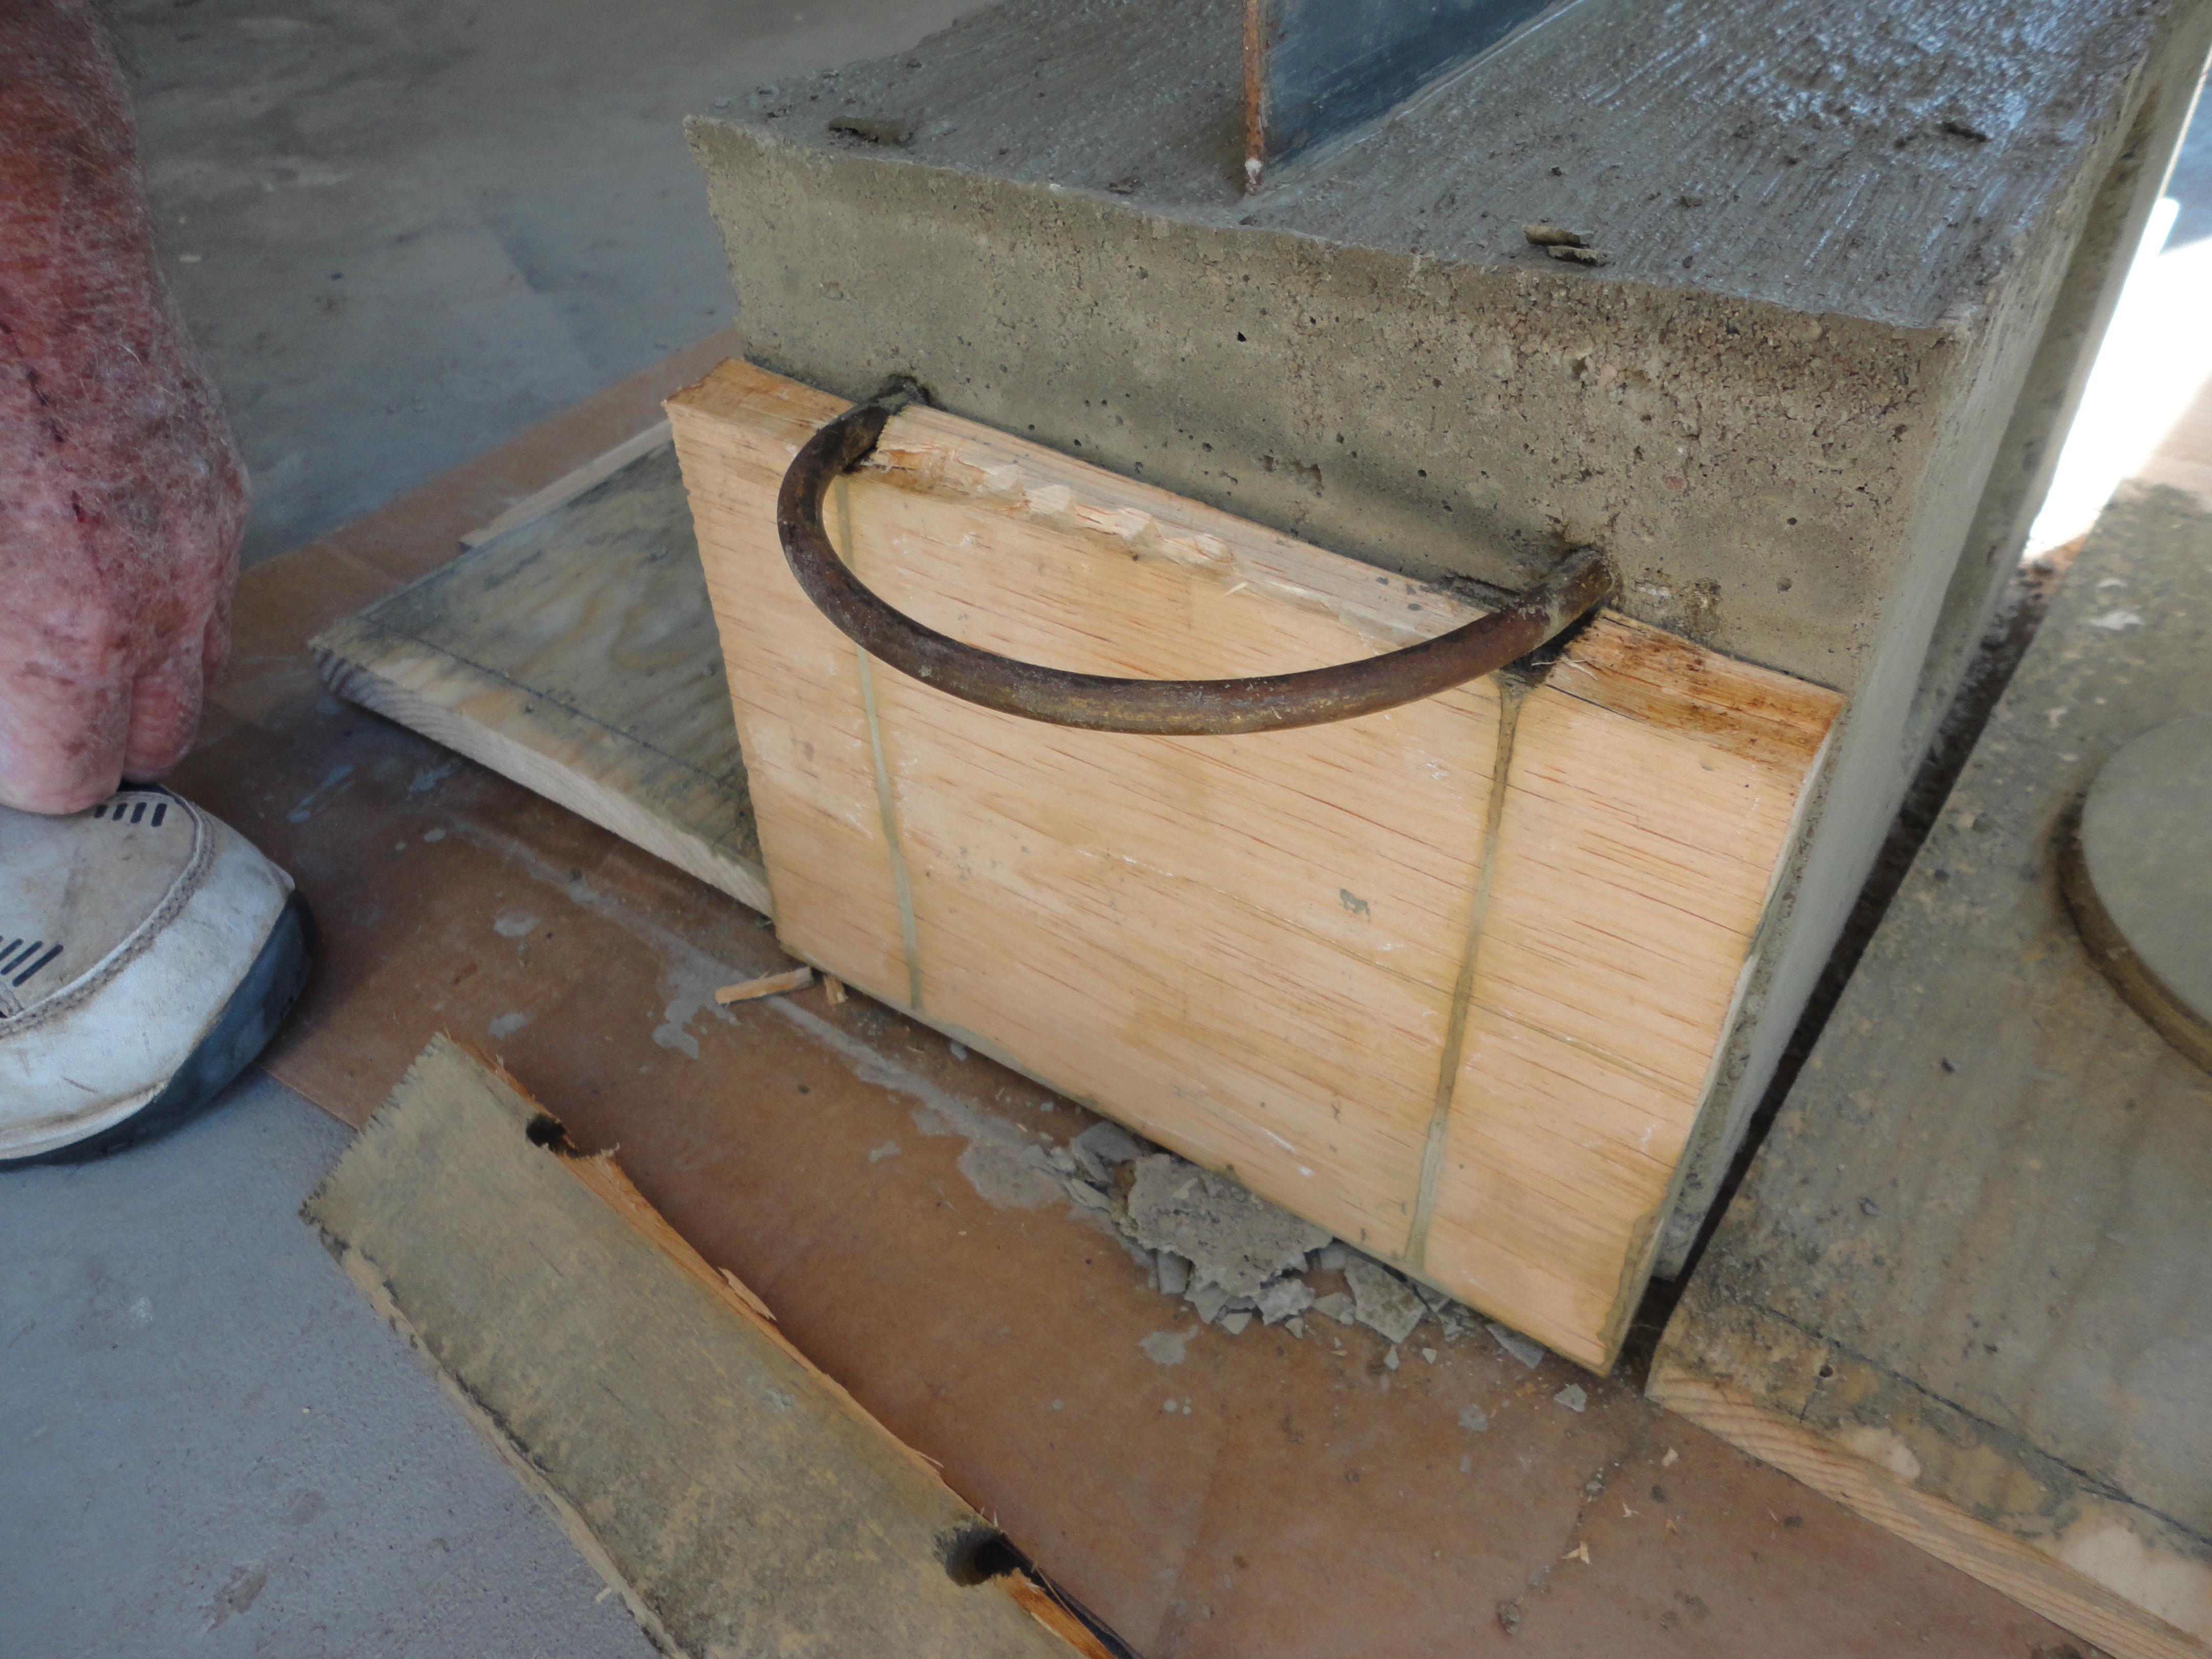
Box sides were cut from 1″x10″ pine boards, mindful that the wood grain ran horizontally on the end that the handle would be inserted in, so it can easily be split off later.
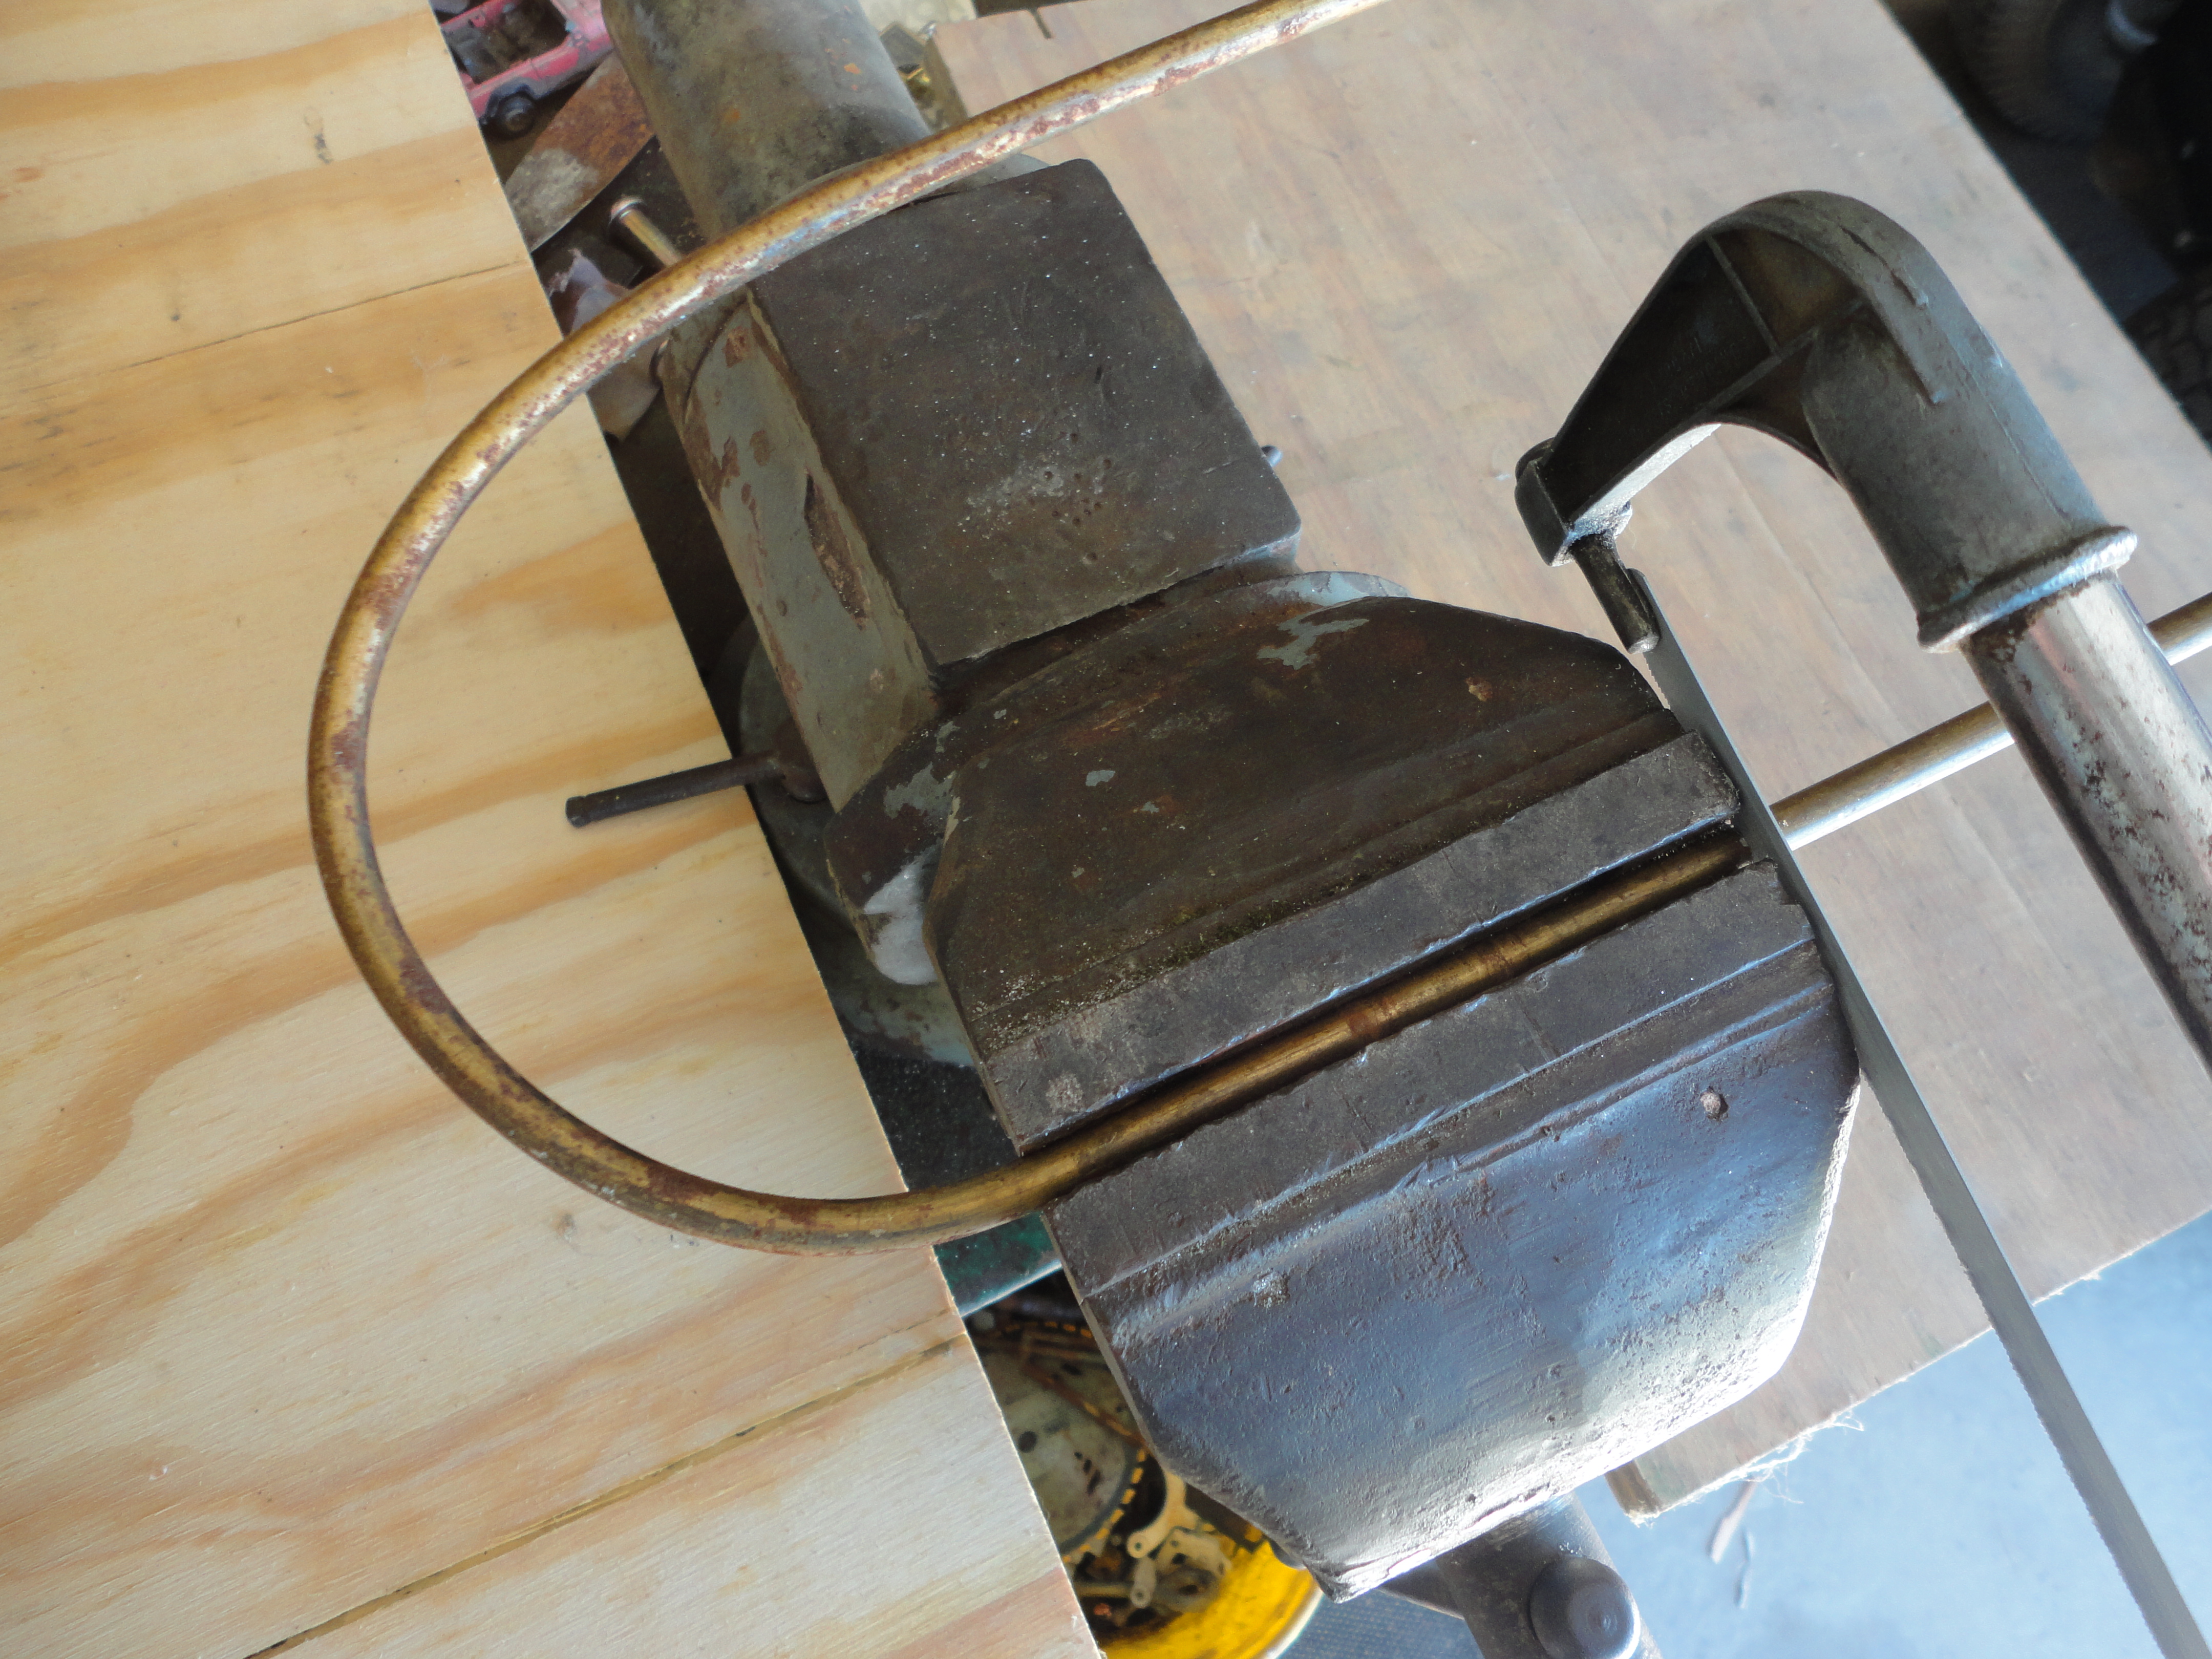
A length of 1/4″ steel rod was bent around a 5″ dia. pole, then put in a vice to trim off the ends with a hack saw. Once handle is shaped, mark the wood for placement and predrill holes. Make sure it slides in easily and fits snugly.
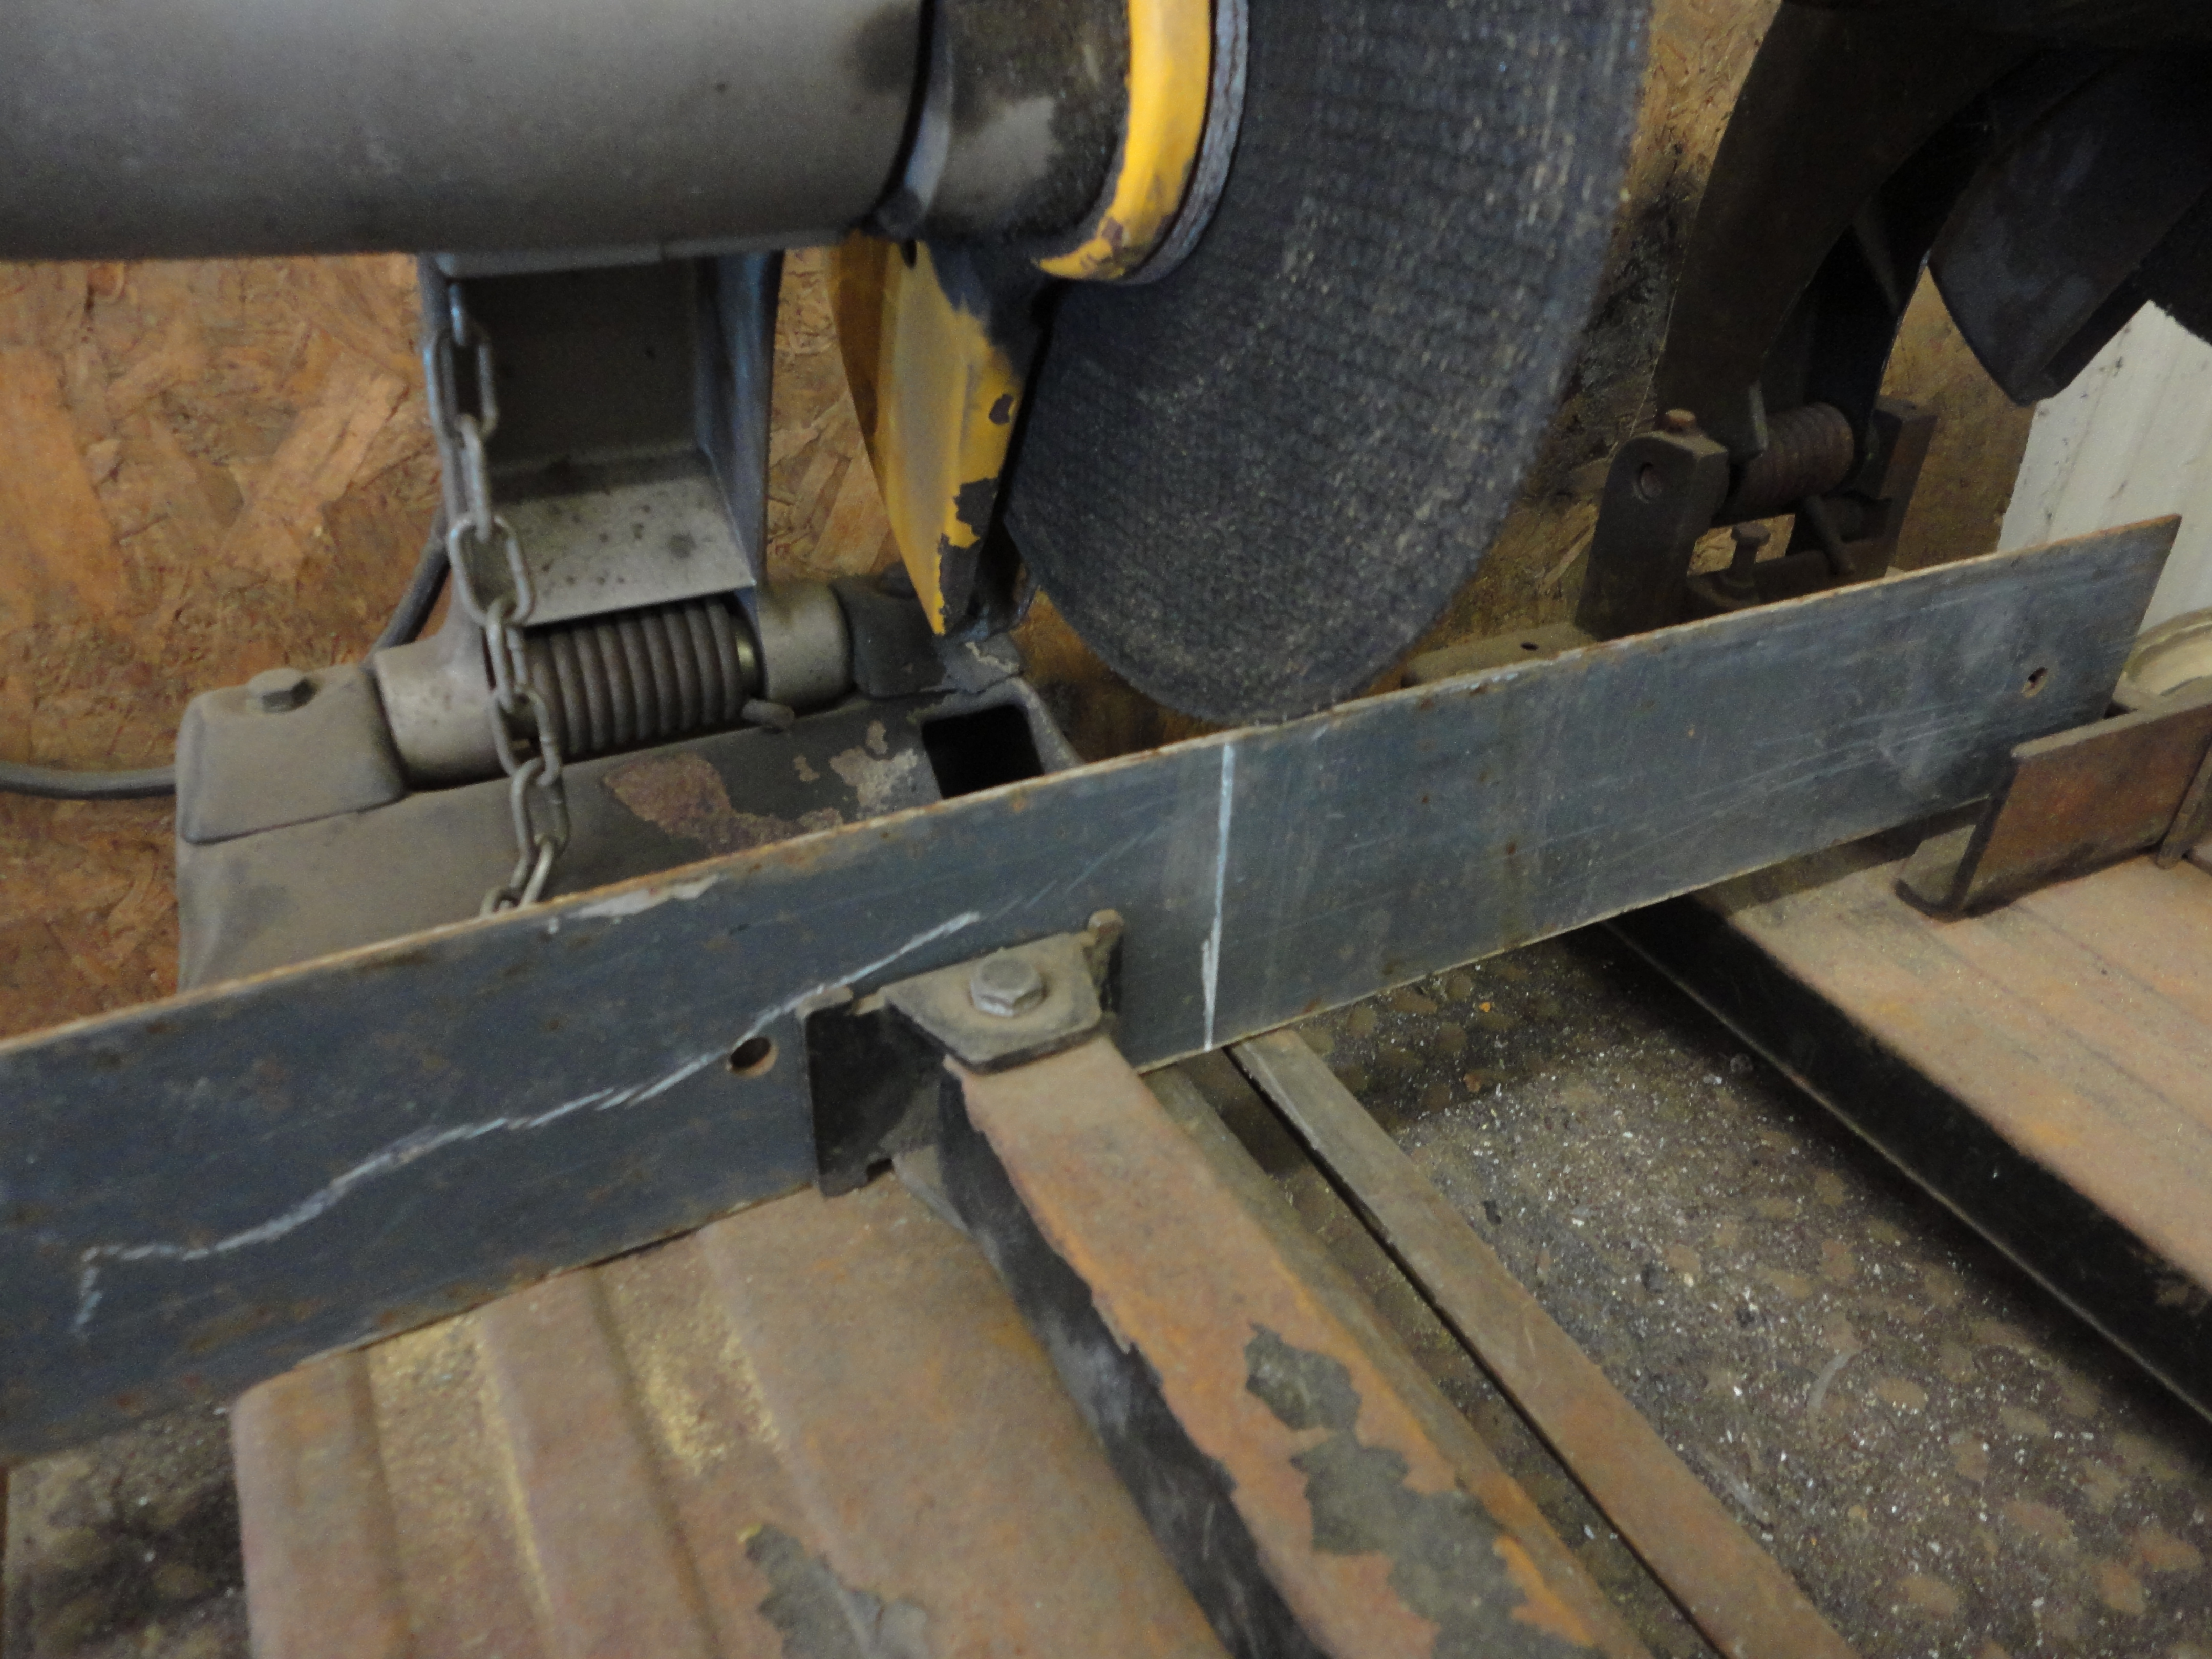
With a chop saw, or hack saw, cut a scrap piece of 1/8″ thick steel. Ours was 3″ wide and approximately 13″ long.
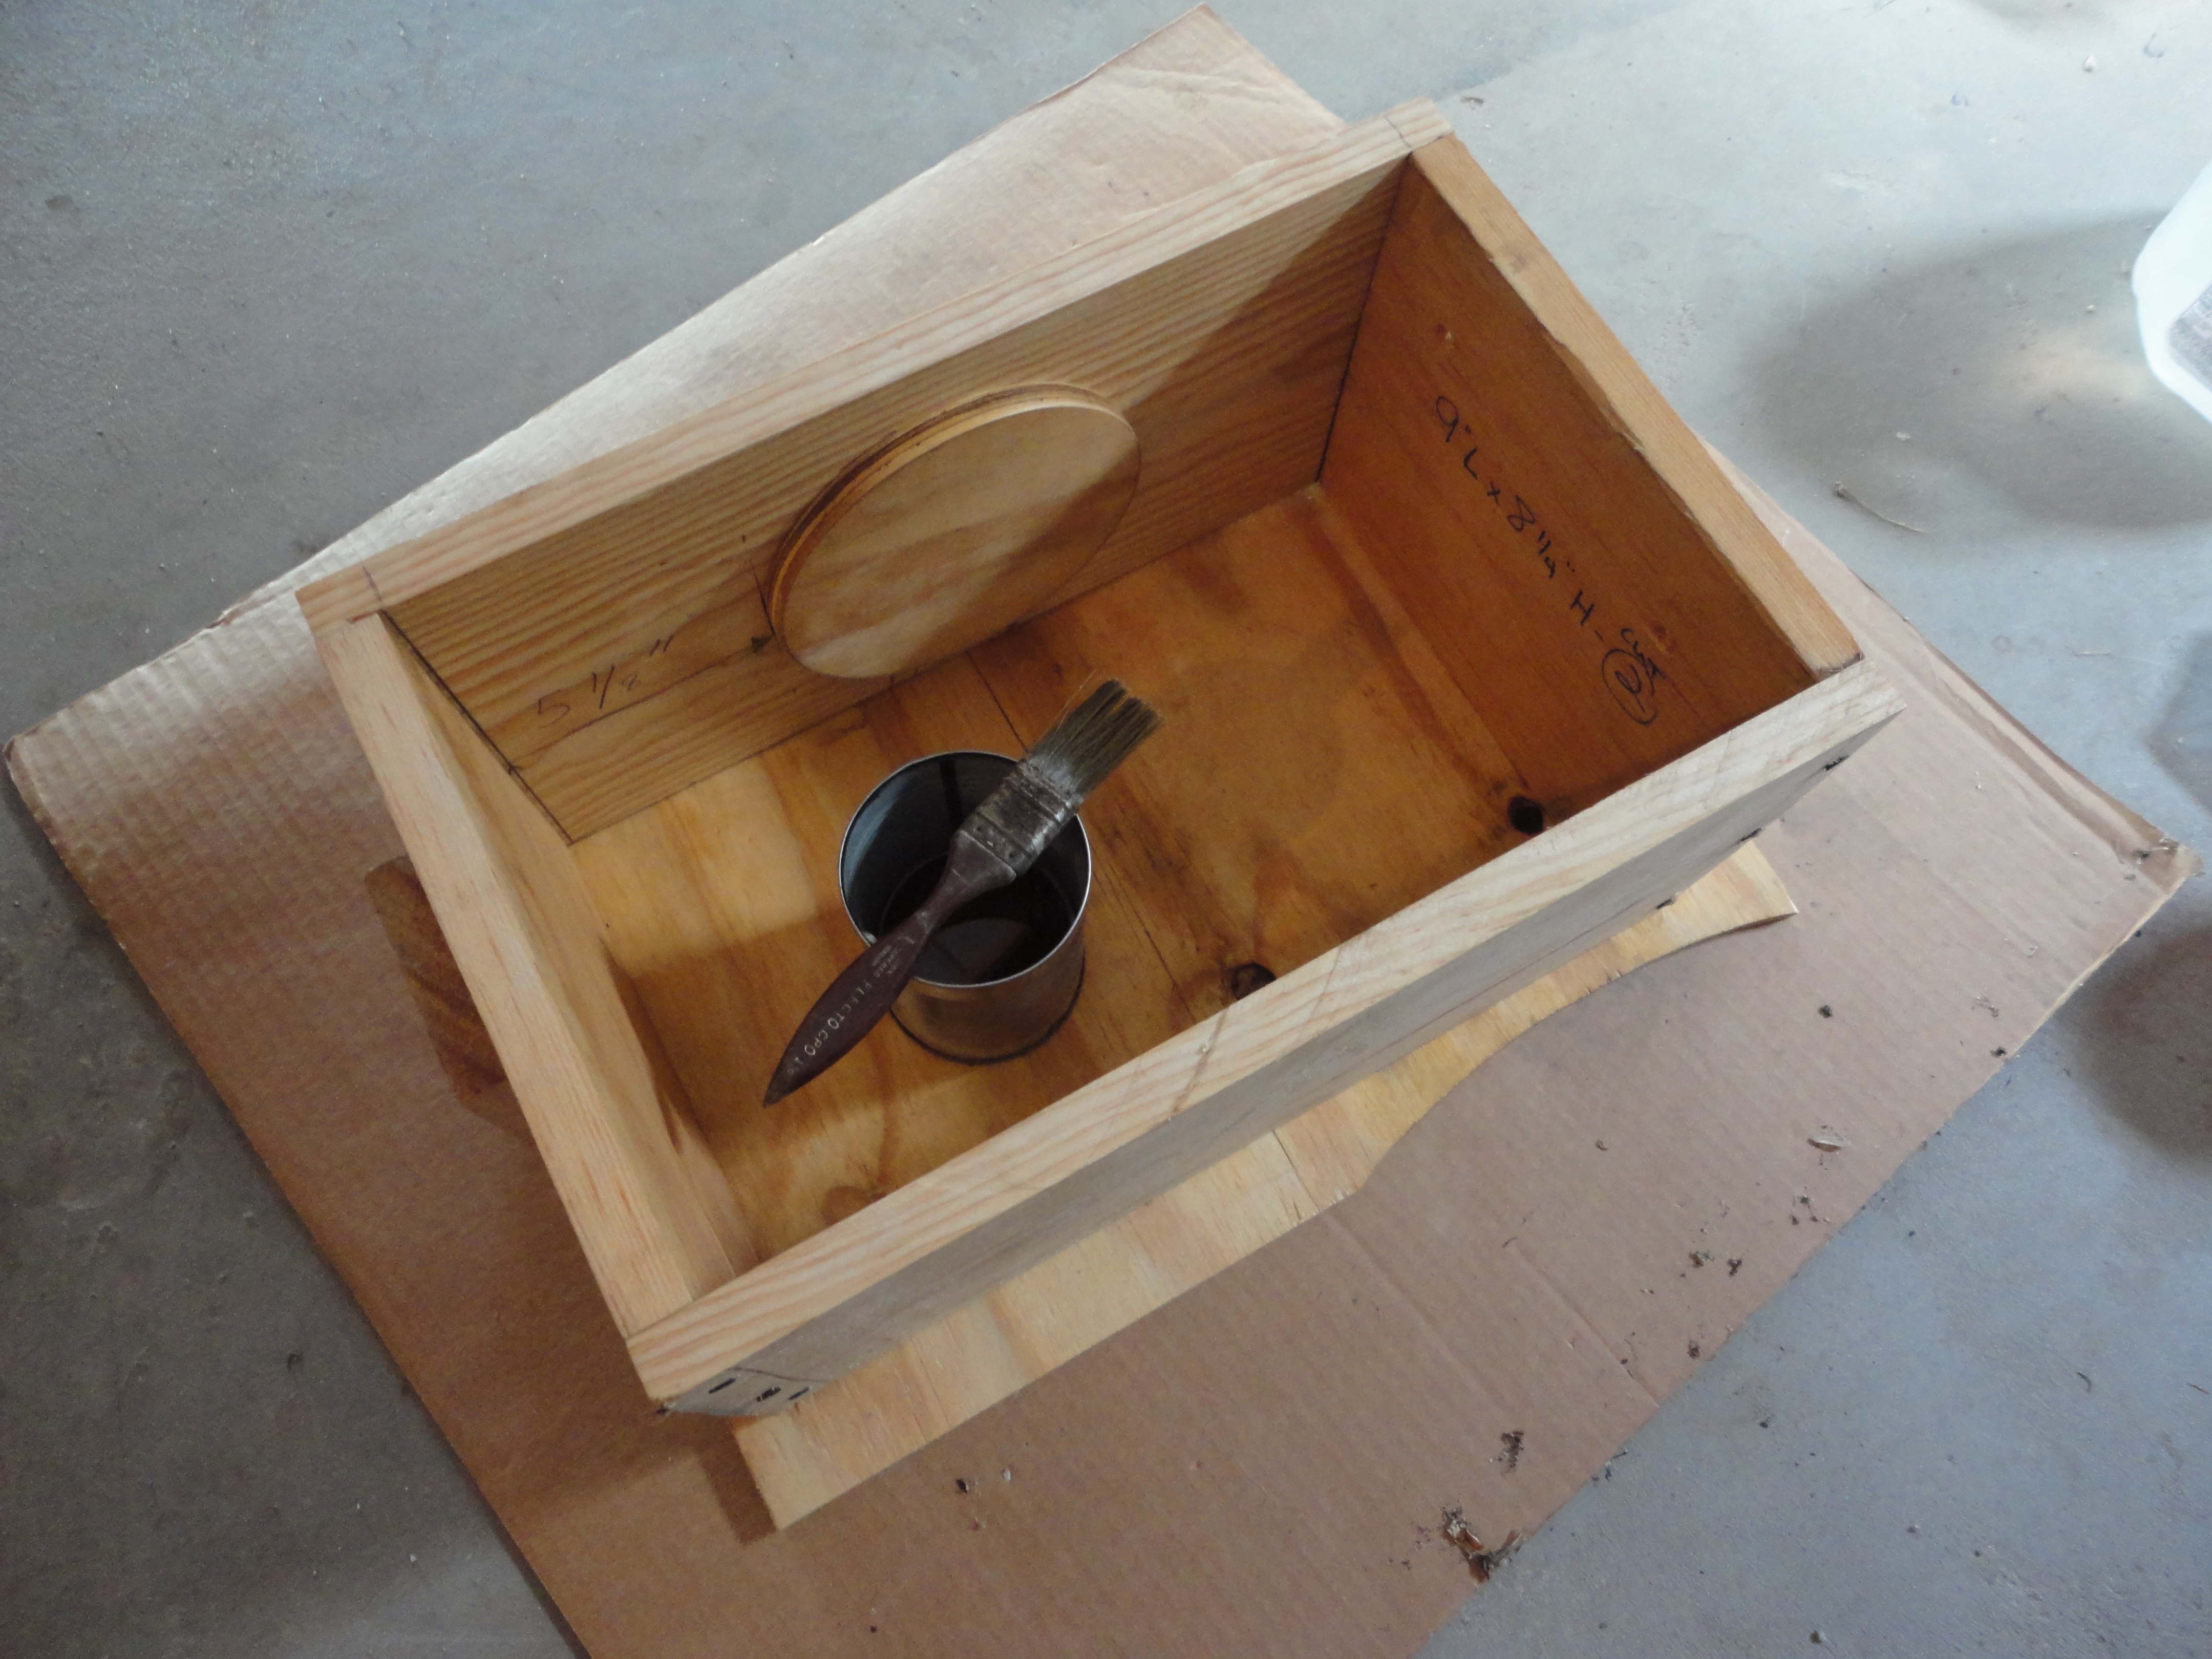
Center and attach the circle of plywood to the inside front piece of wood, then screw the box together. Its important to keep the top edges of the box even, so the concrete can be leveled off after its poured. Attach a piece of scrap plywood to the bottom of the assembled box, and give the inside a coat of diesel fuel to prevent the concrete from sticking. Putting a large piece of cardboard under the box will catch any leaking concrete, and make it easier to move around, if needed.

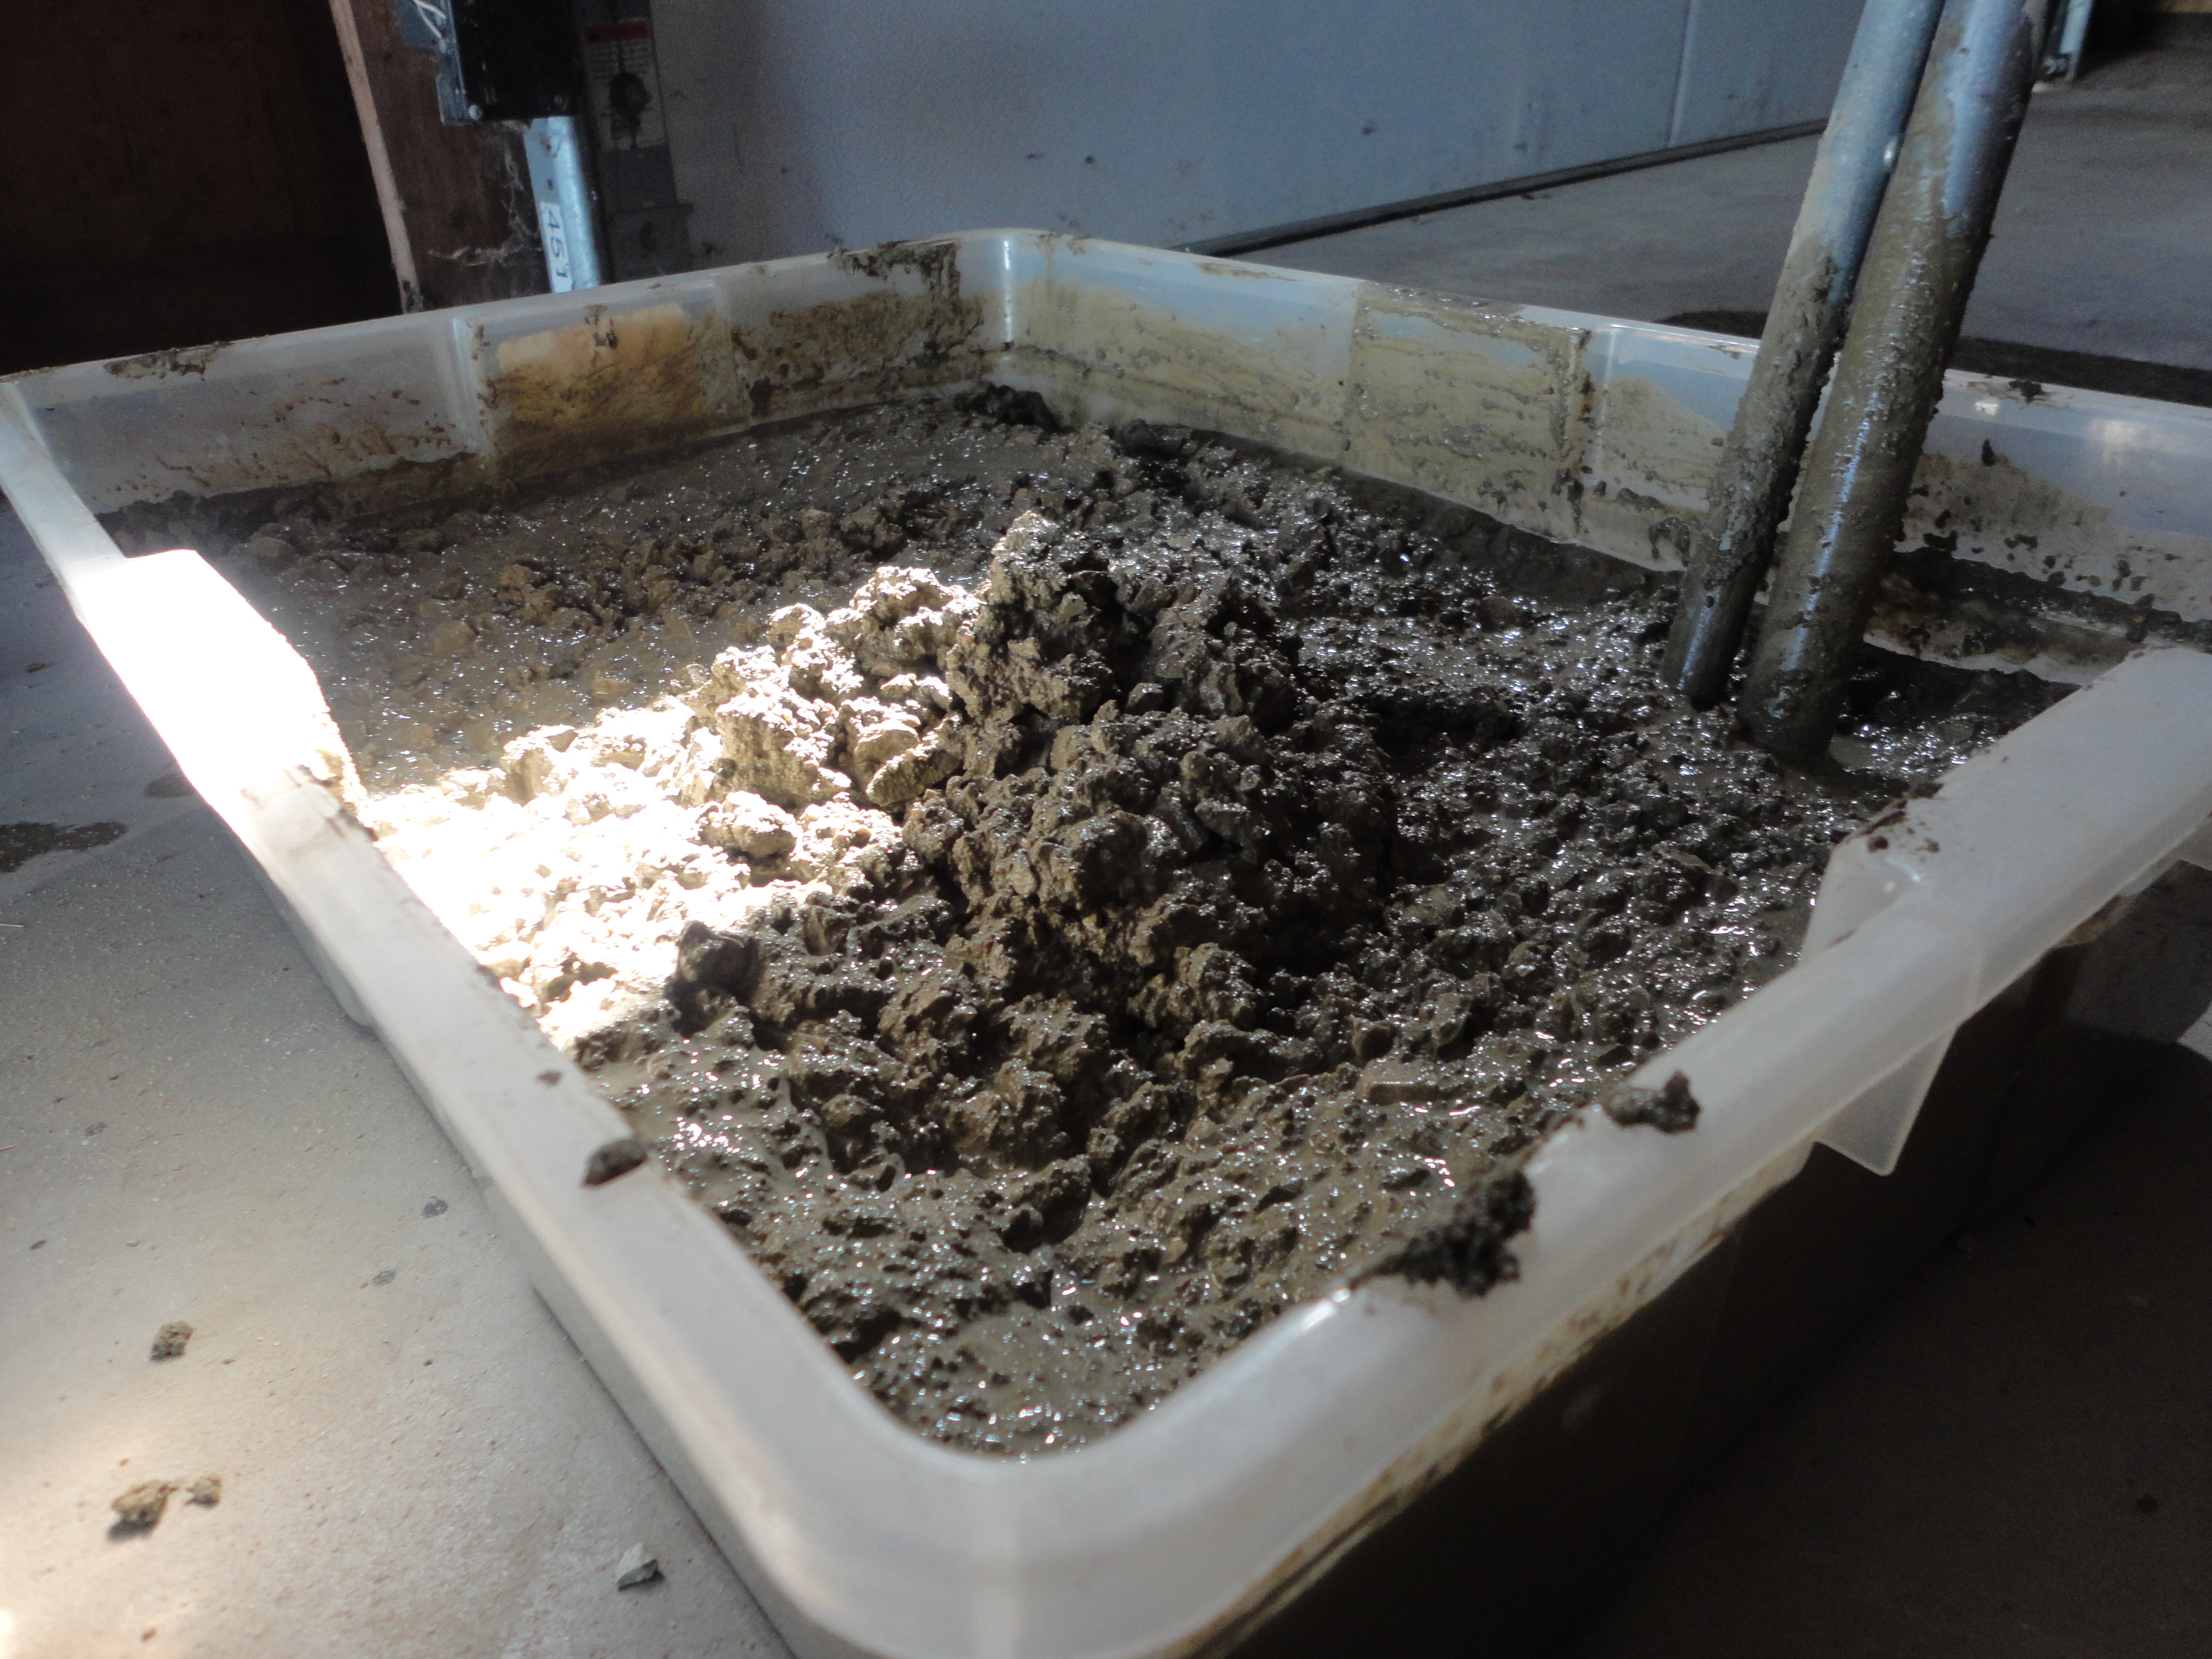
You’ll appreciate an extra pair of hands, and something sturdy to stir with, when mixing up an 80 lb. bag of Quikrete. We used about 1 1/4 gal. of water and mixed it well.
Scoop the concrete in the box. Use whatever you stirred with, or a paint stick, to tamp and work it down as you fill, especially around the outside edges, to help obtain a smooth finish on the sides when it has dried.
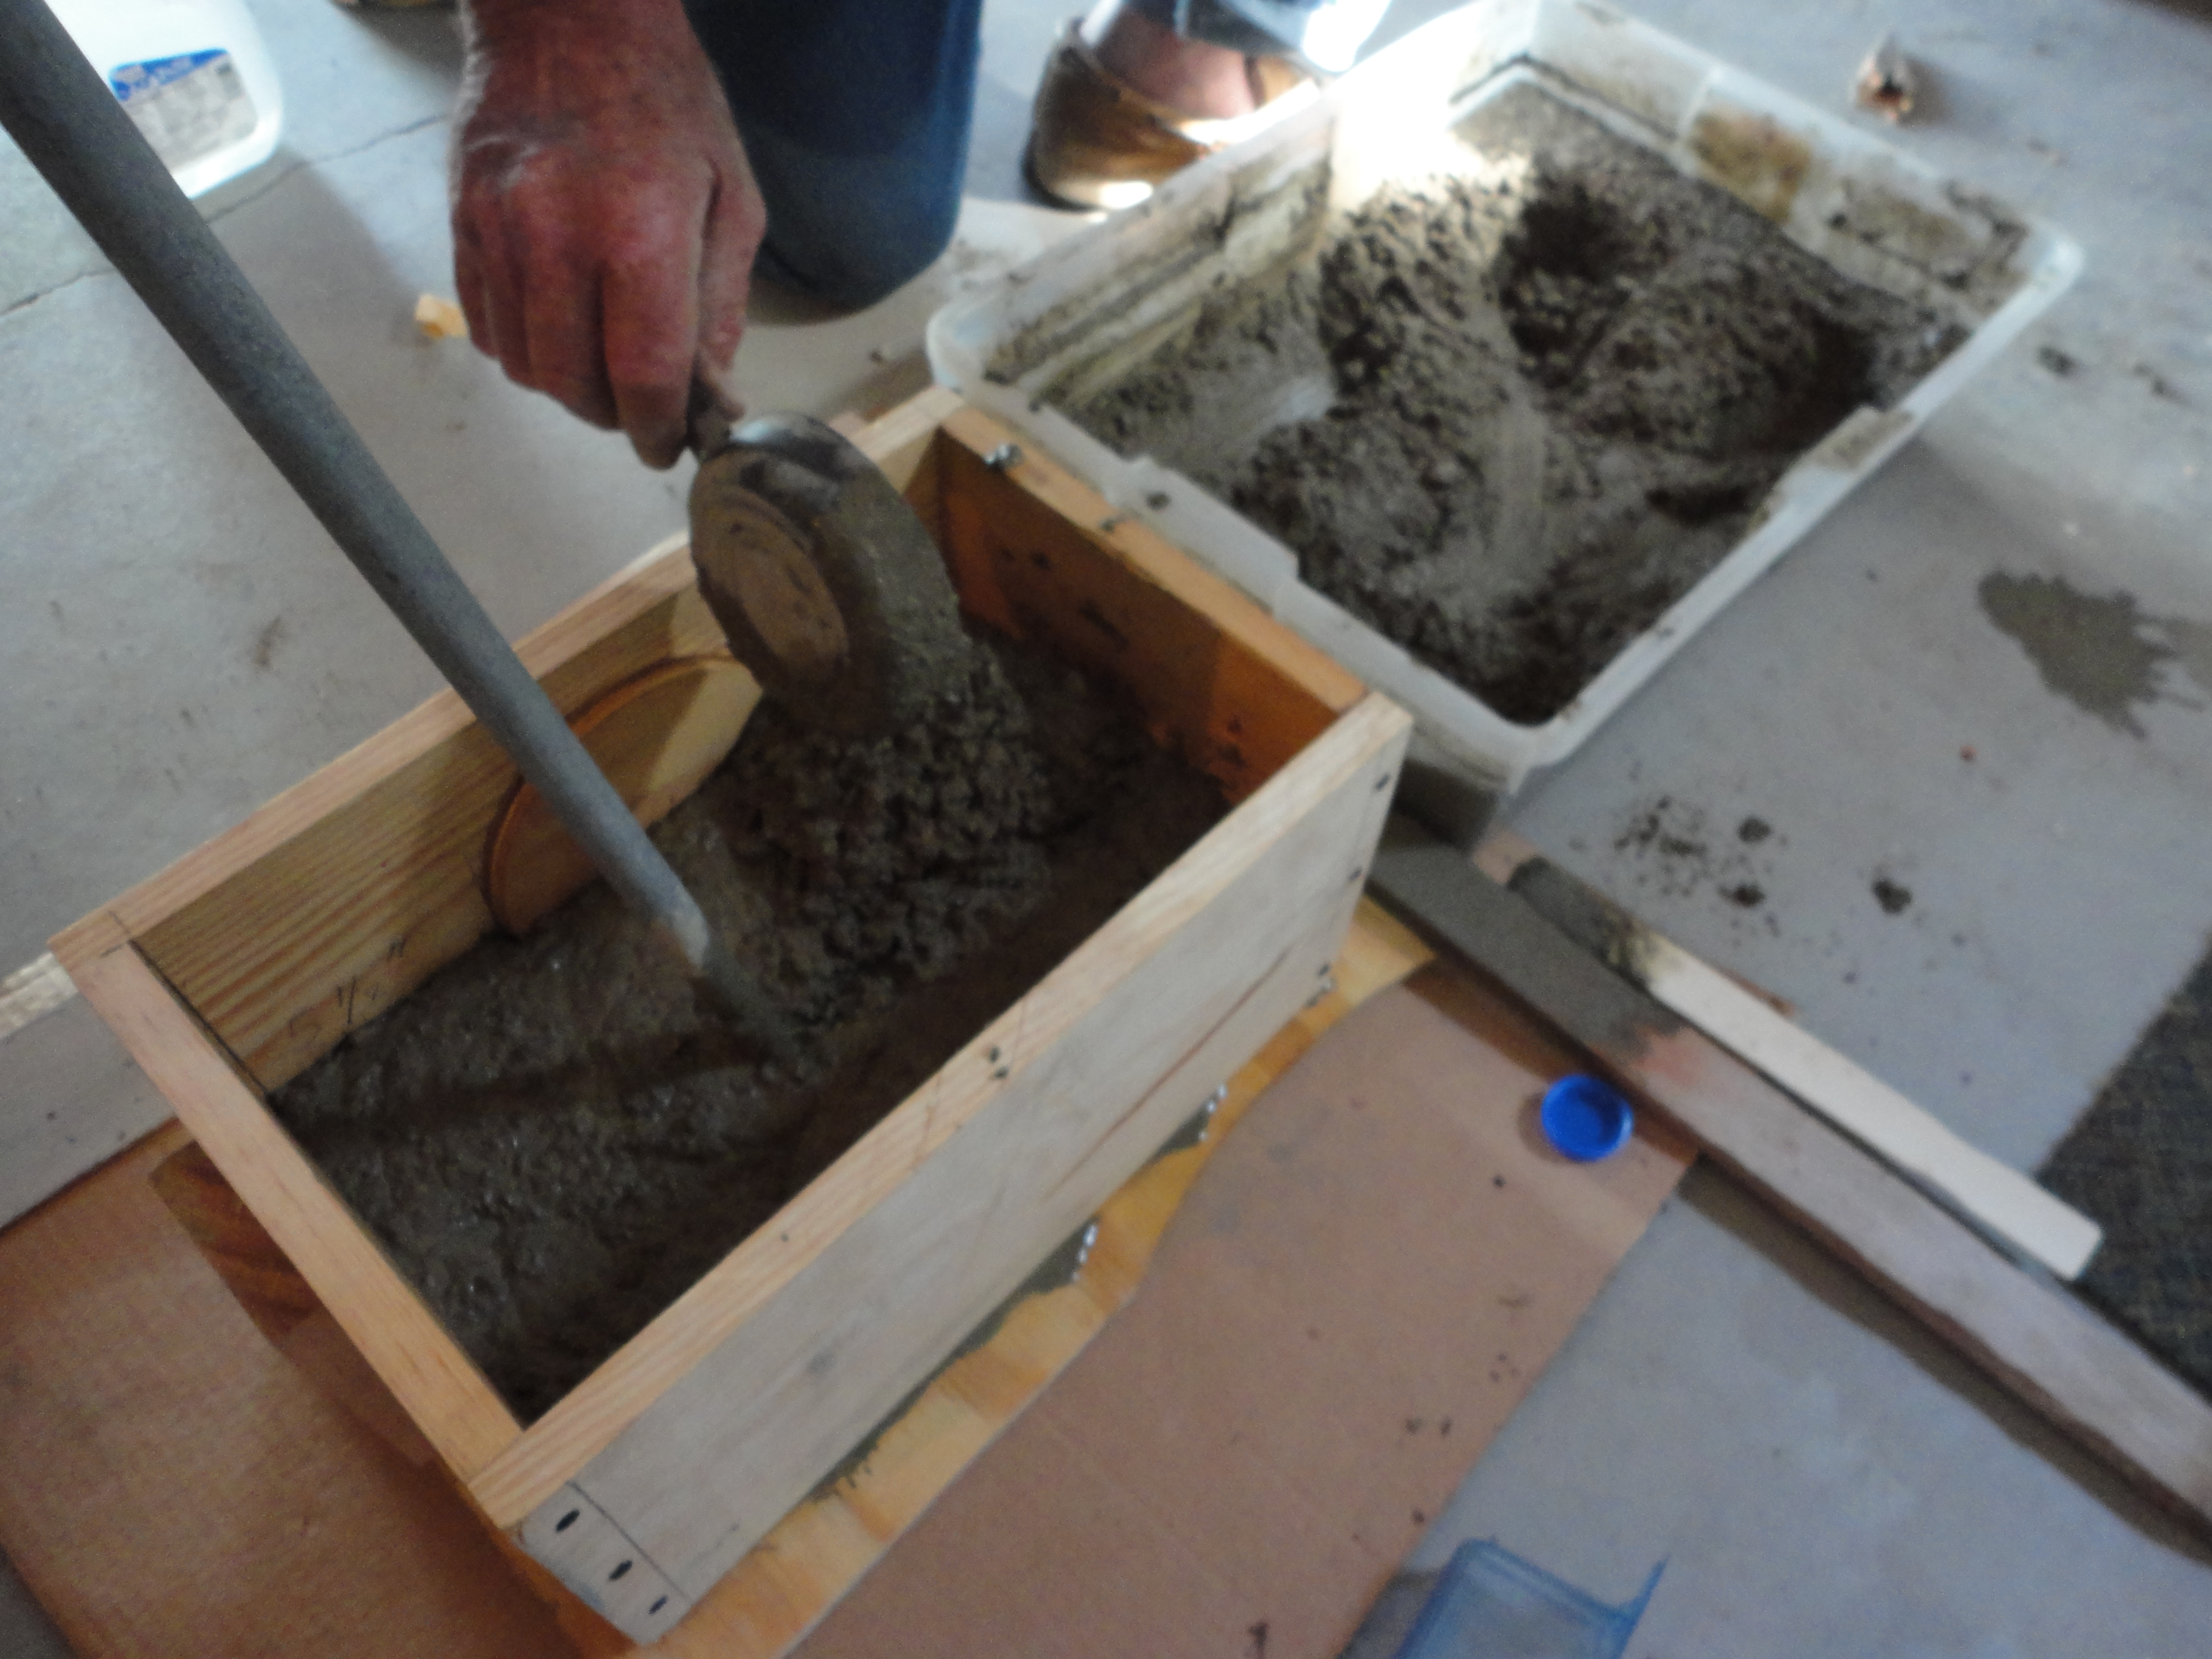
After filling and tamping, slide the edge of a paint stick across the top to level. Insert the handle into the predrilled holes.
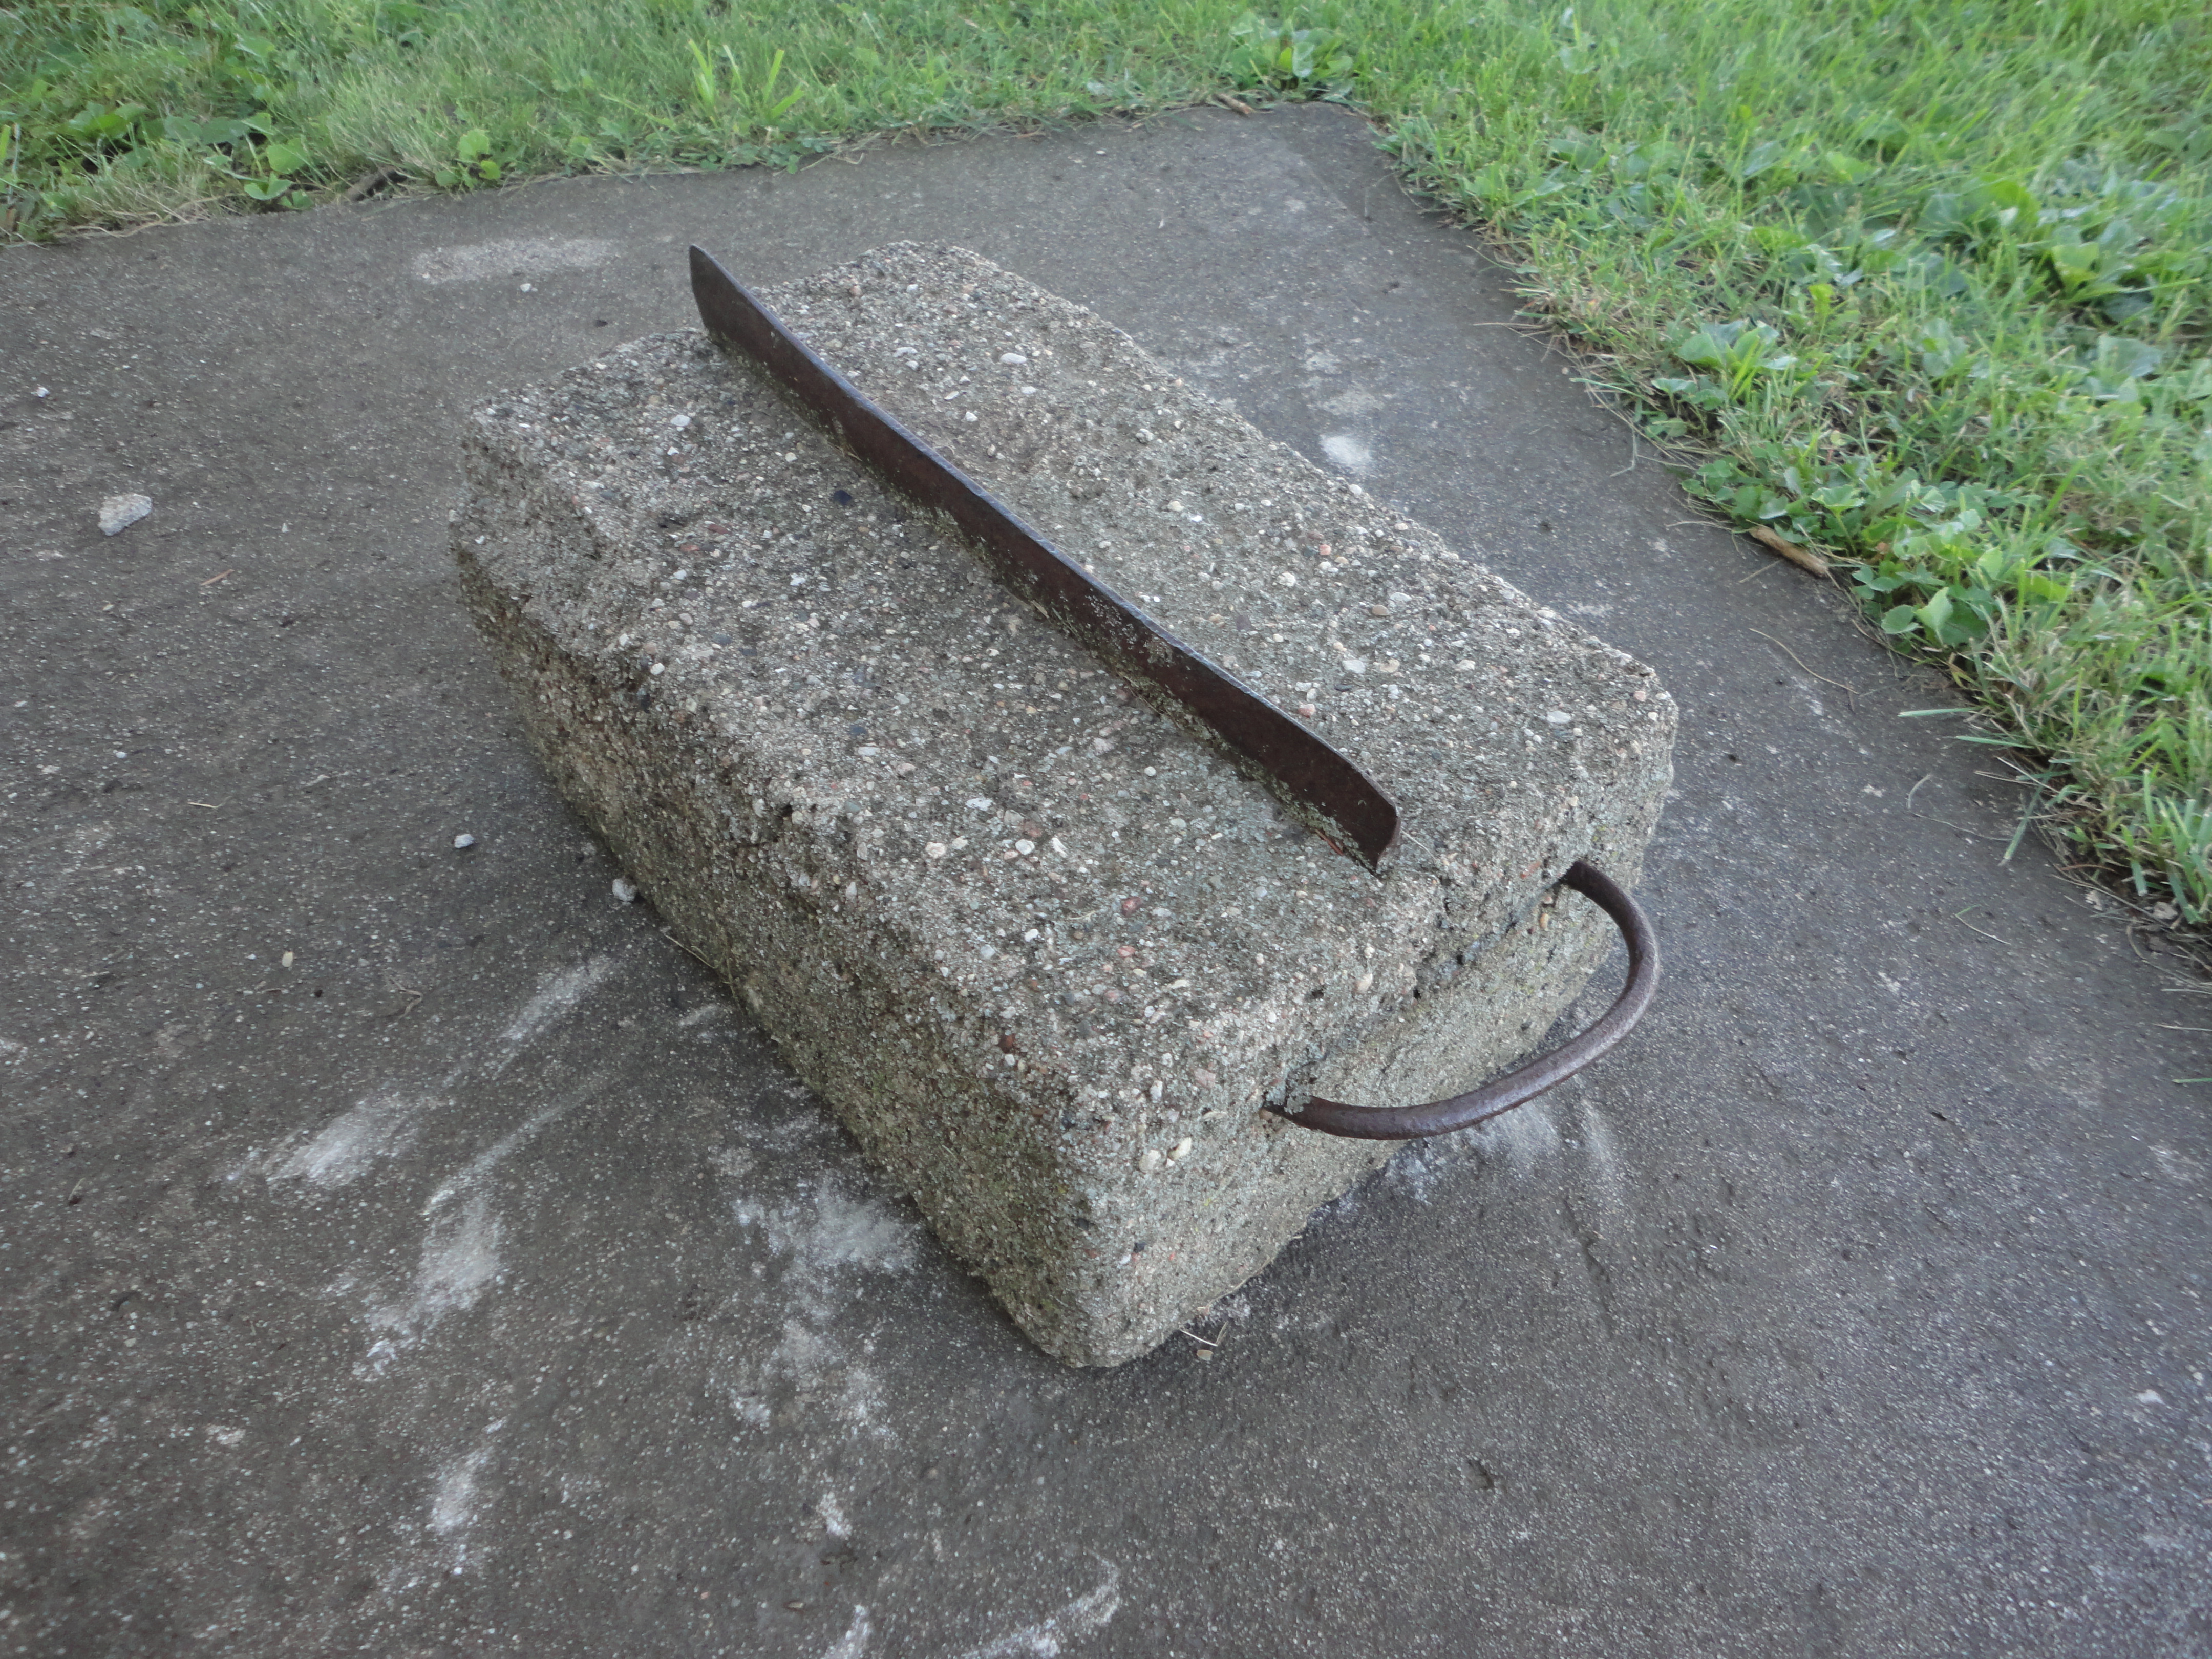
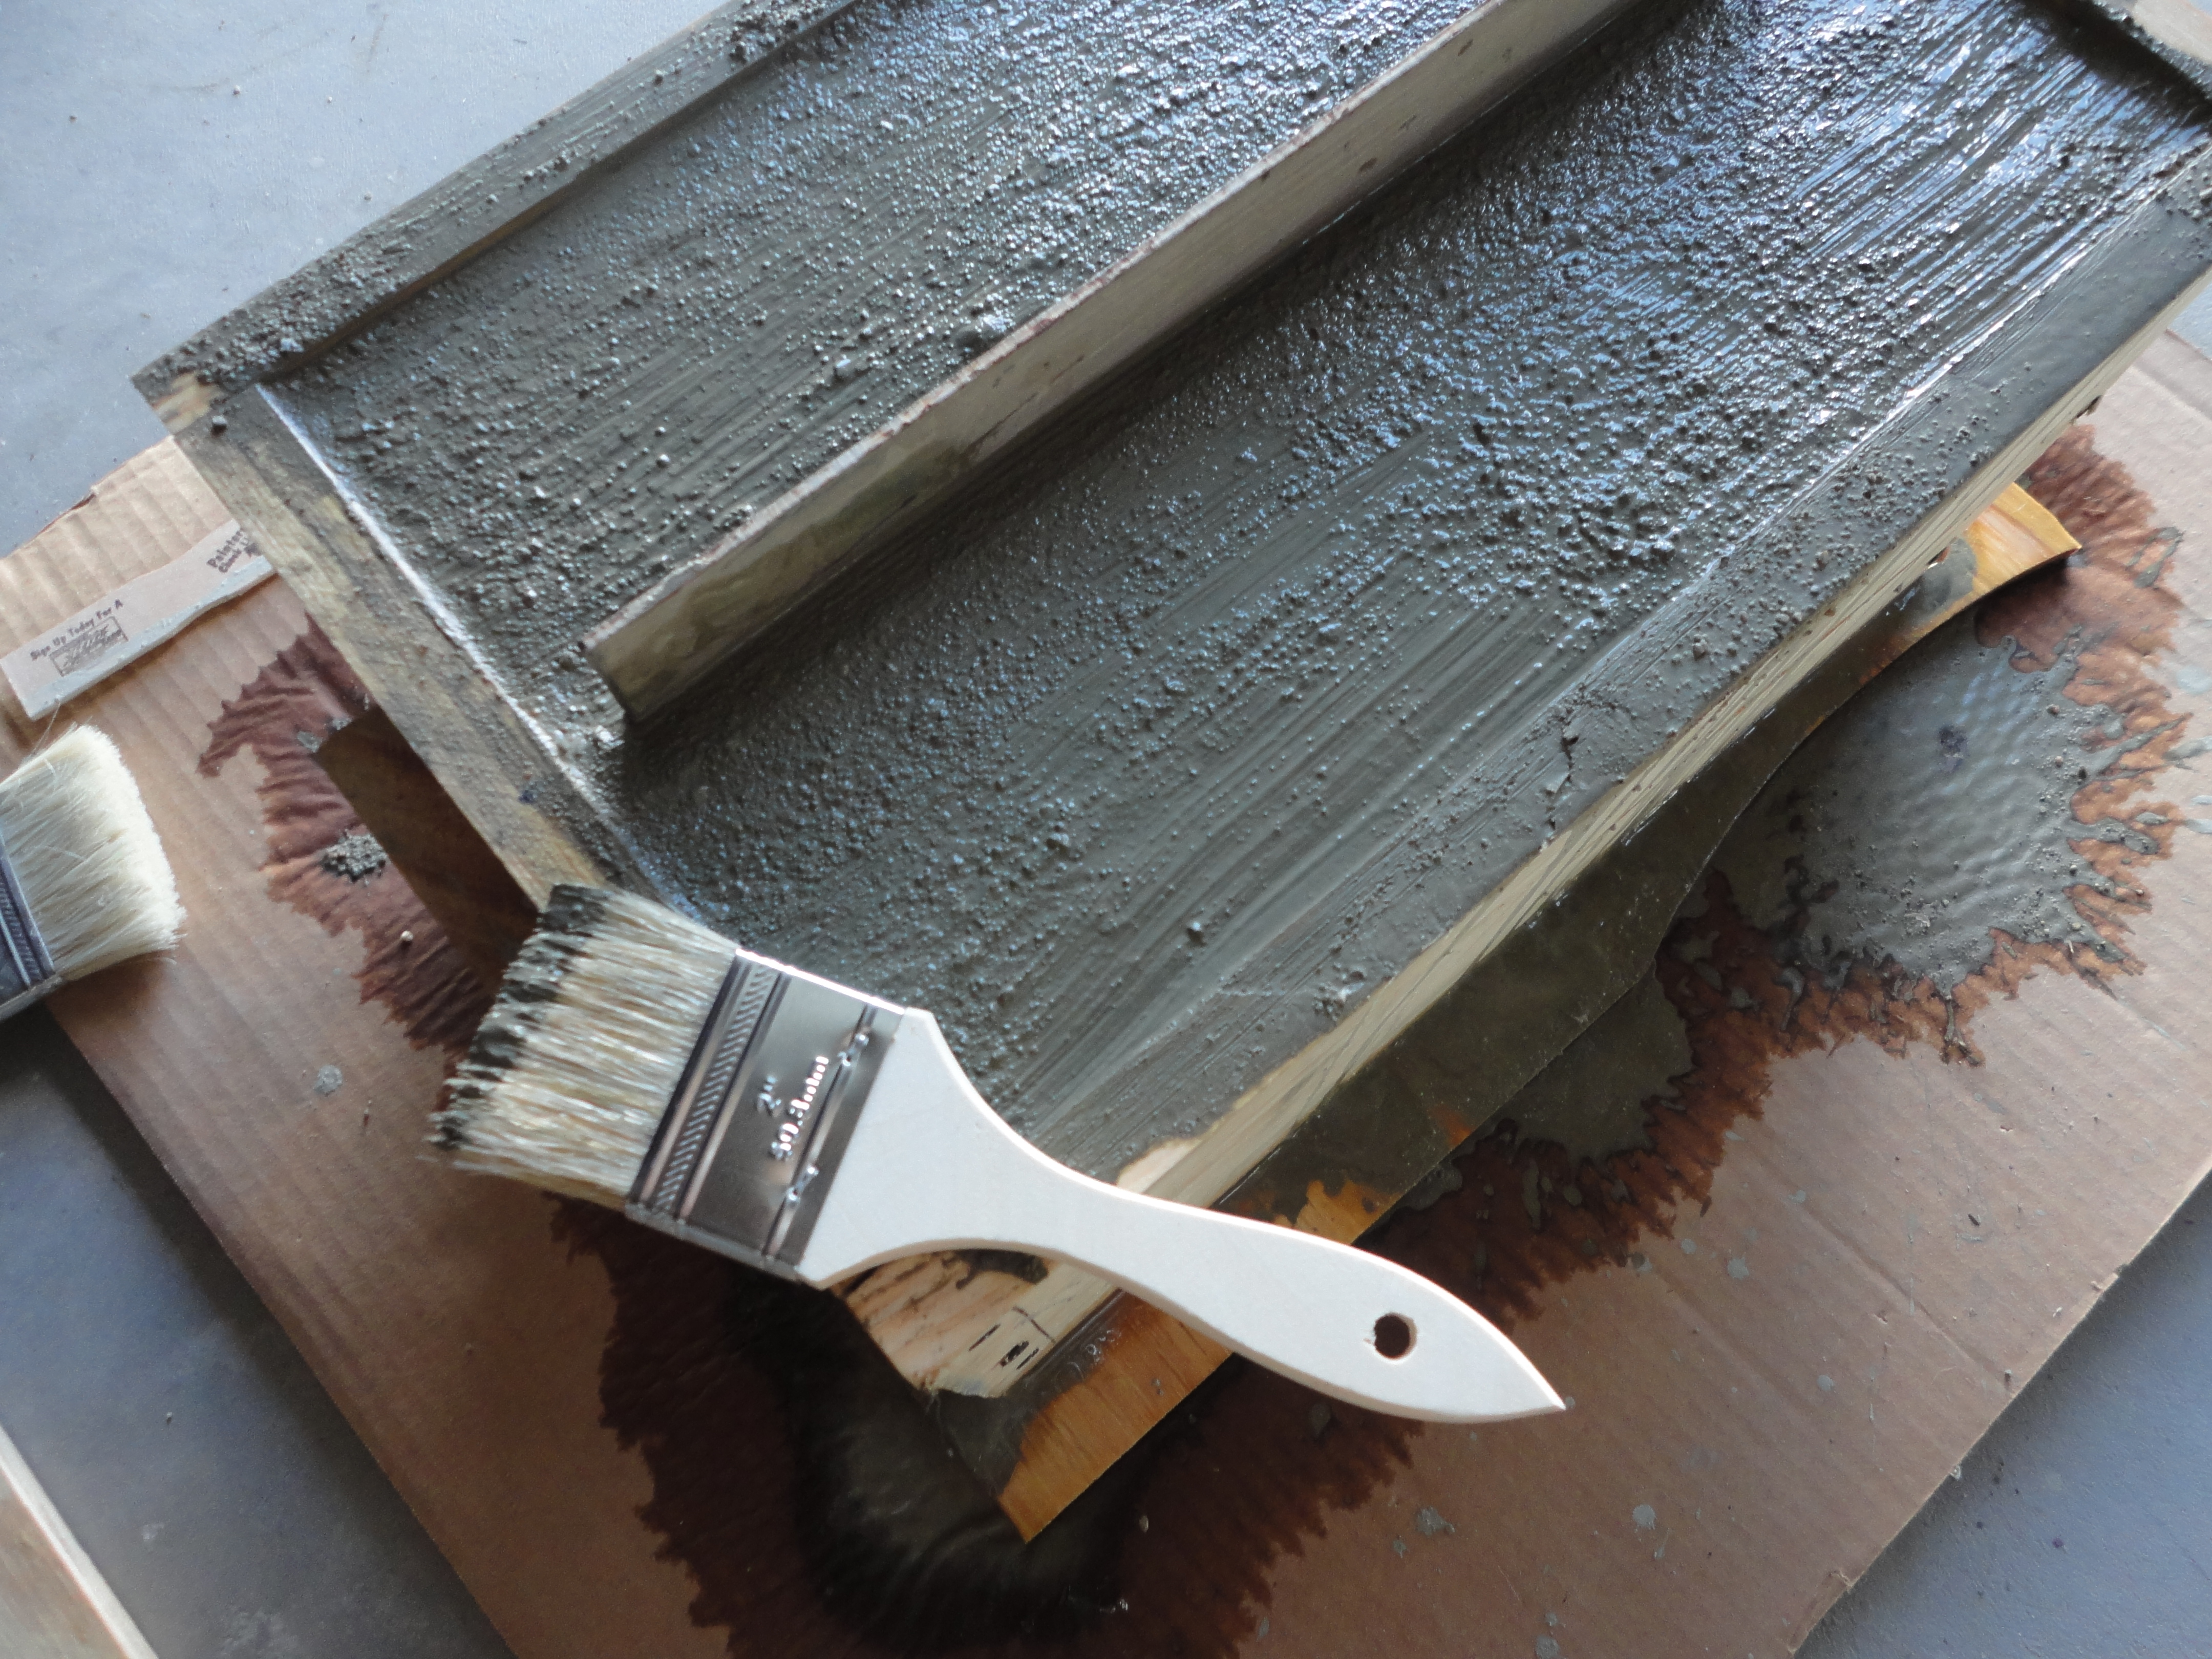
Wait about 20 minutes, level top again with paint stick, and slowly push in the piece of steel, upright. Let it sit approximately another 30 minutes, then brush the top lightly with a 2″ chip brush. Times will vary depending on how wet the concrete is.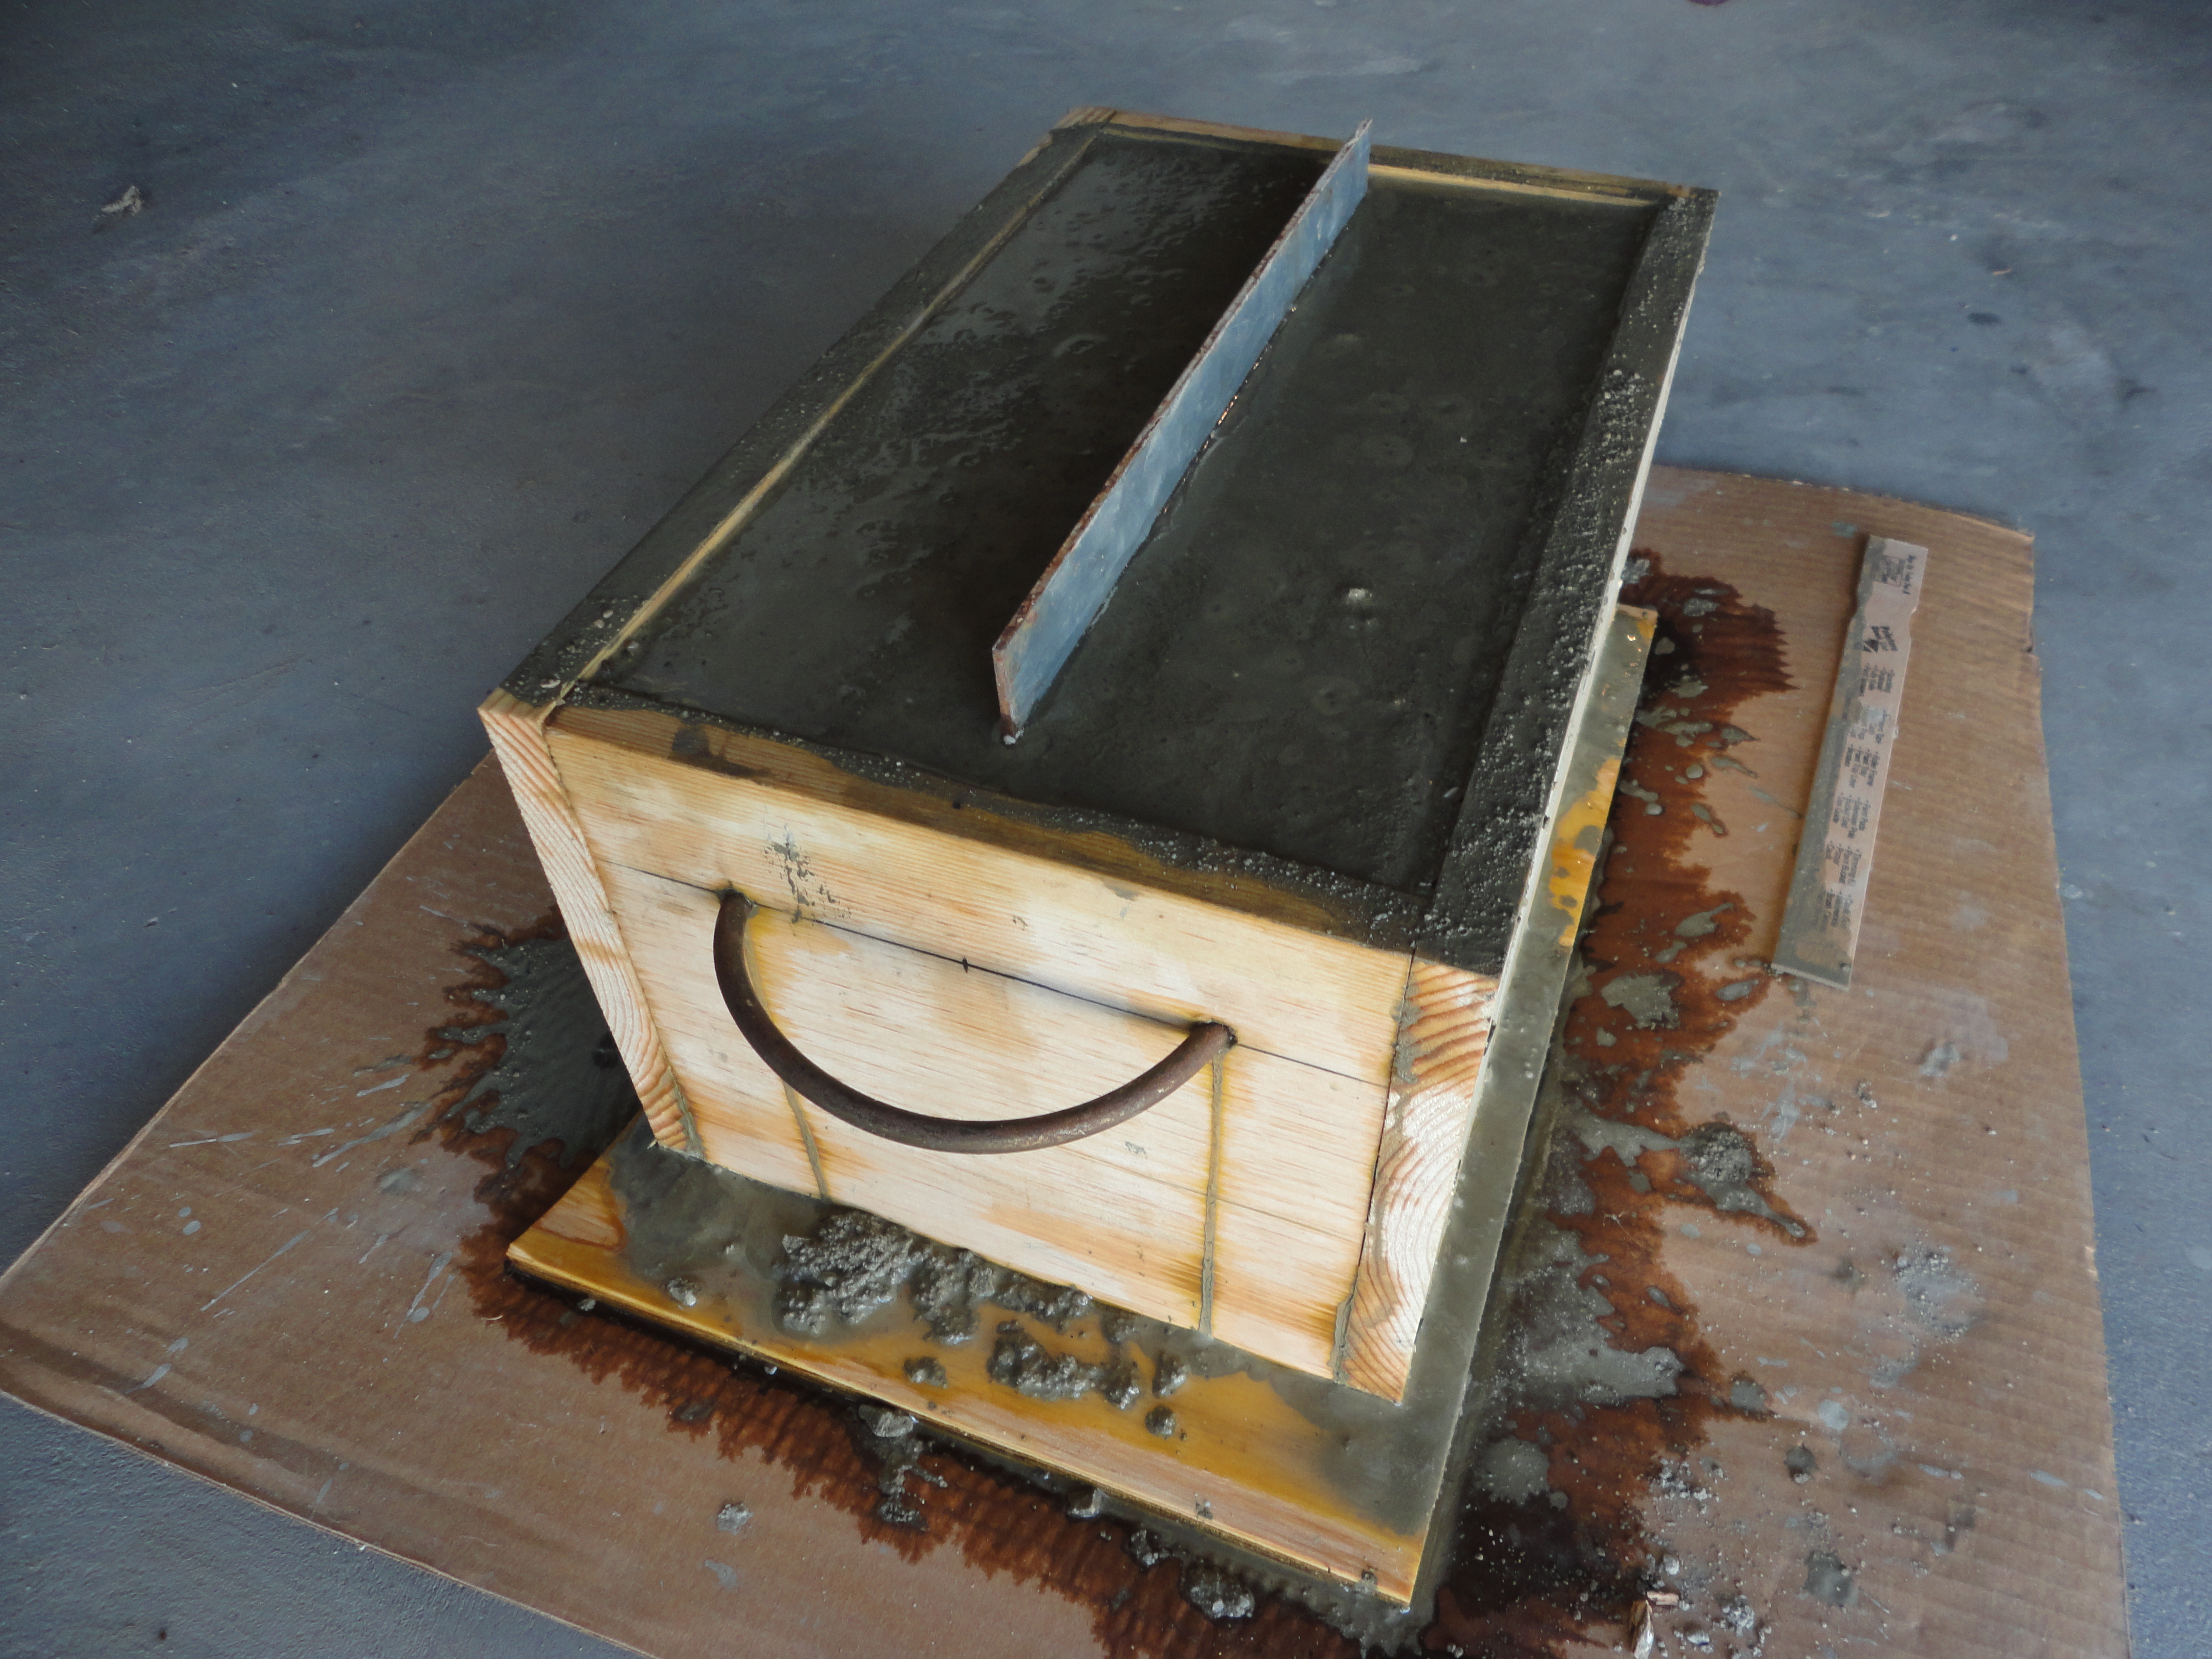
NOTE: Before mixing concrete, you may want to spray and prepare a few small containers or molds to quickly use up any excess. Waste Not, Want Not.

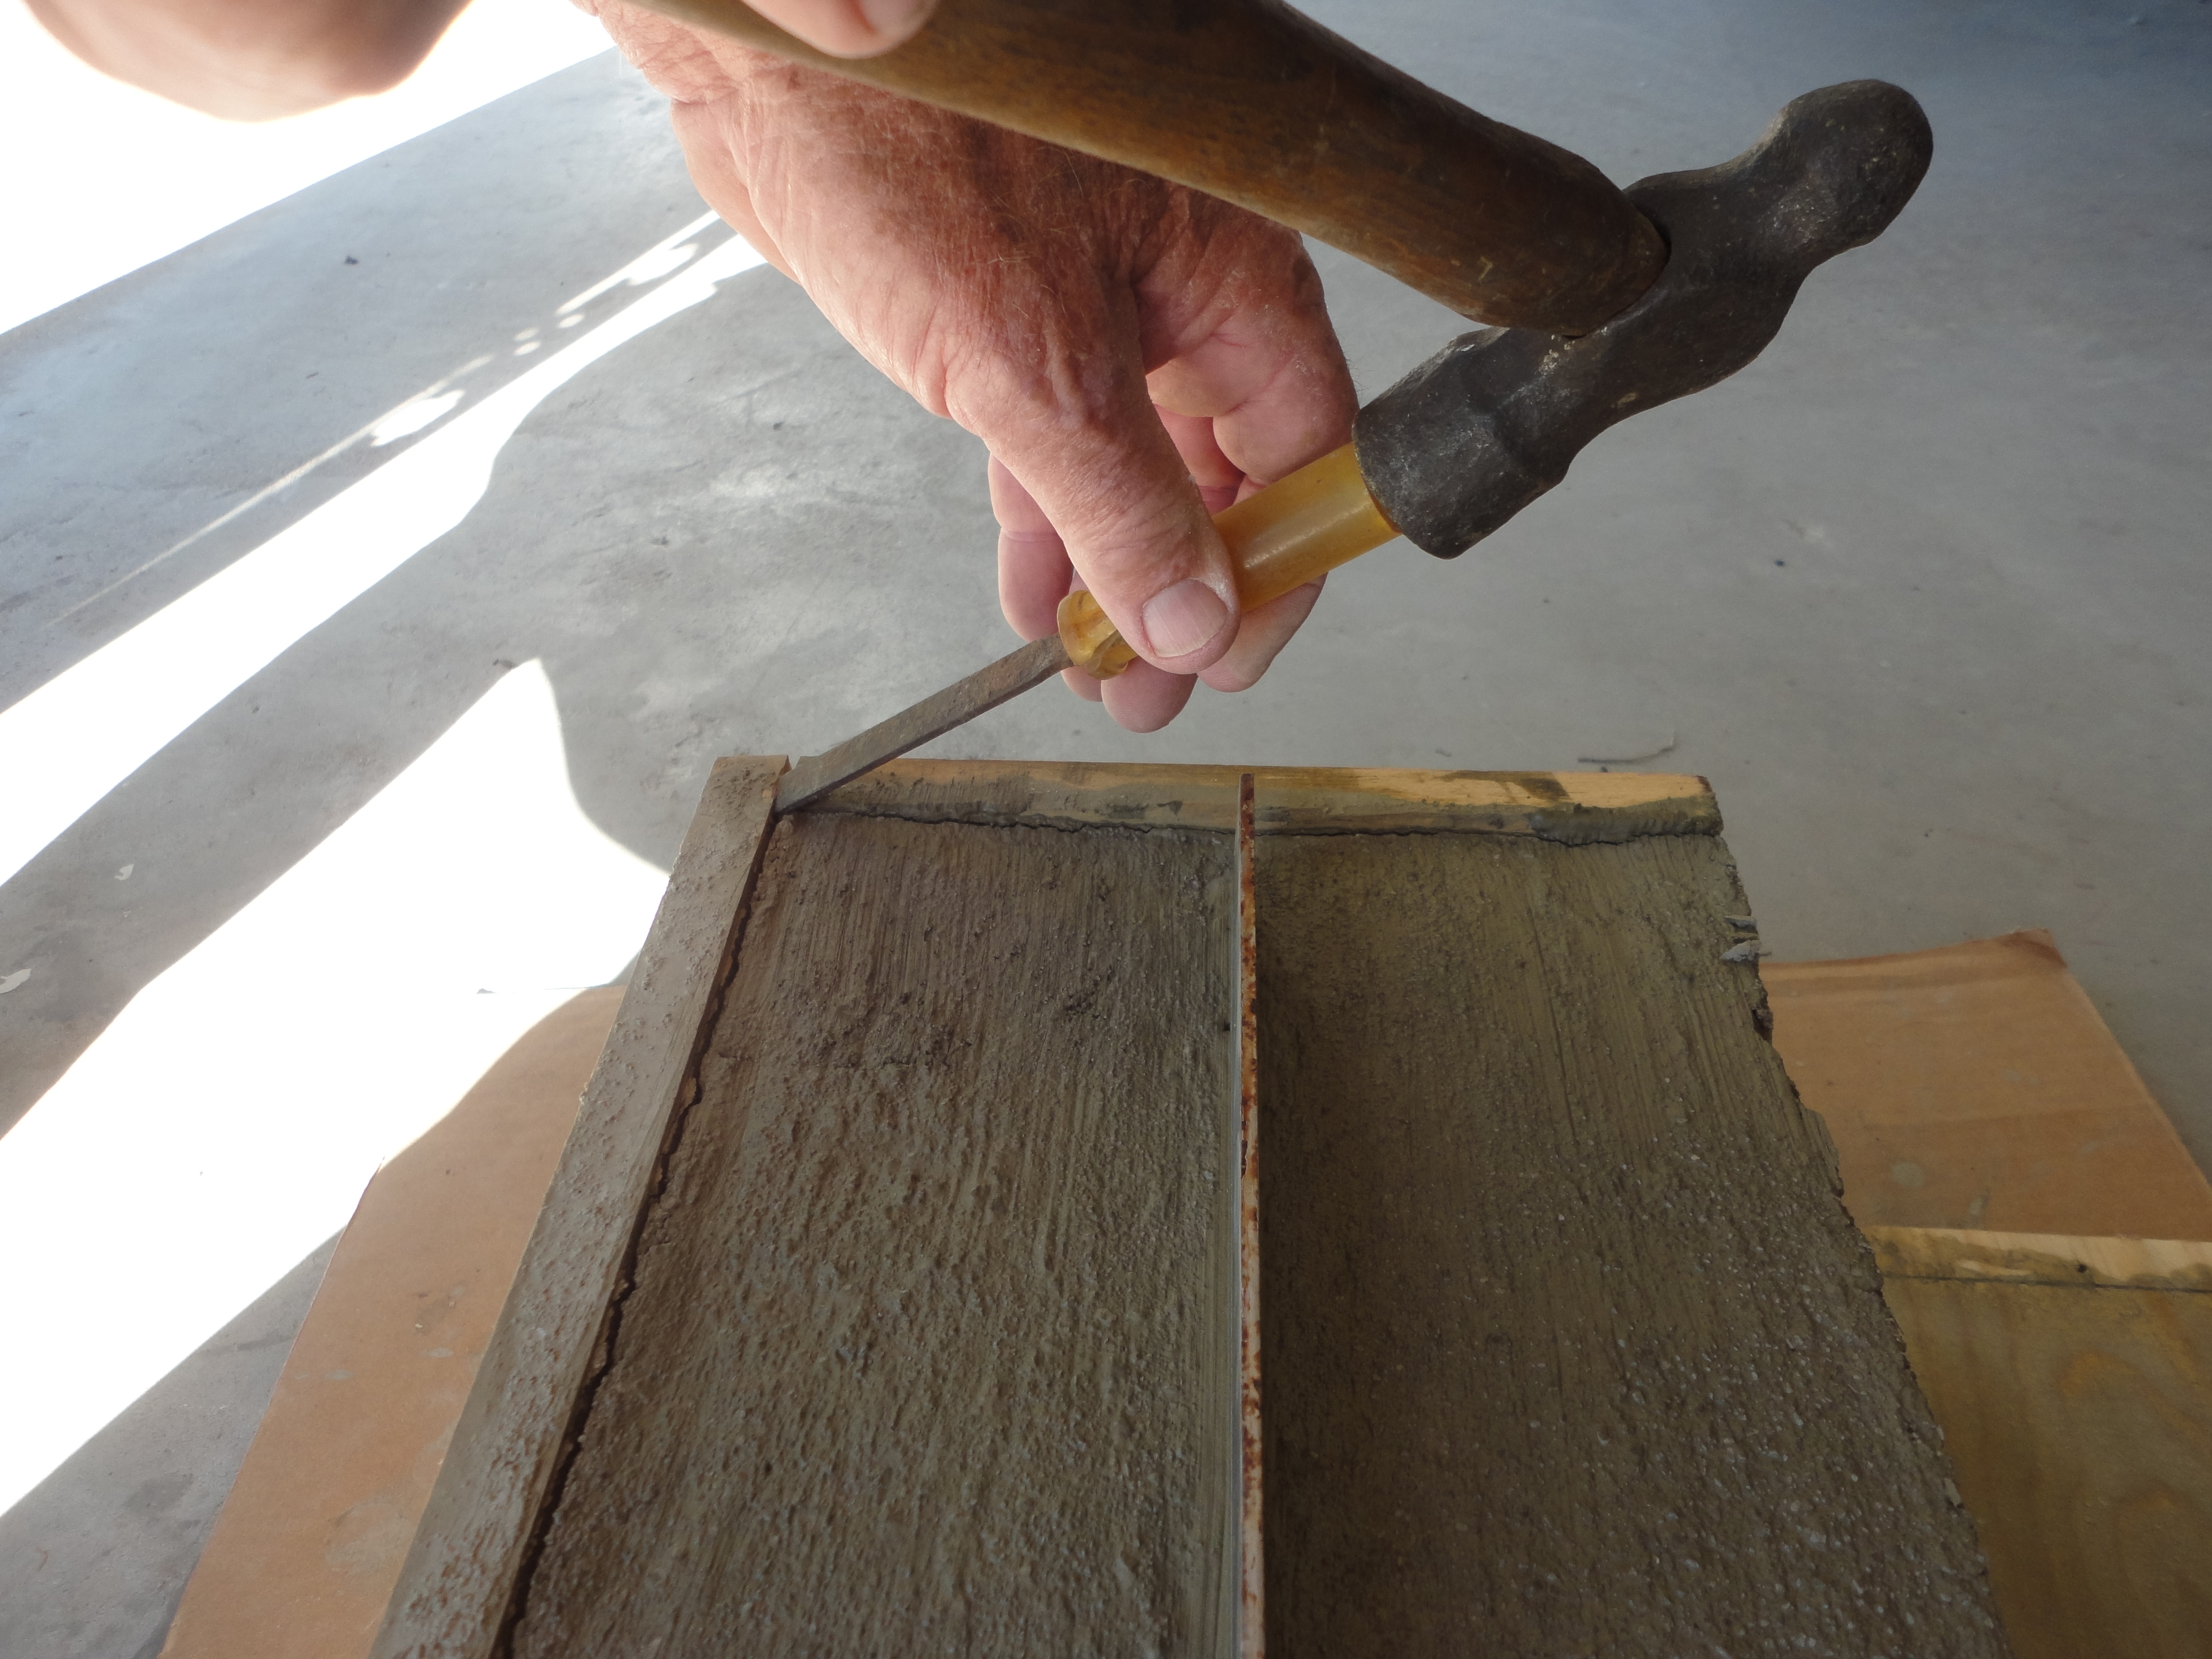
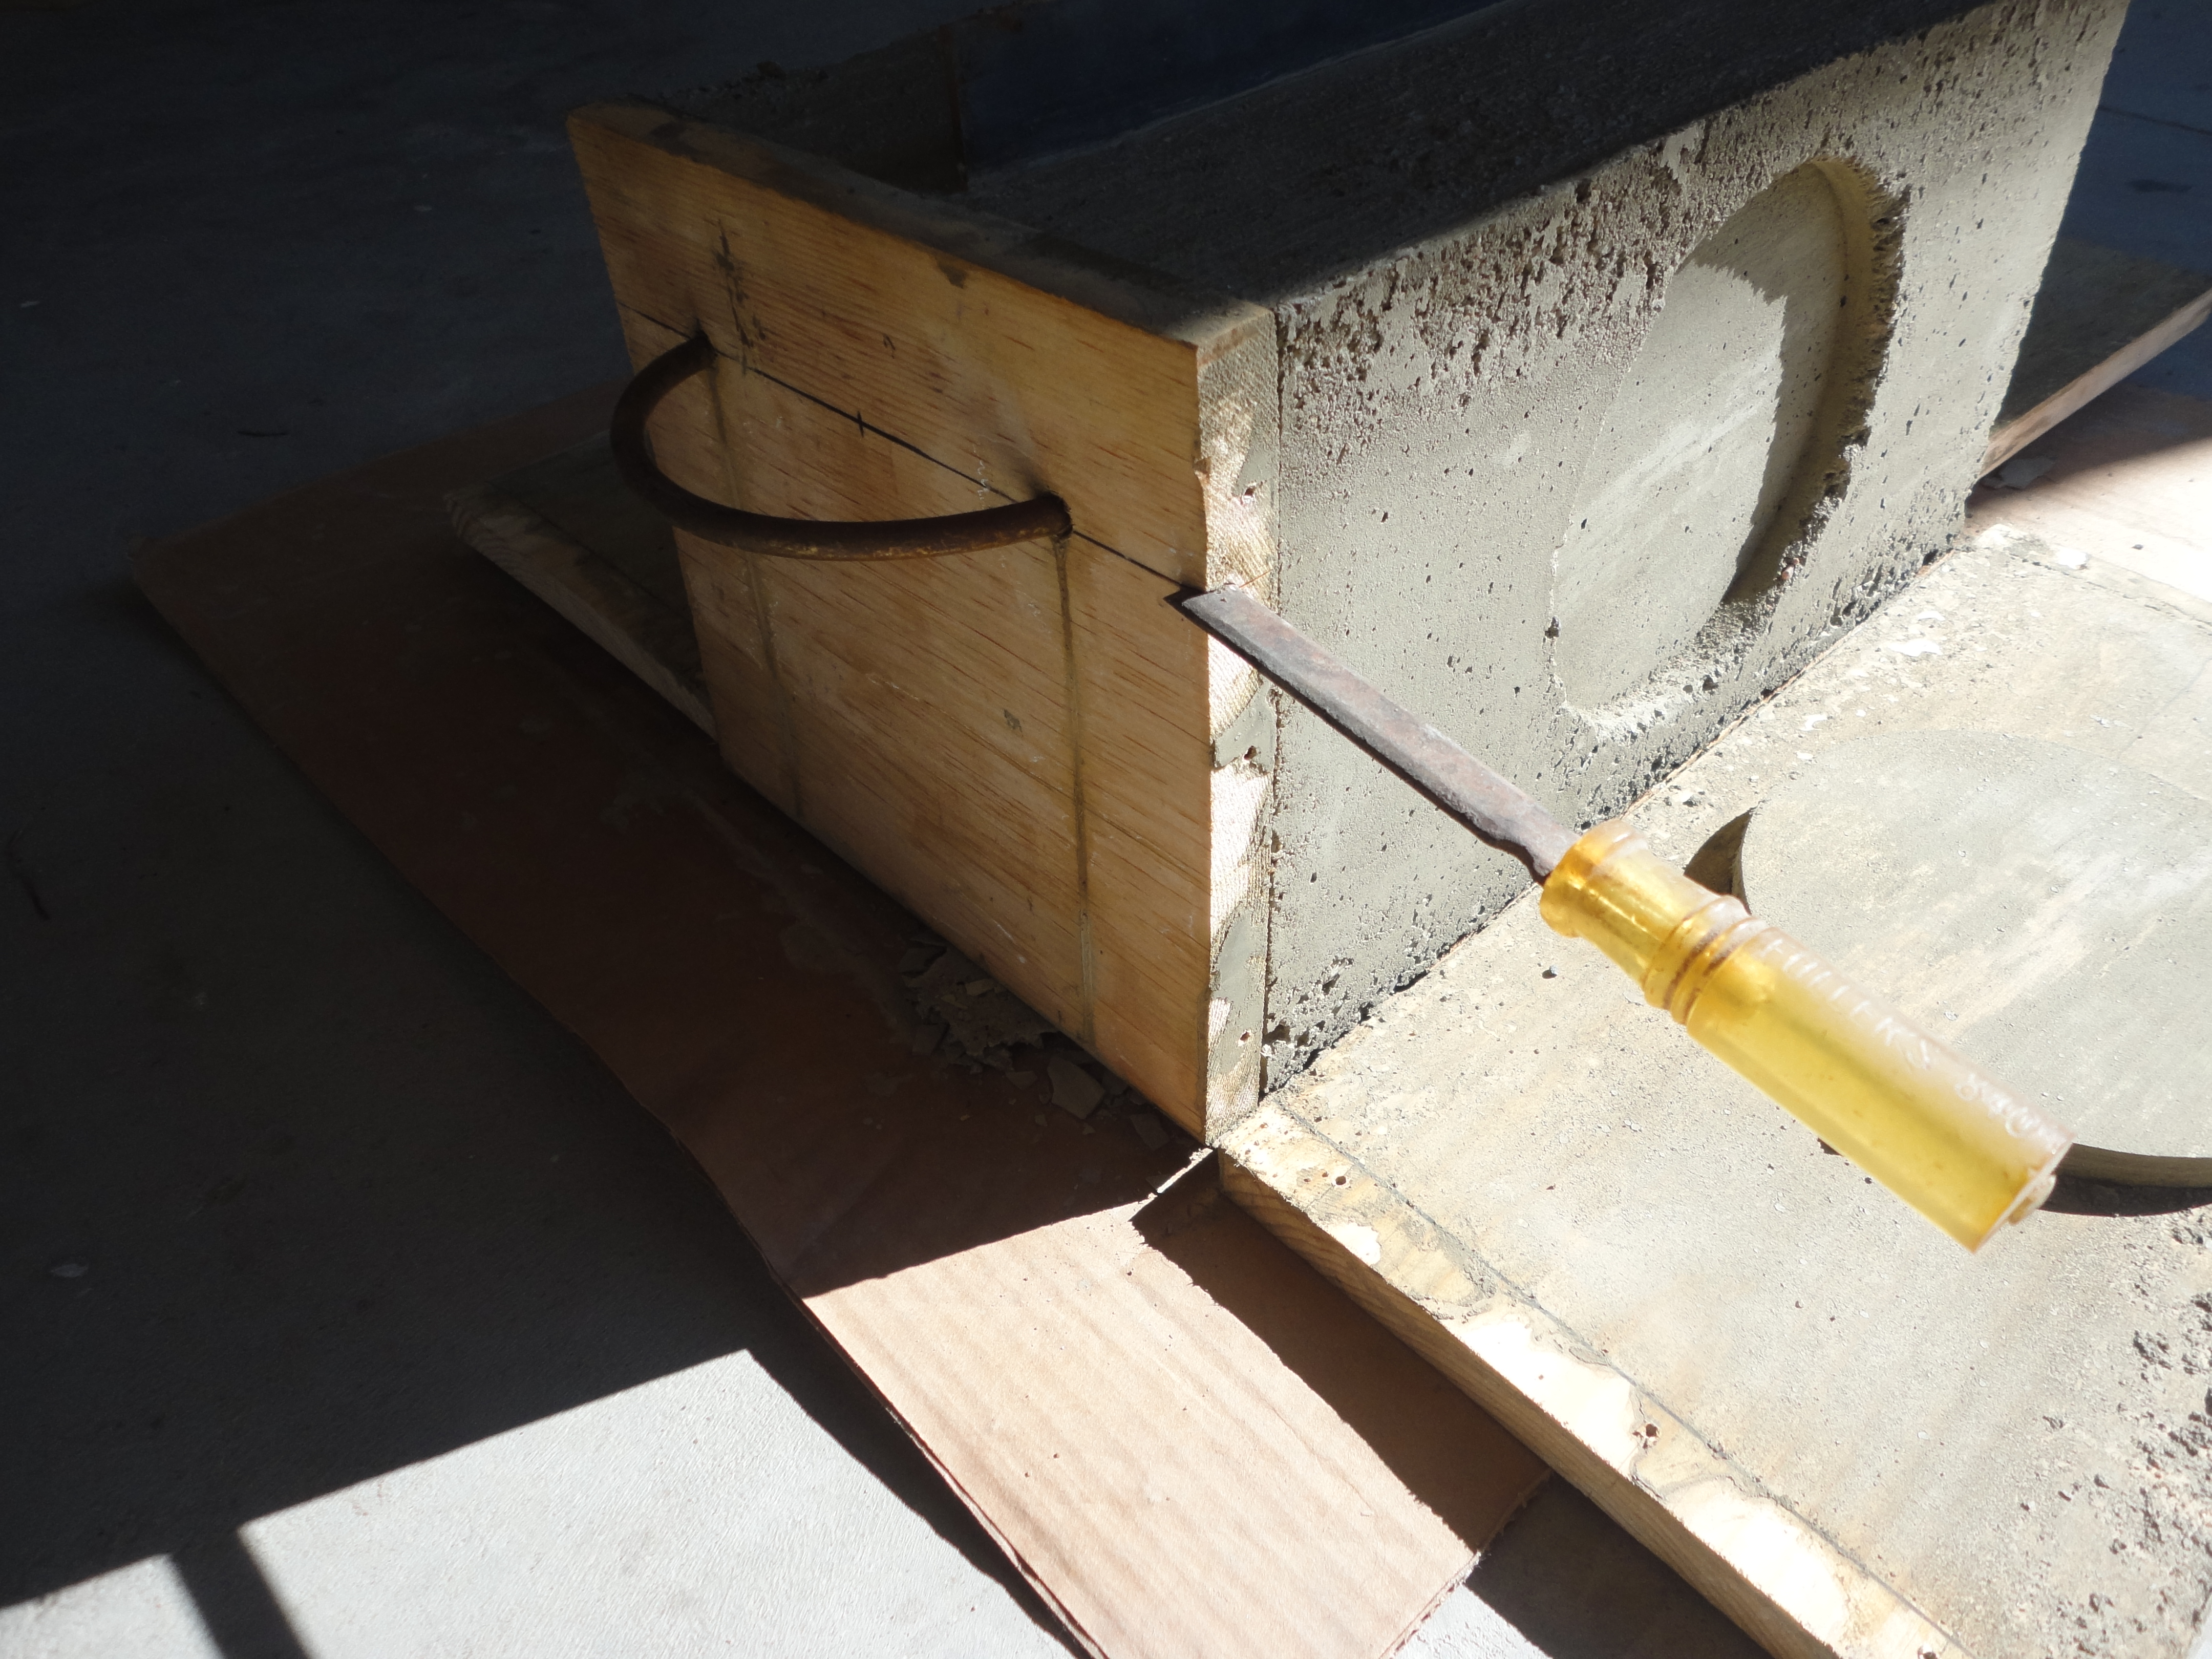
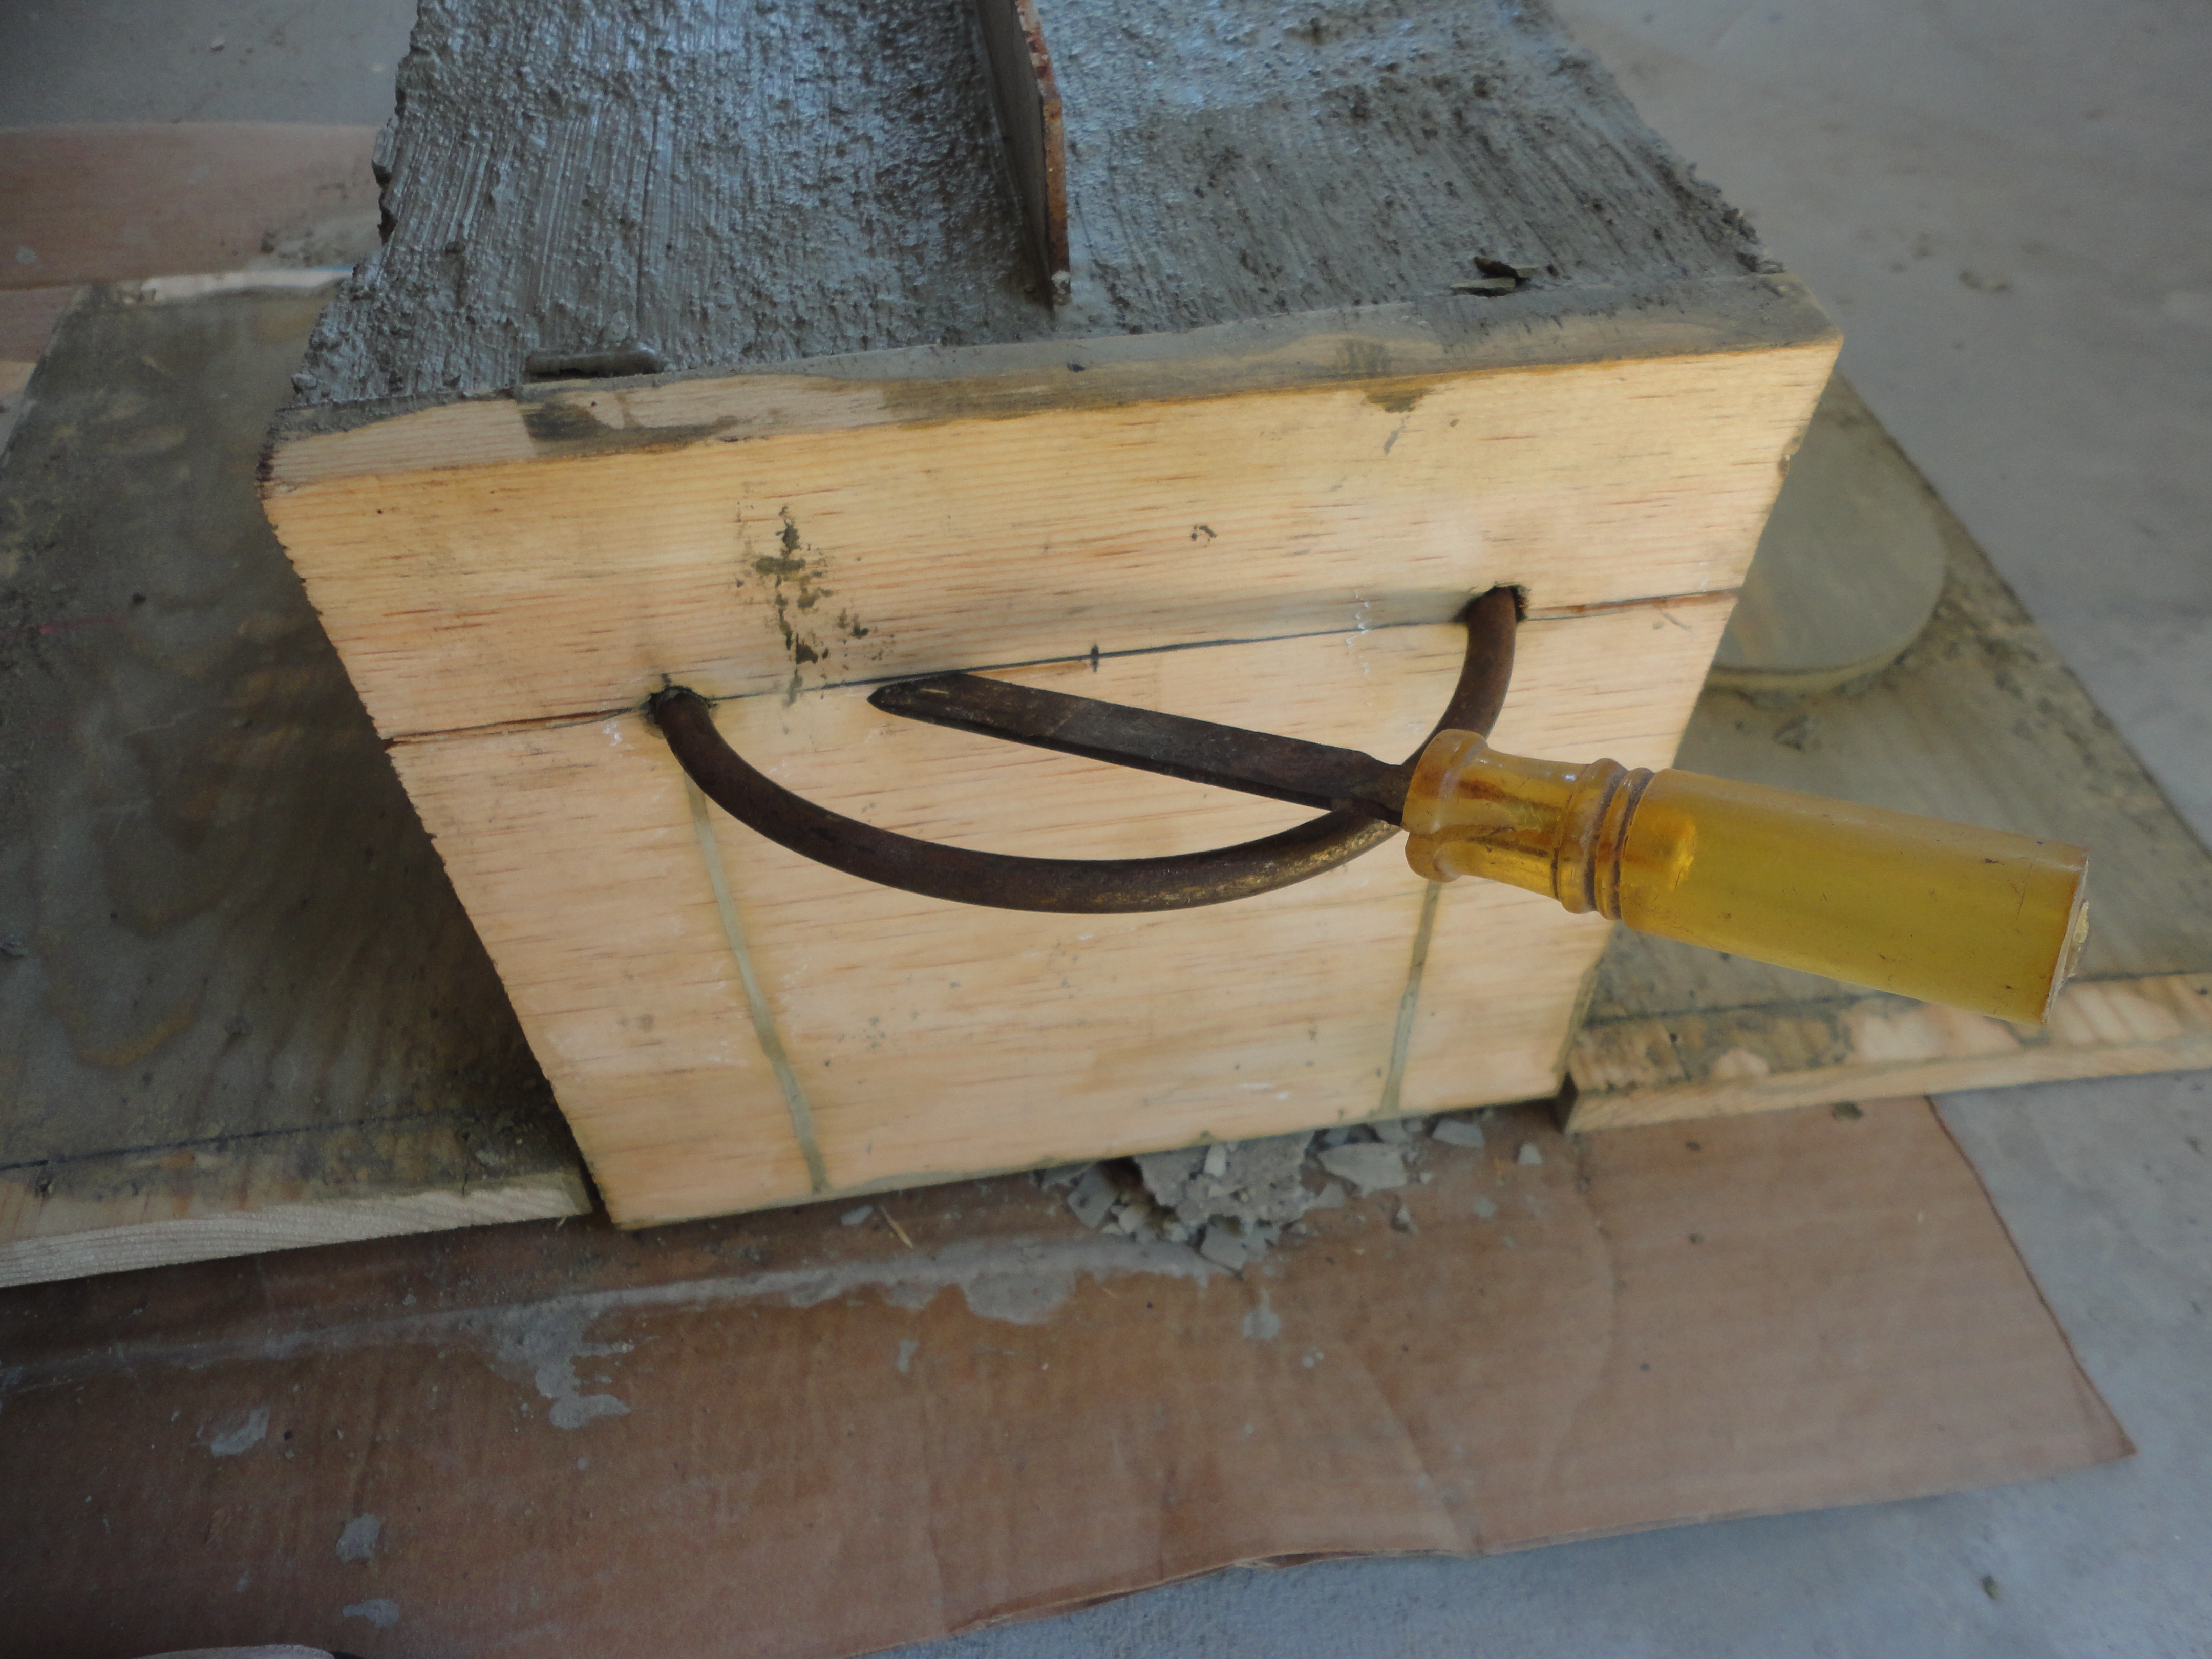
After 24 hours, tip the box and brace it while removing the bottom. Sit it back up on the plywood, sideways, to dry another 12 hours. Remove all the screws and tap sides off gently. On the handle end, tap a wood chisel gently into the wood, first from the sides, then across the middle. Repeat until it splits easily; remove. Lightly sand top outside edge of concrete.


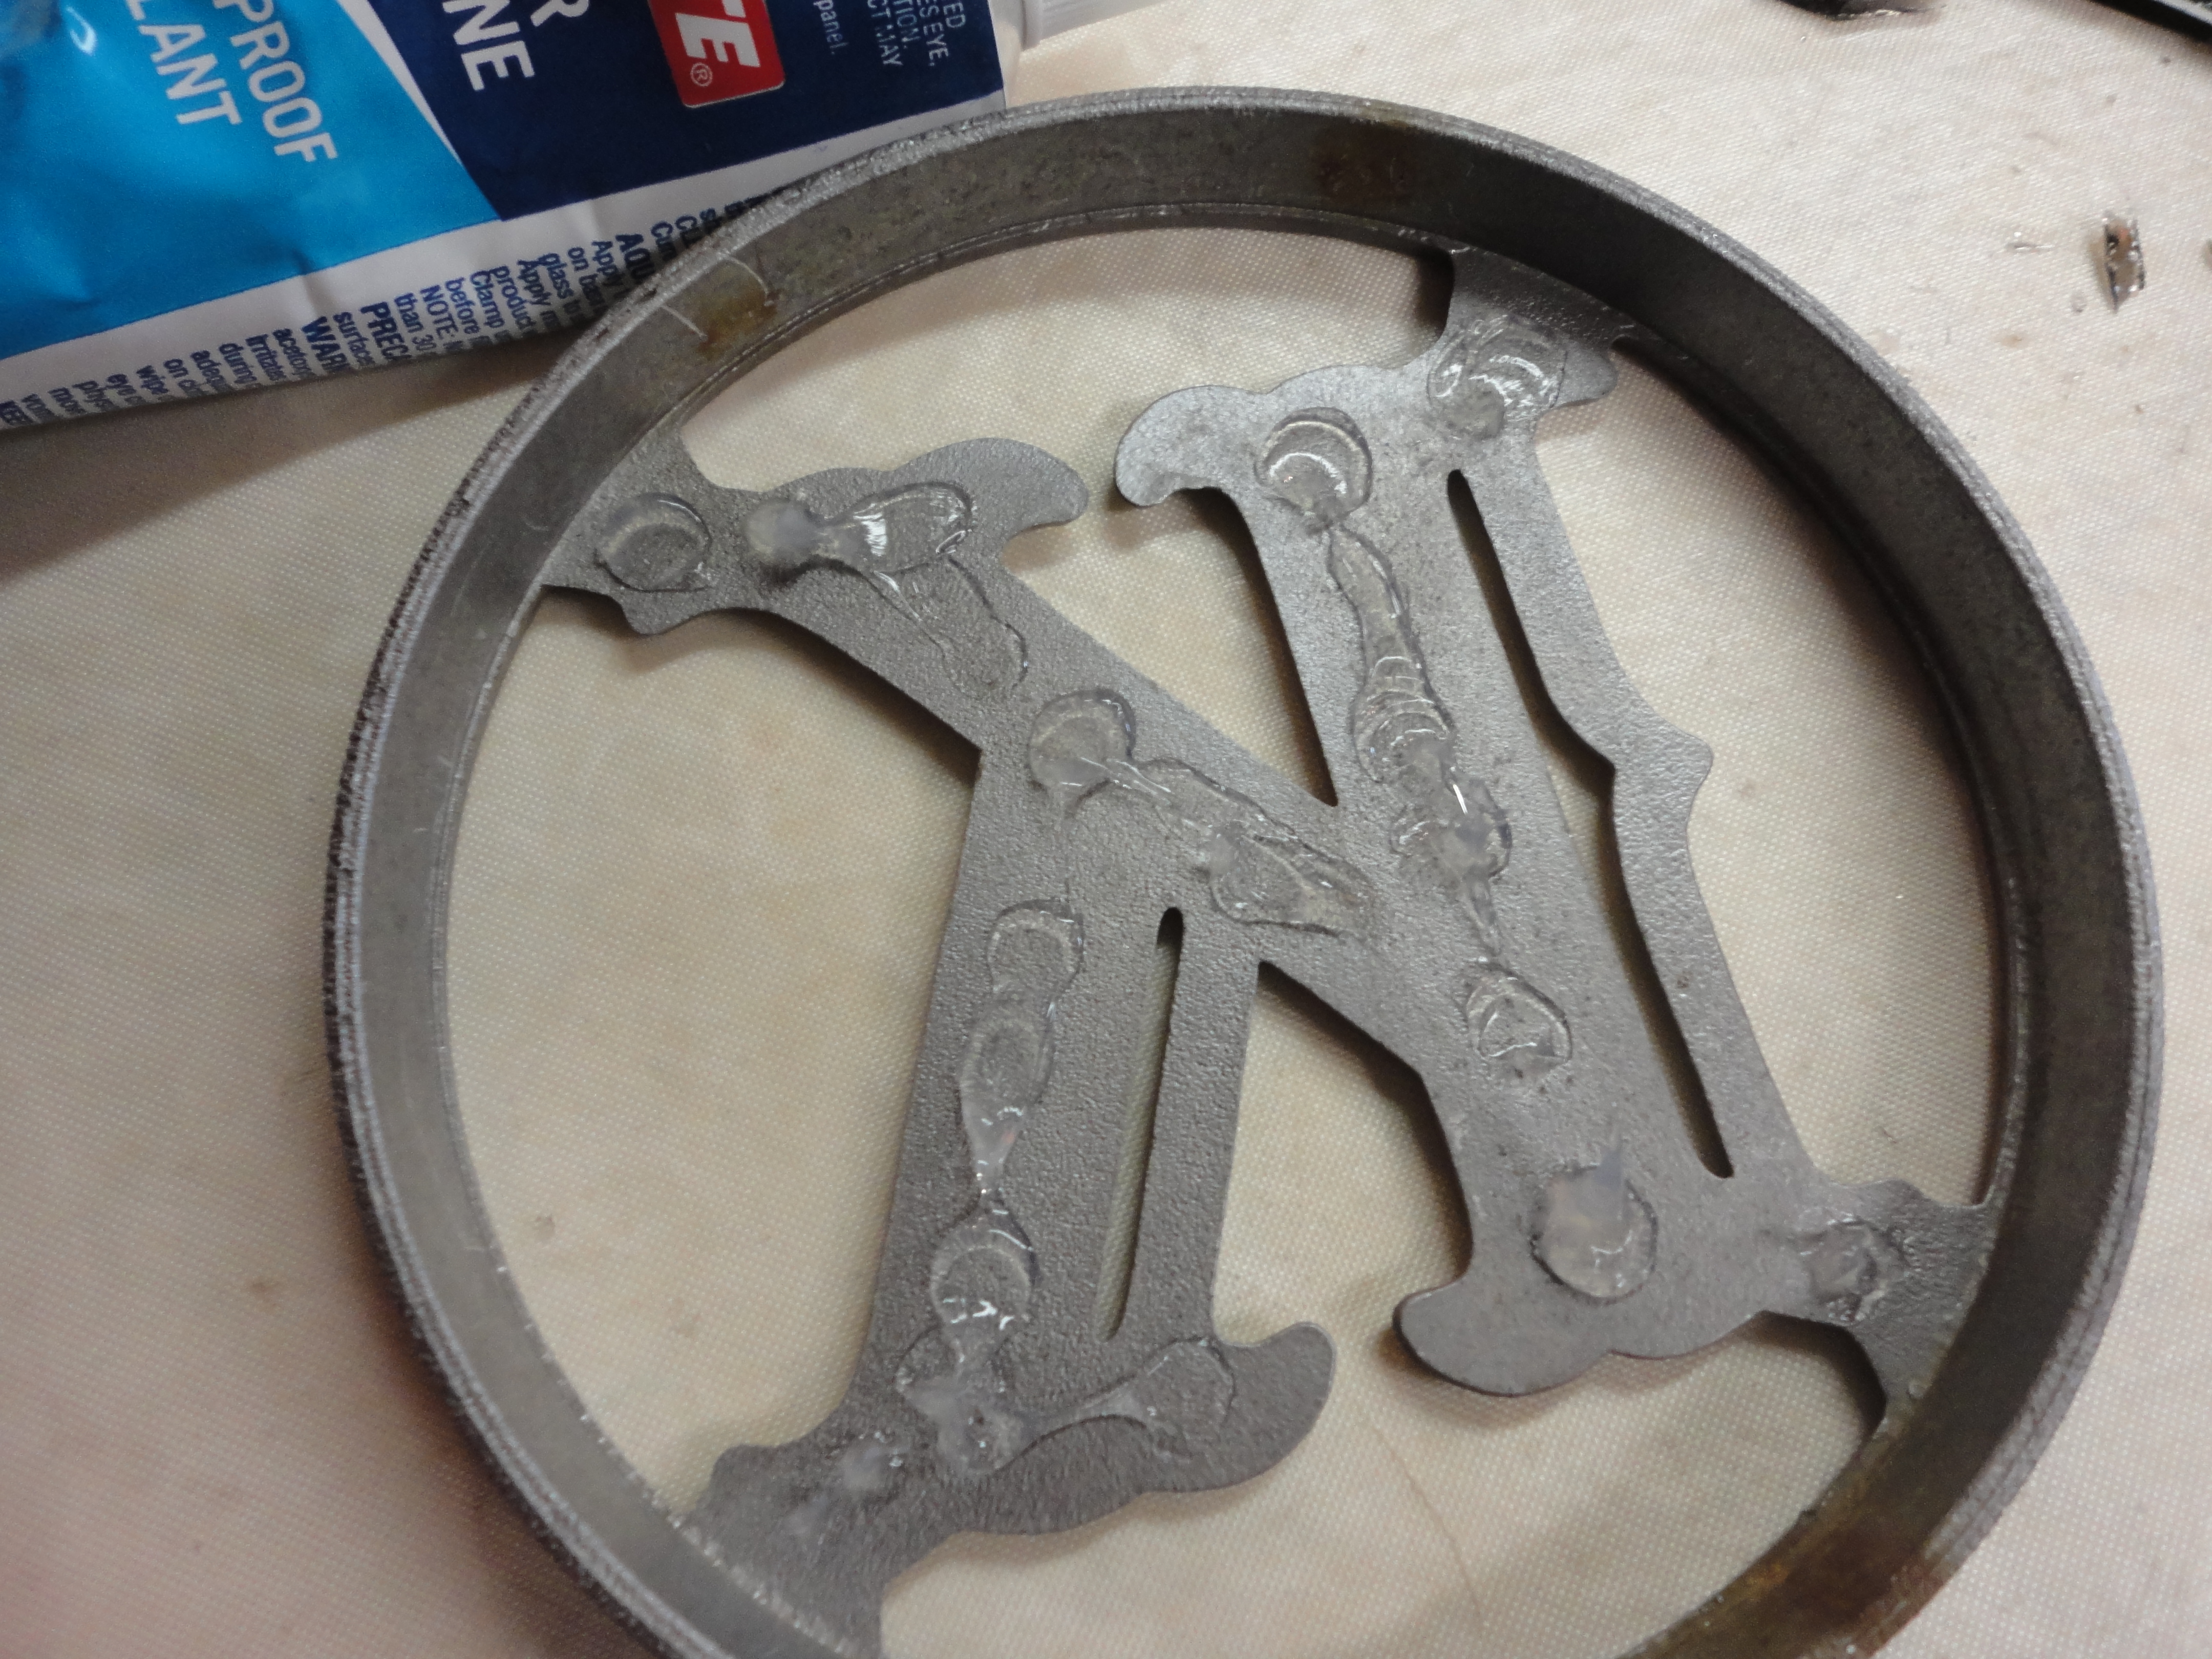
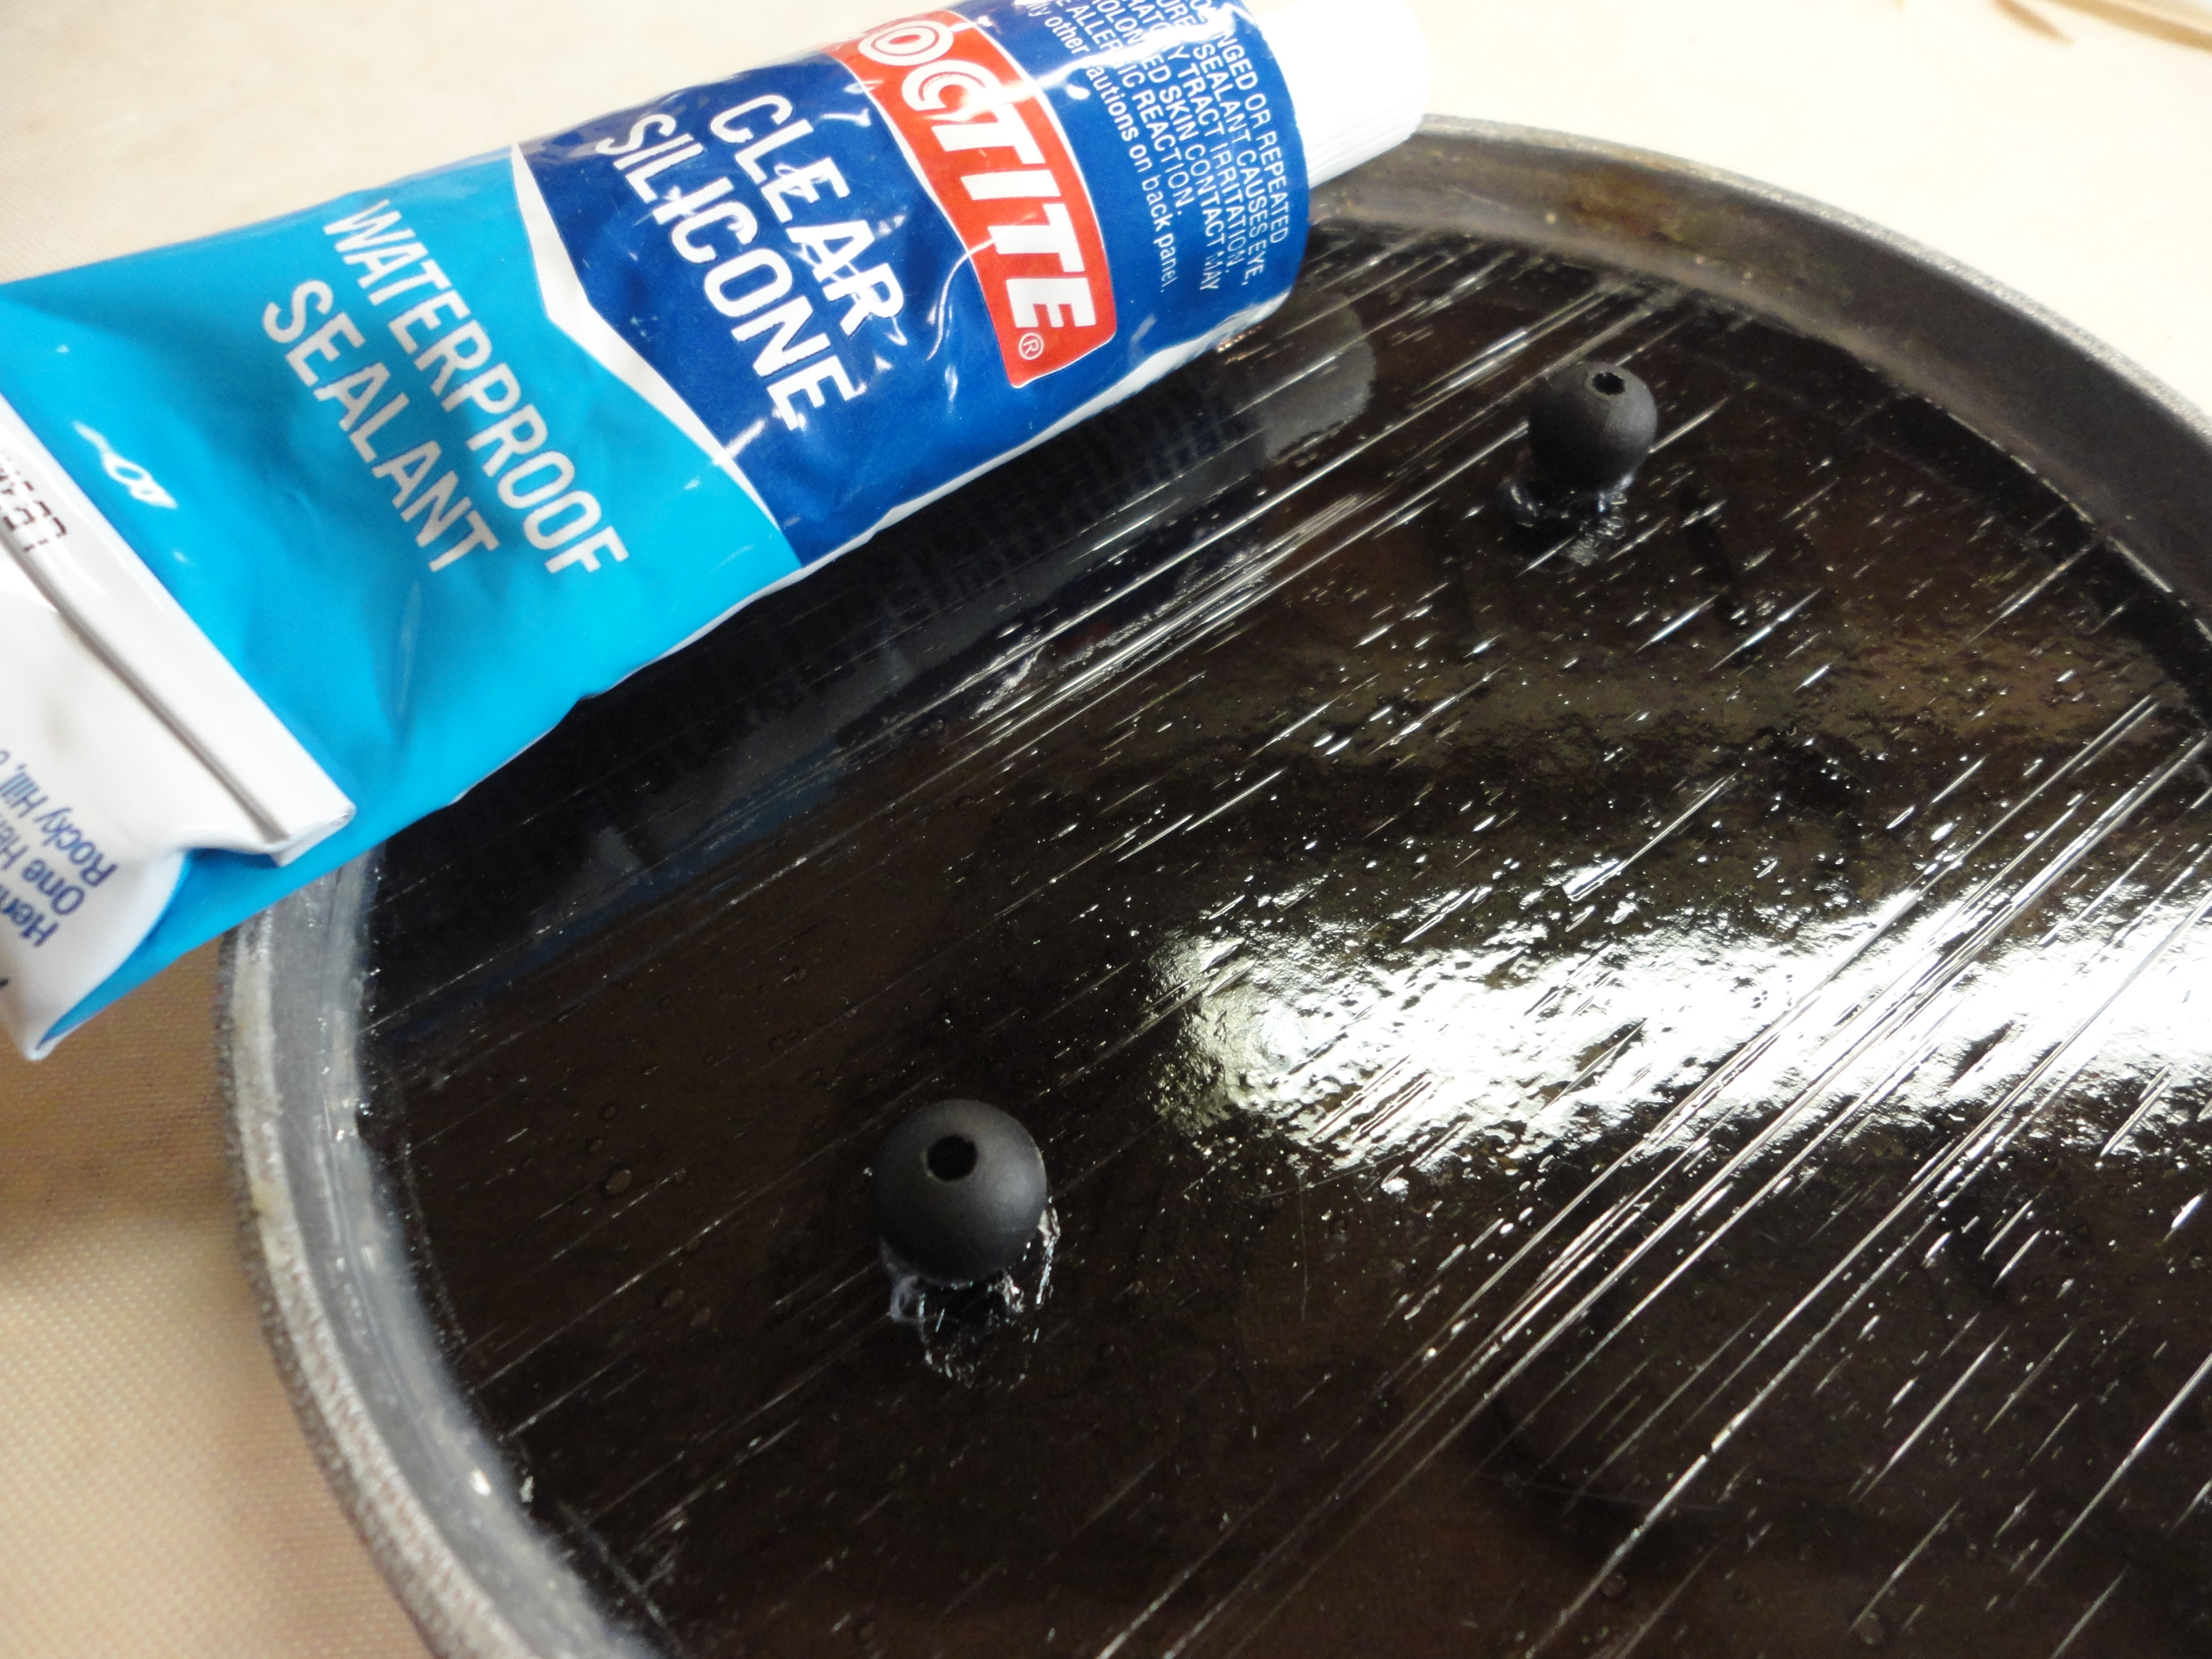
Trace your circle pattern on your choice of glass. Cut and grind to fit inside the aluminum circle. Dab silicone glue on the backside of the “K”, insert glass, and weigh down to dry. Run a thin bead of silicone around the backside edge of the glass. I also glued on two 3/8″ resin beads to help brace the glass against the concrete. Let dry.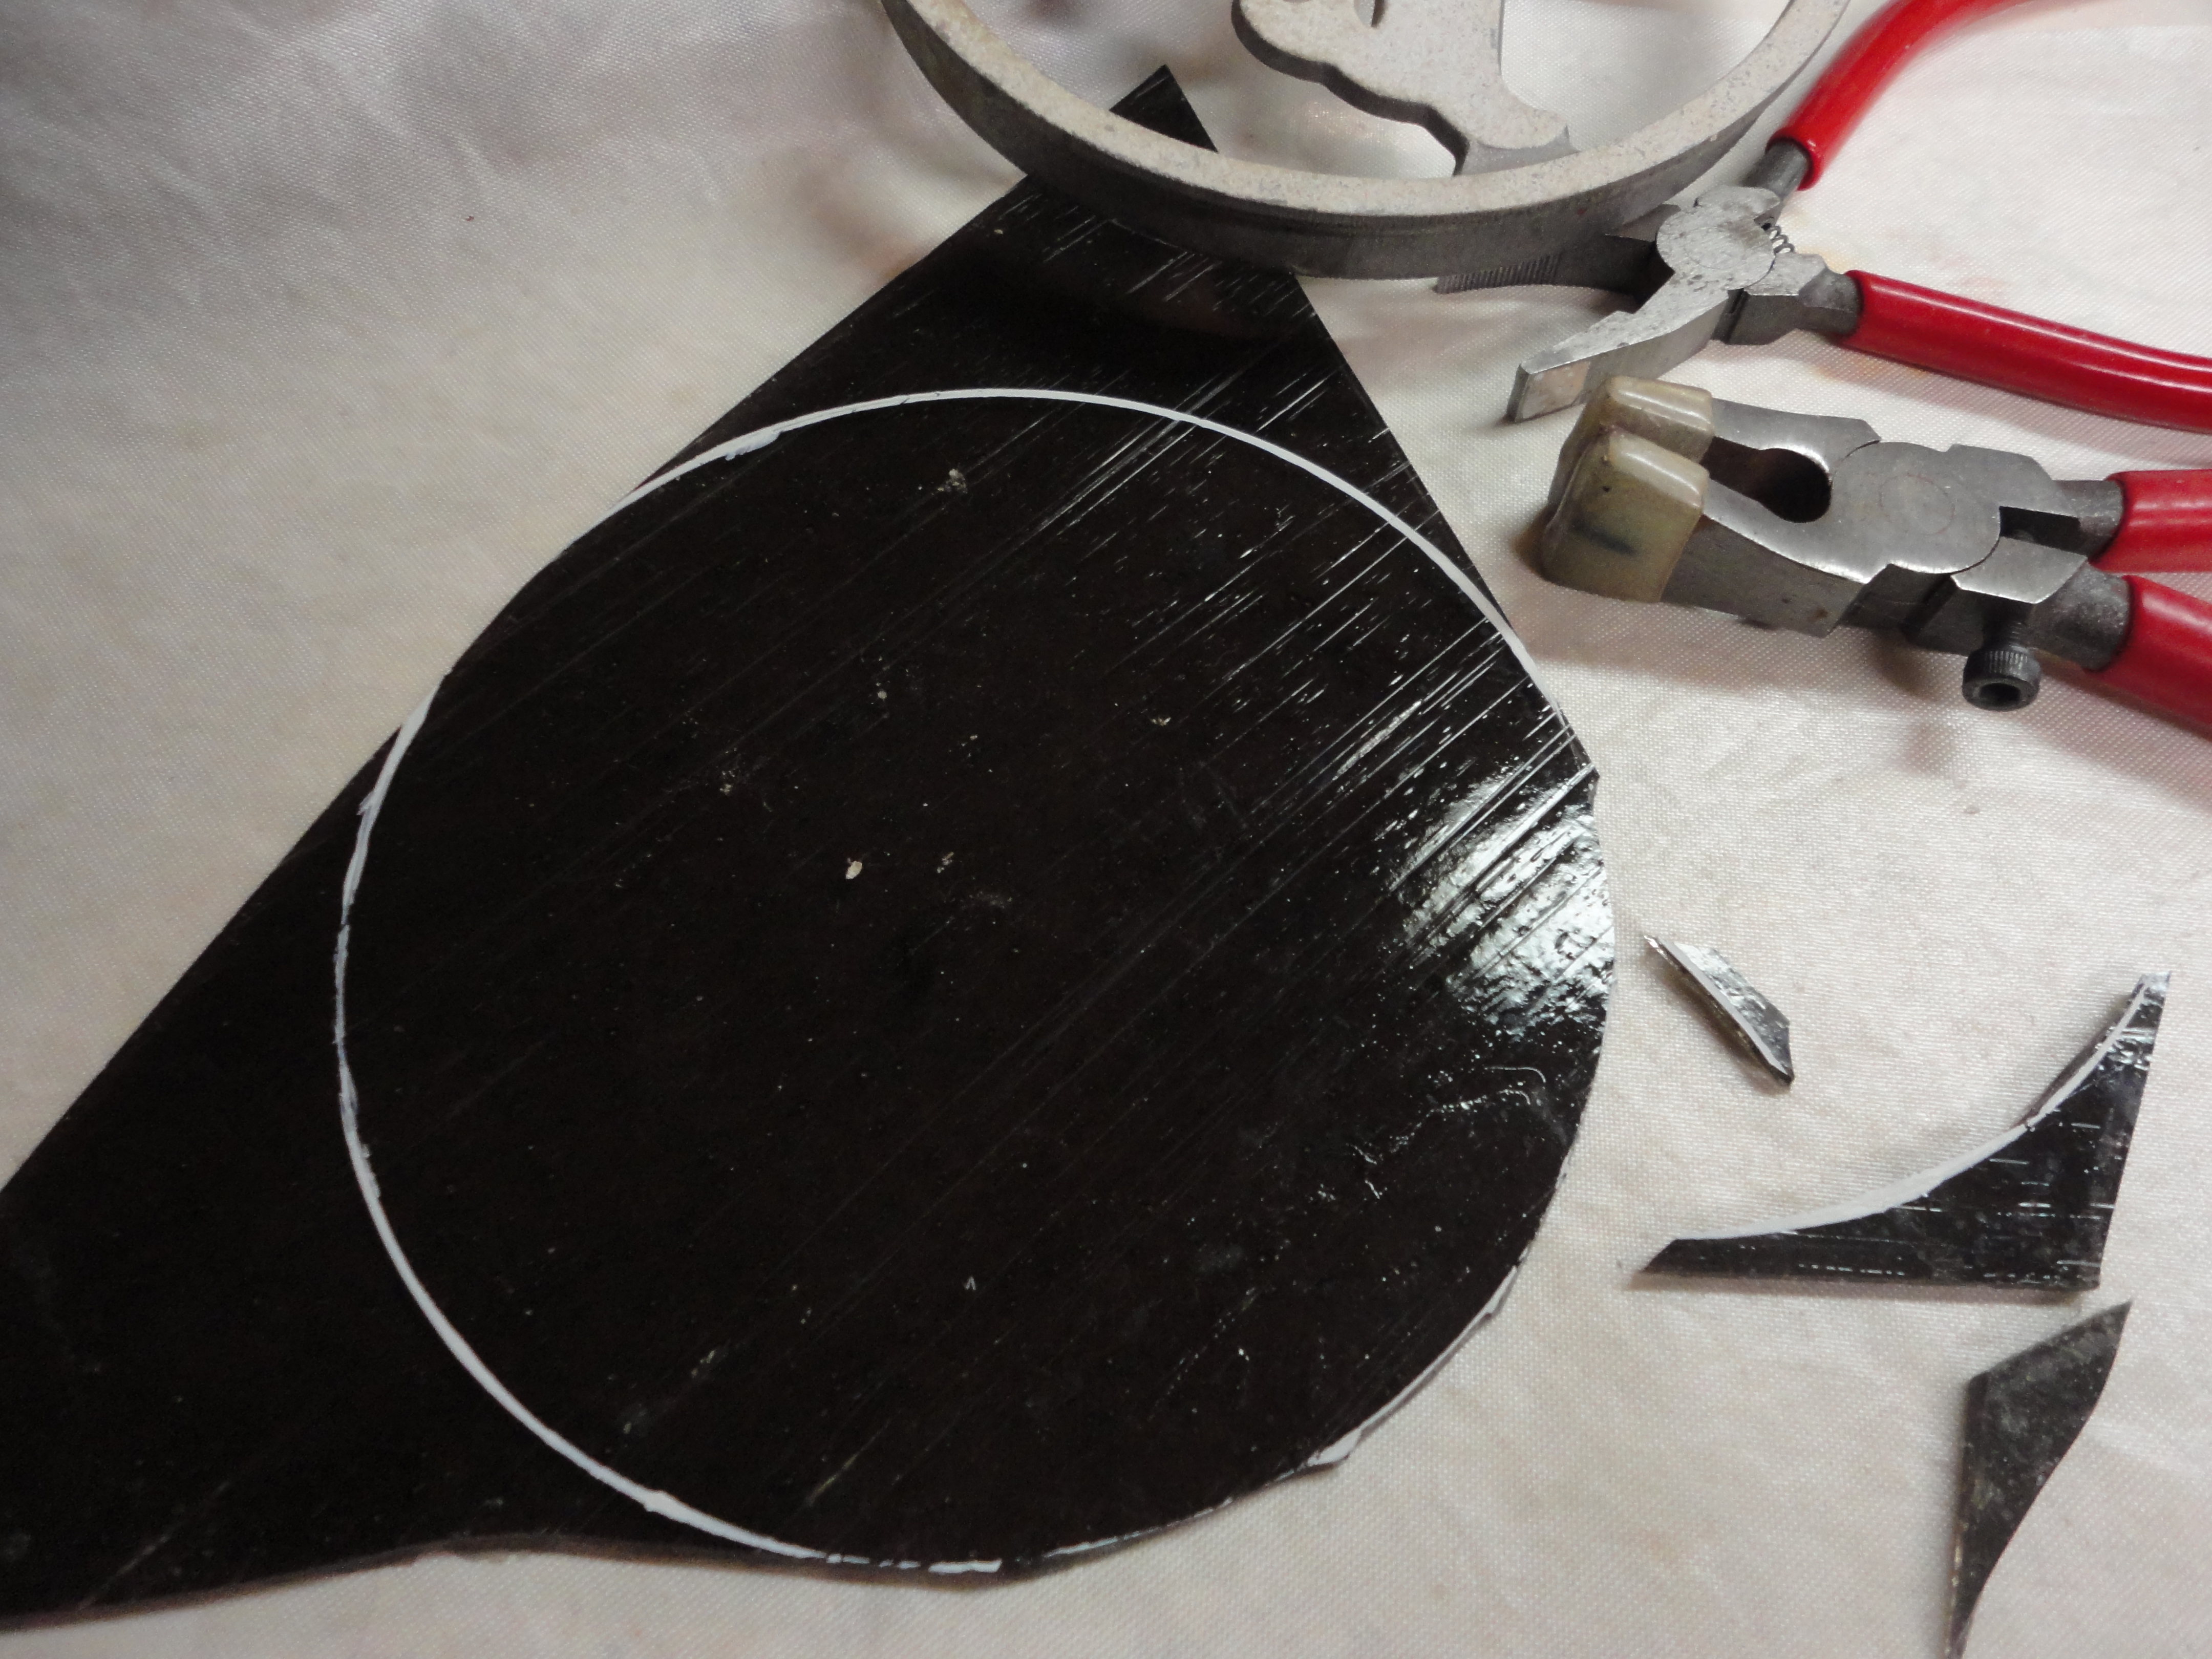


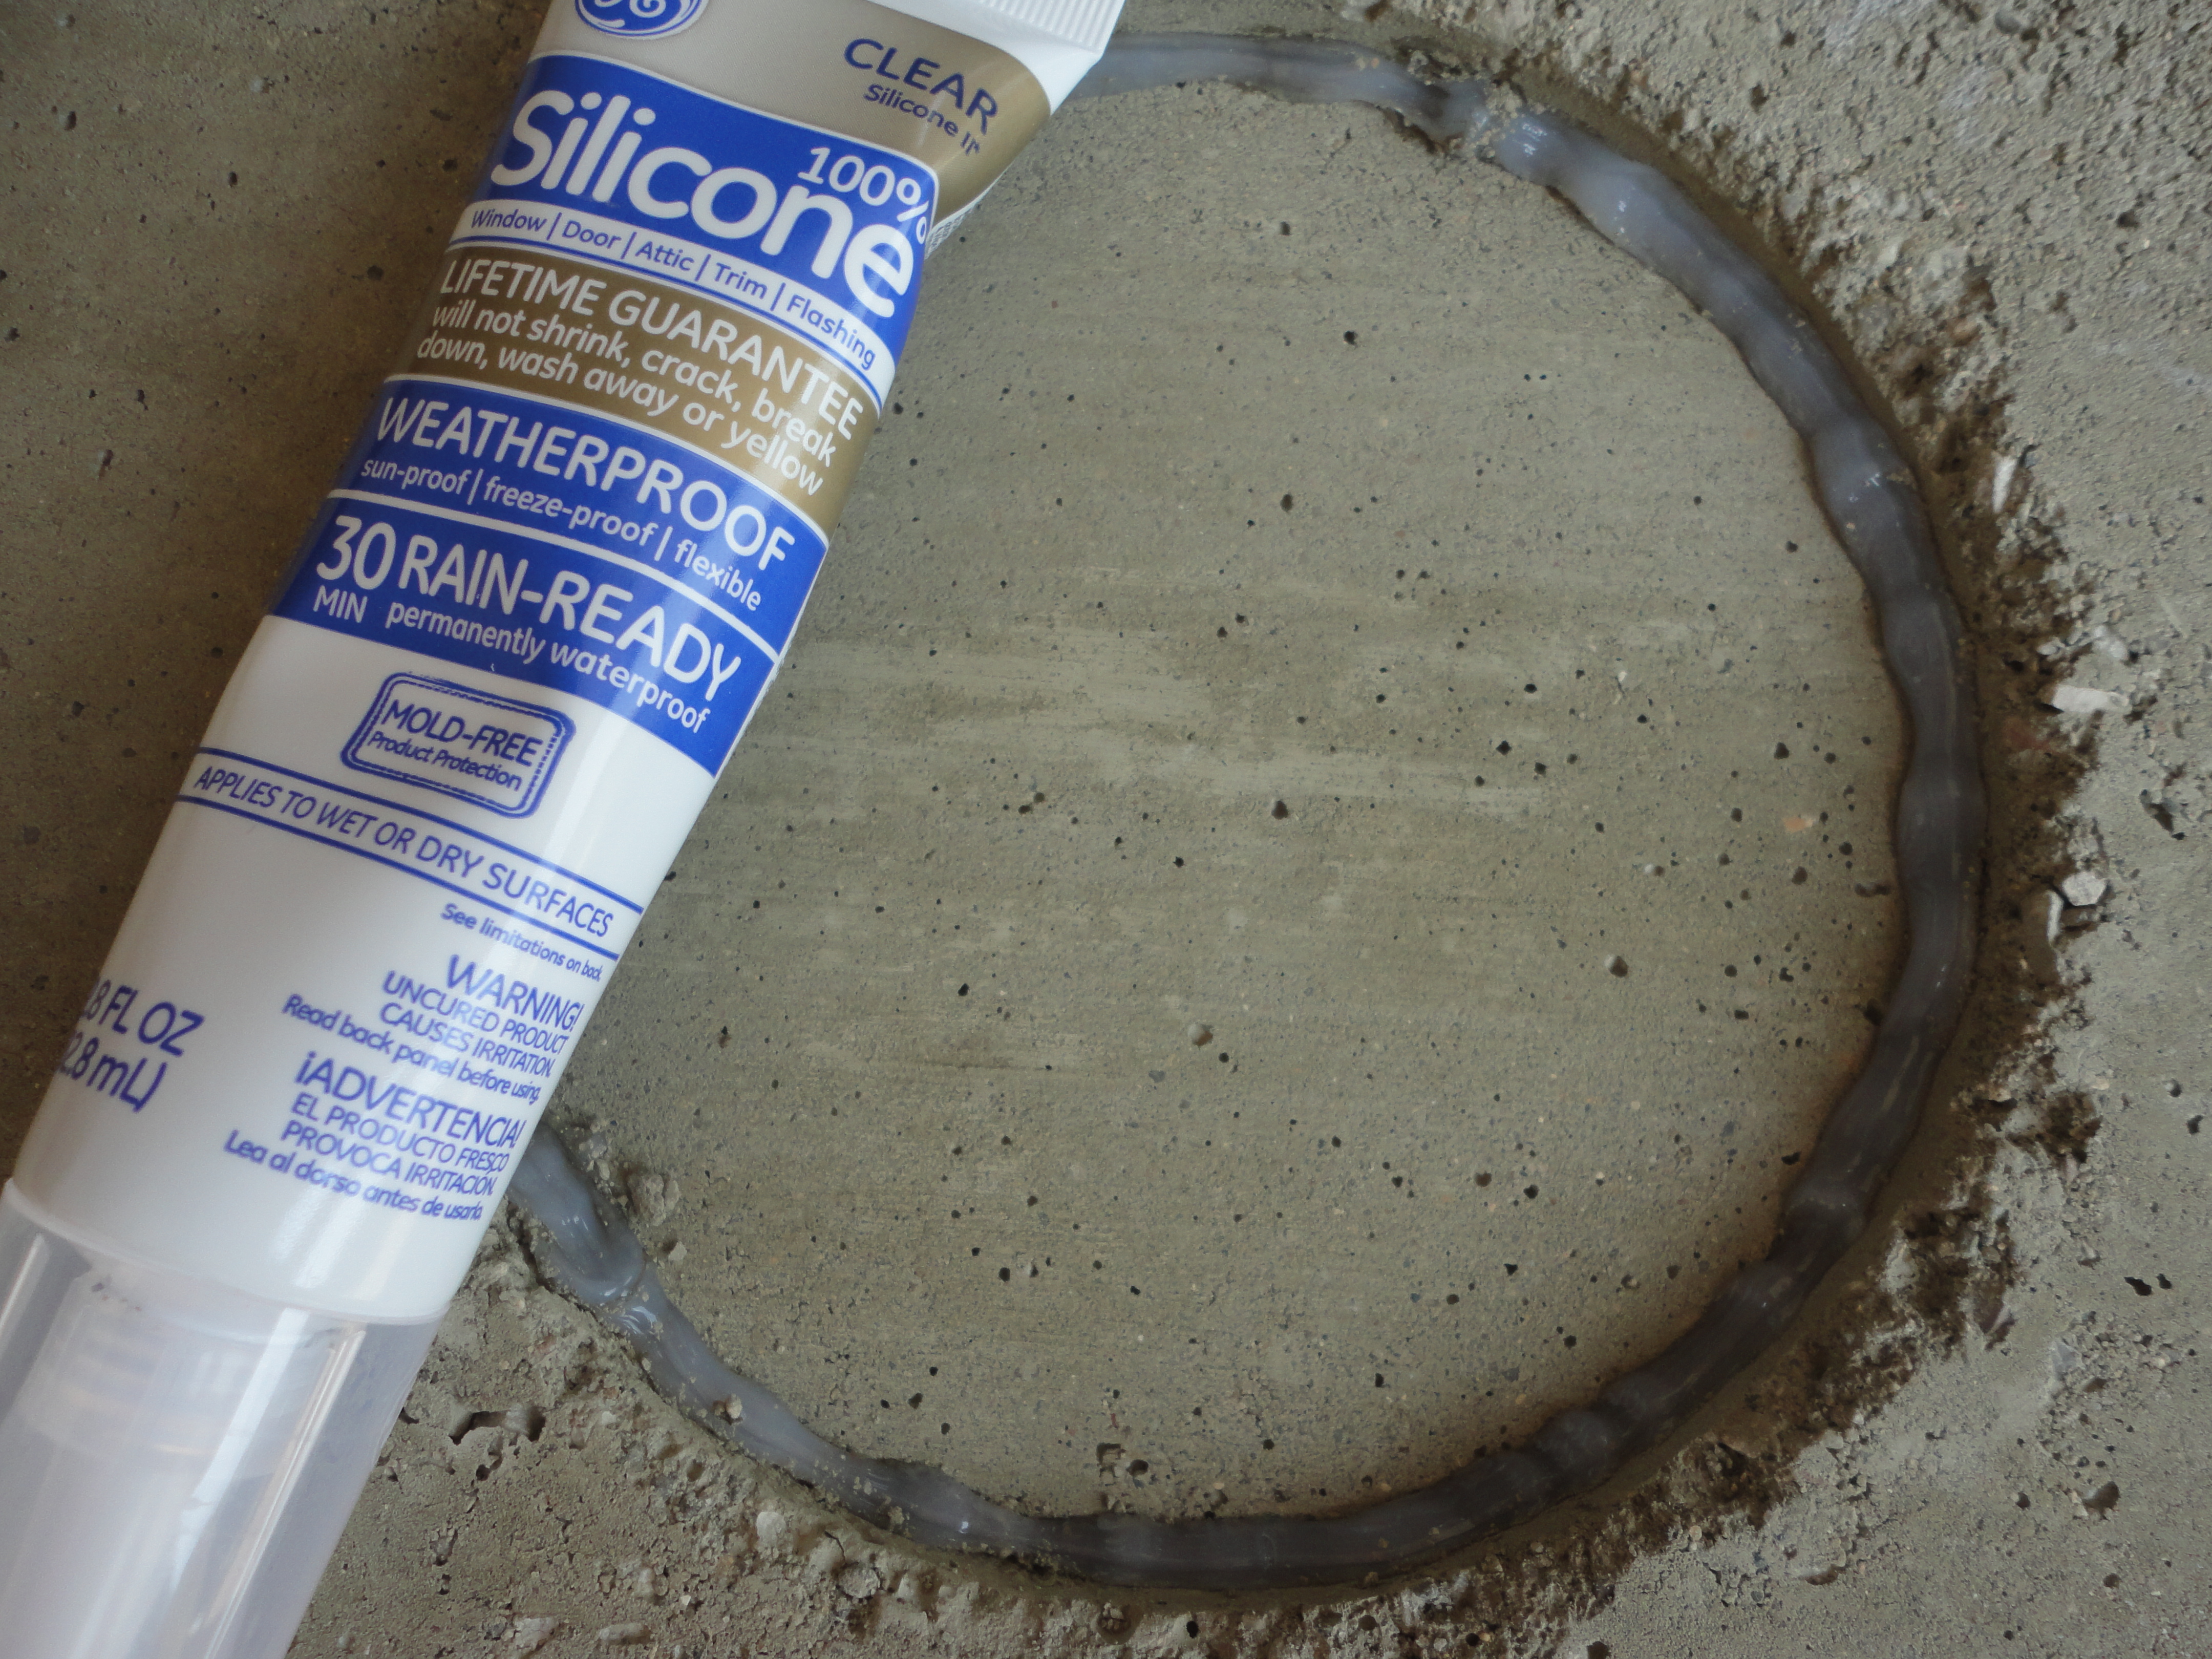
Run a thick bead of silicone around the inside circumference of the concrete circle and set the aluminum piece in place. Dry over night.
Using a baggie, pipe in an initial layer of interior/exterior sanded gray grout to fill the gap between the aluminum and concrete. Then apply a top layer with a putty knife. Let it dry a minute, then smooth and clean with a damp cloth. 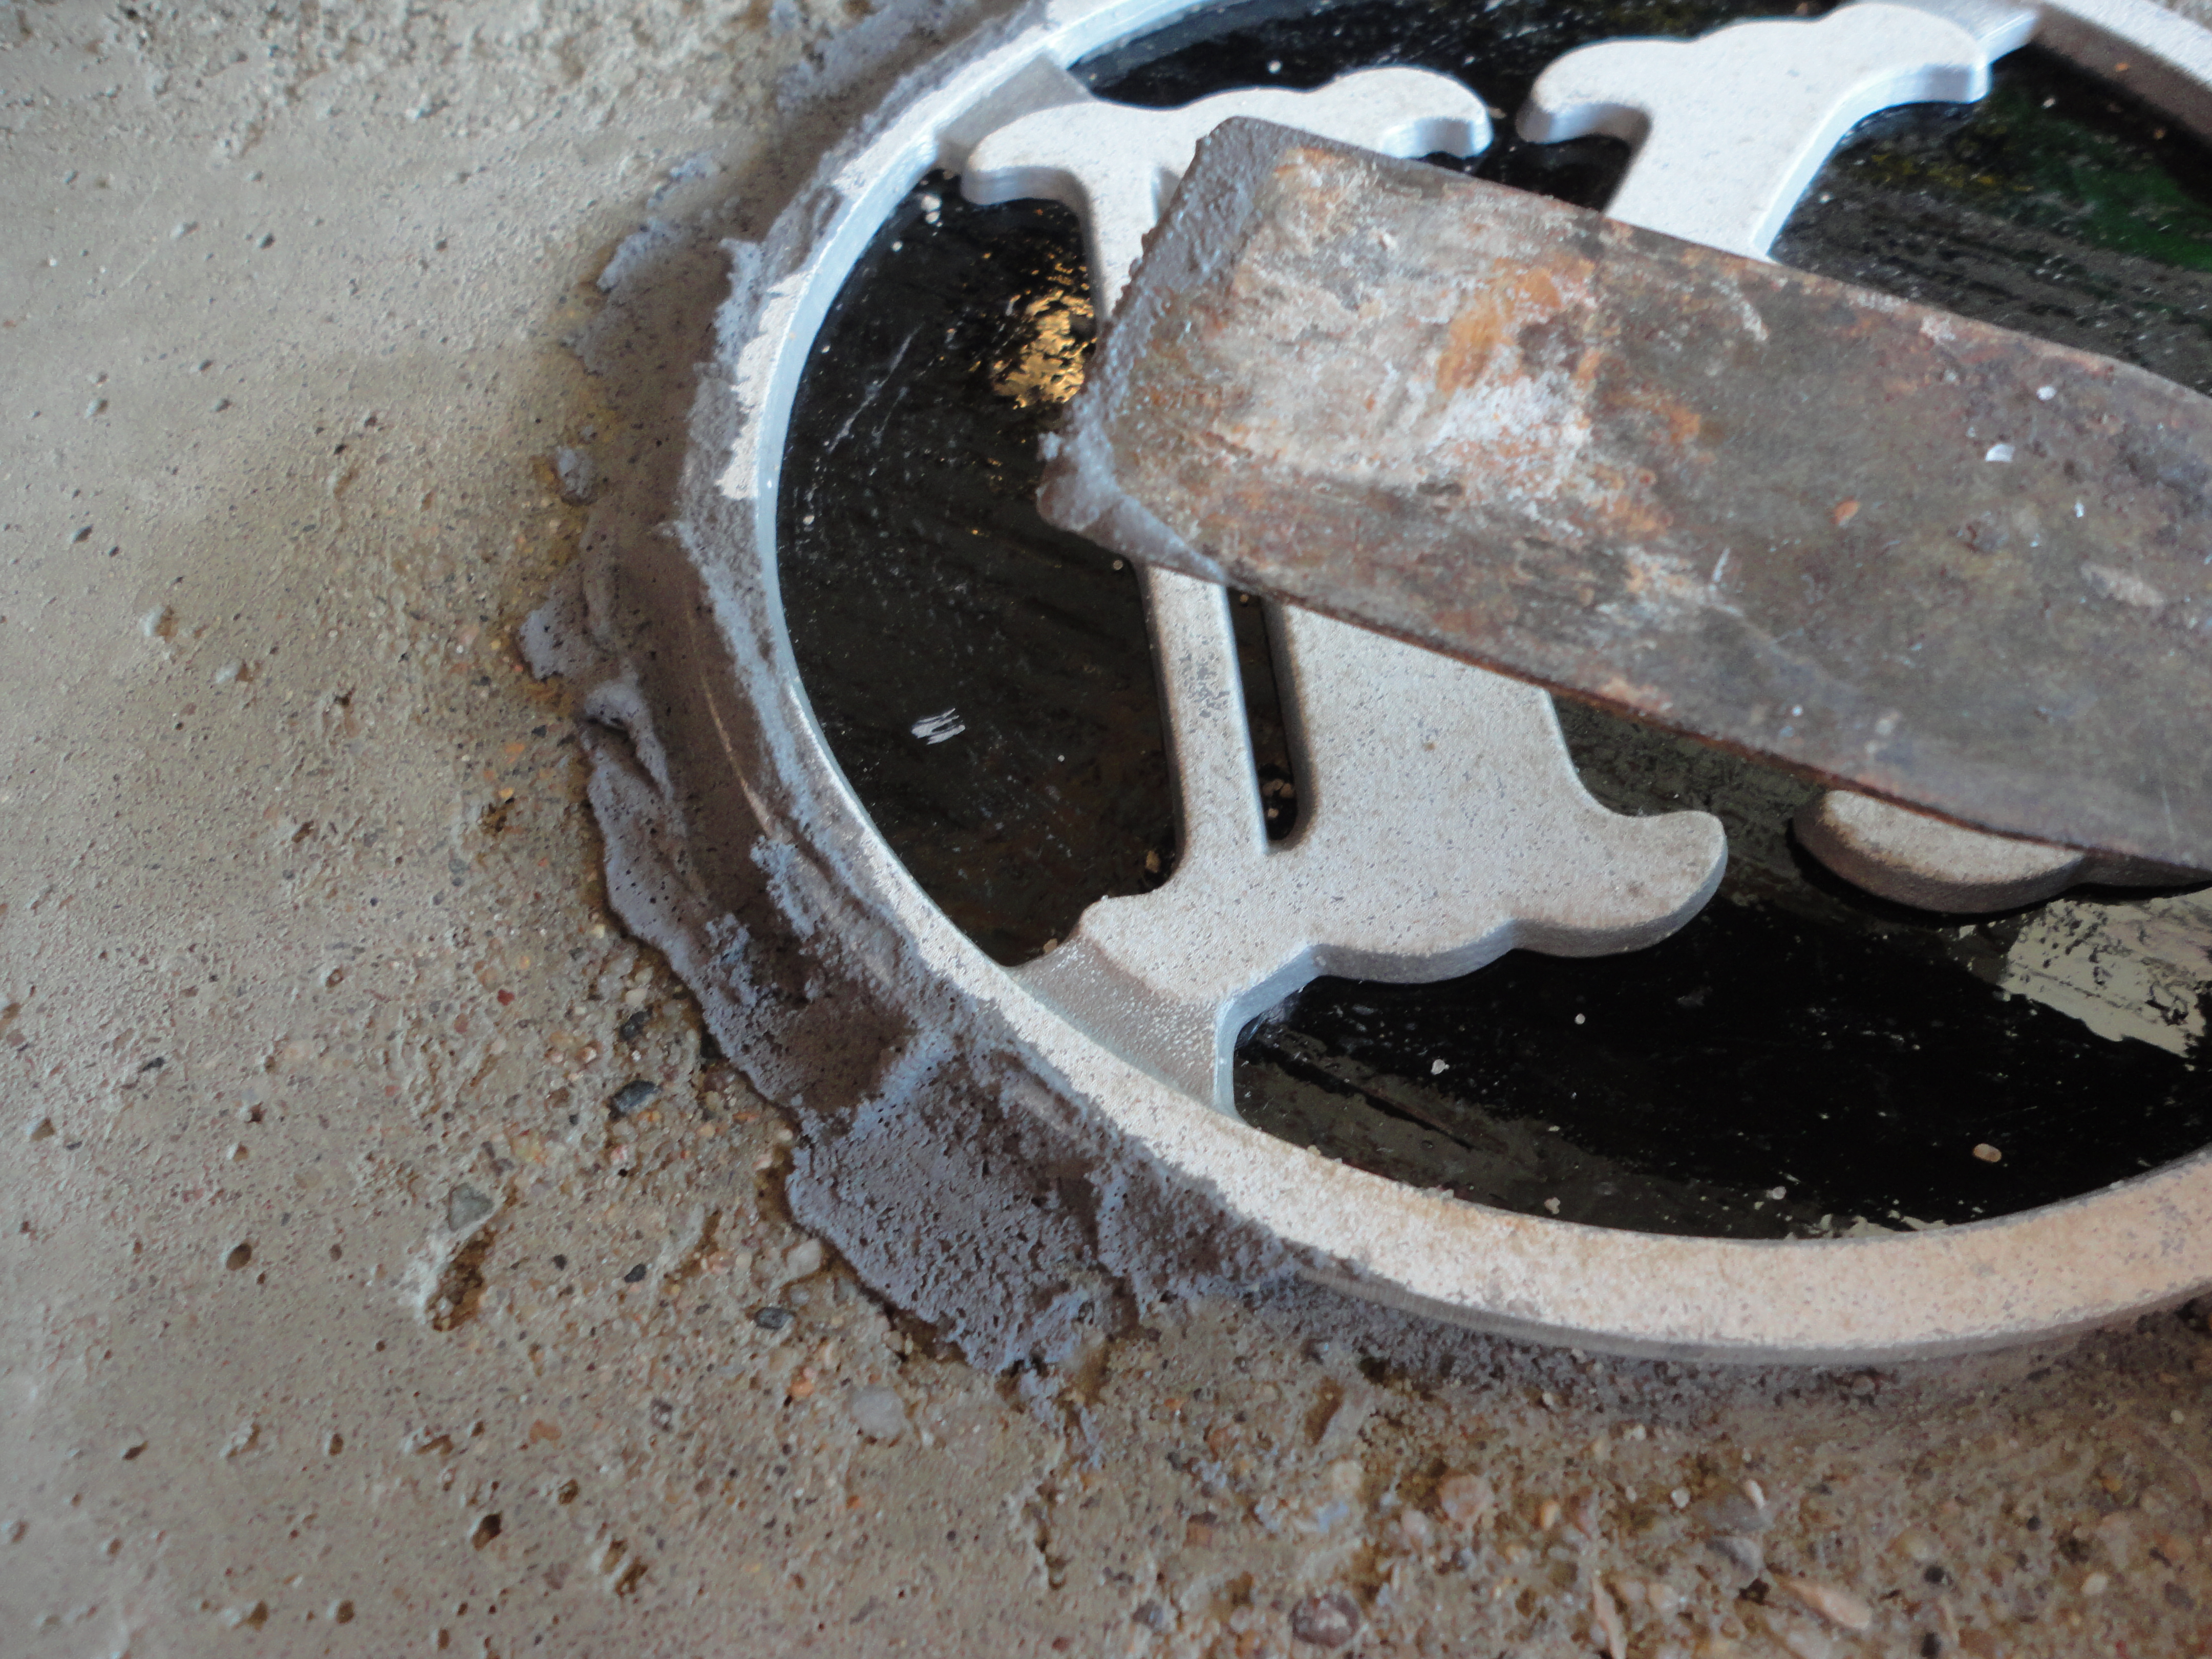
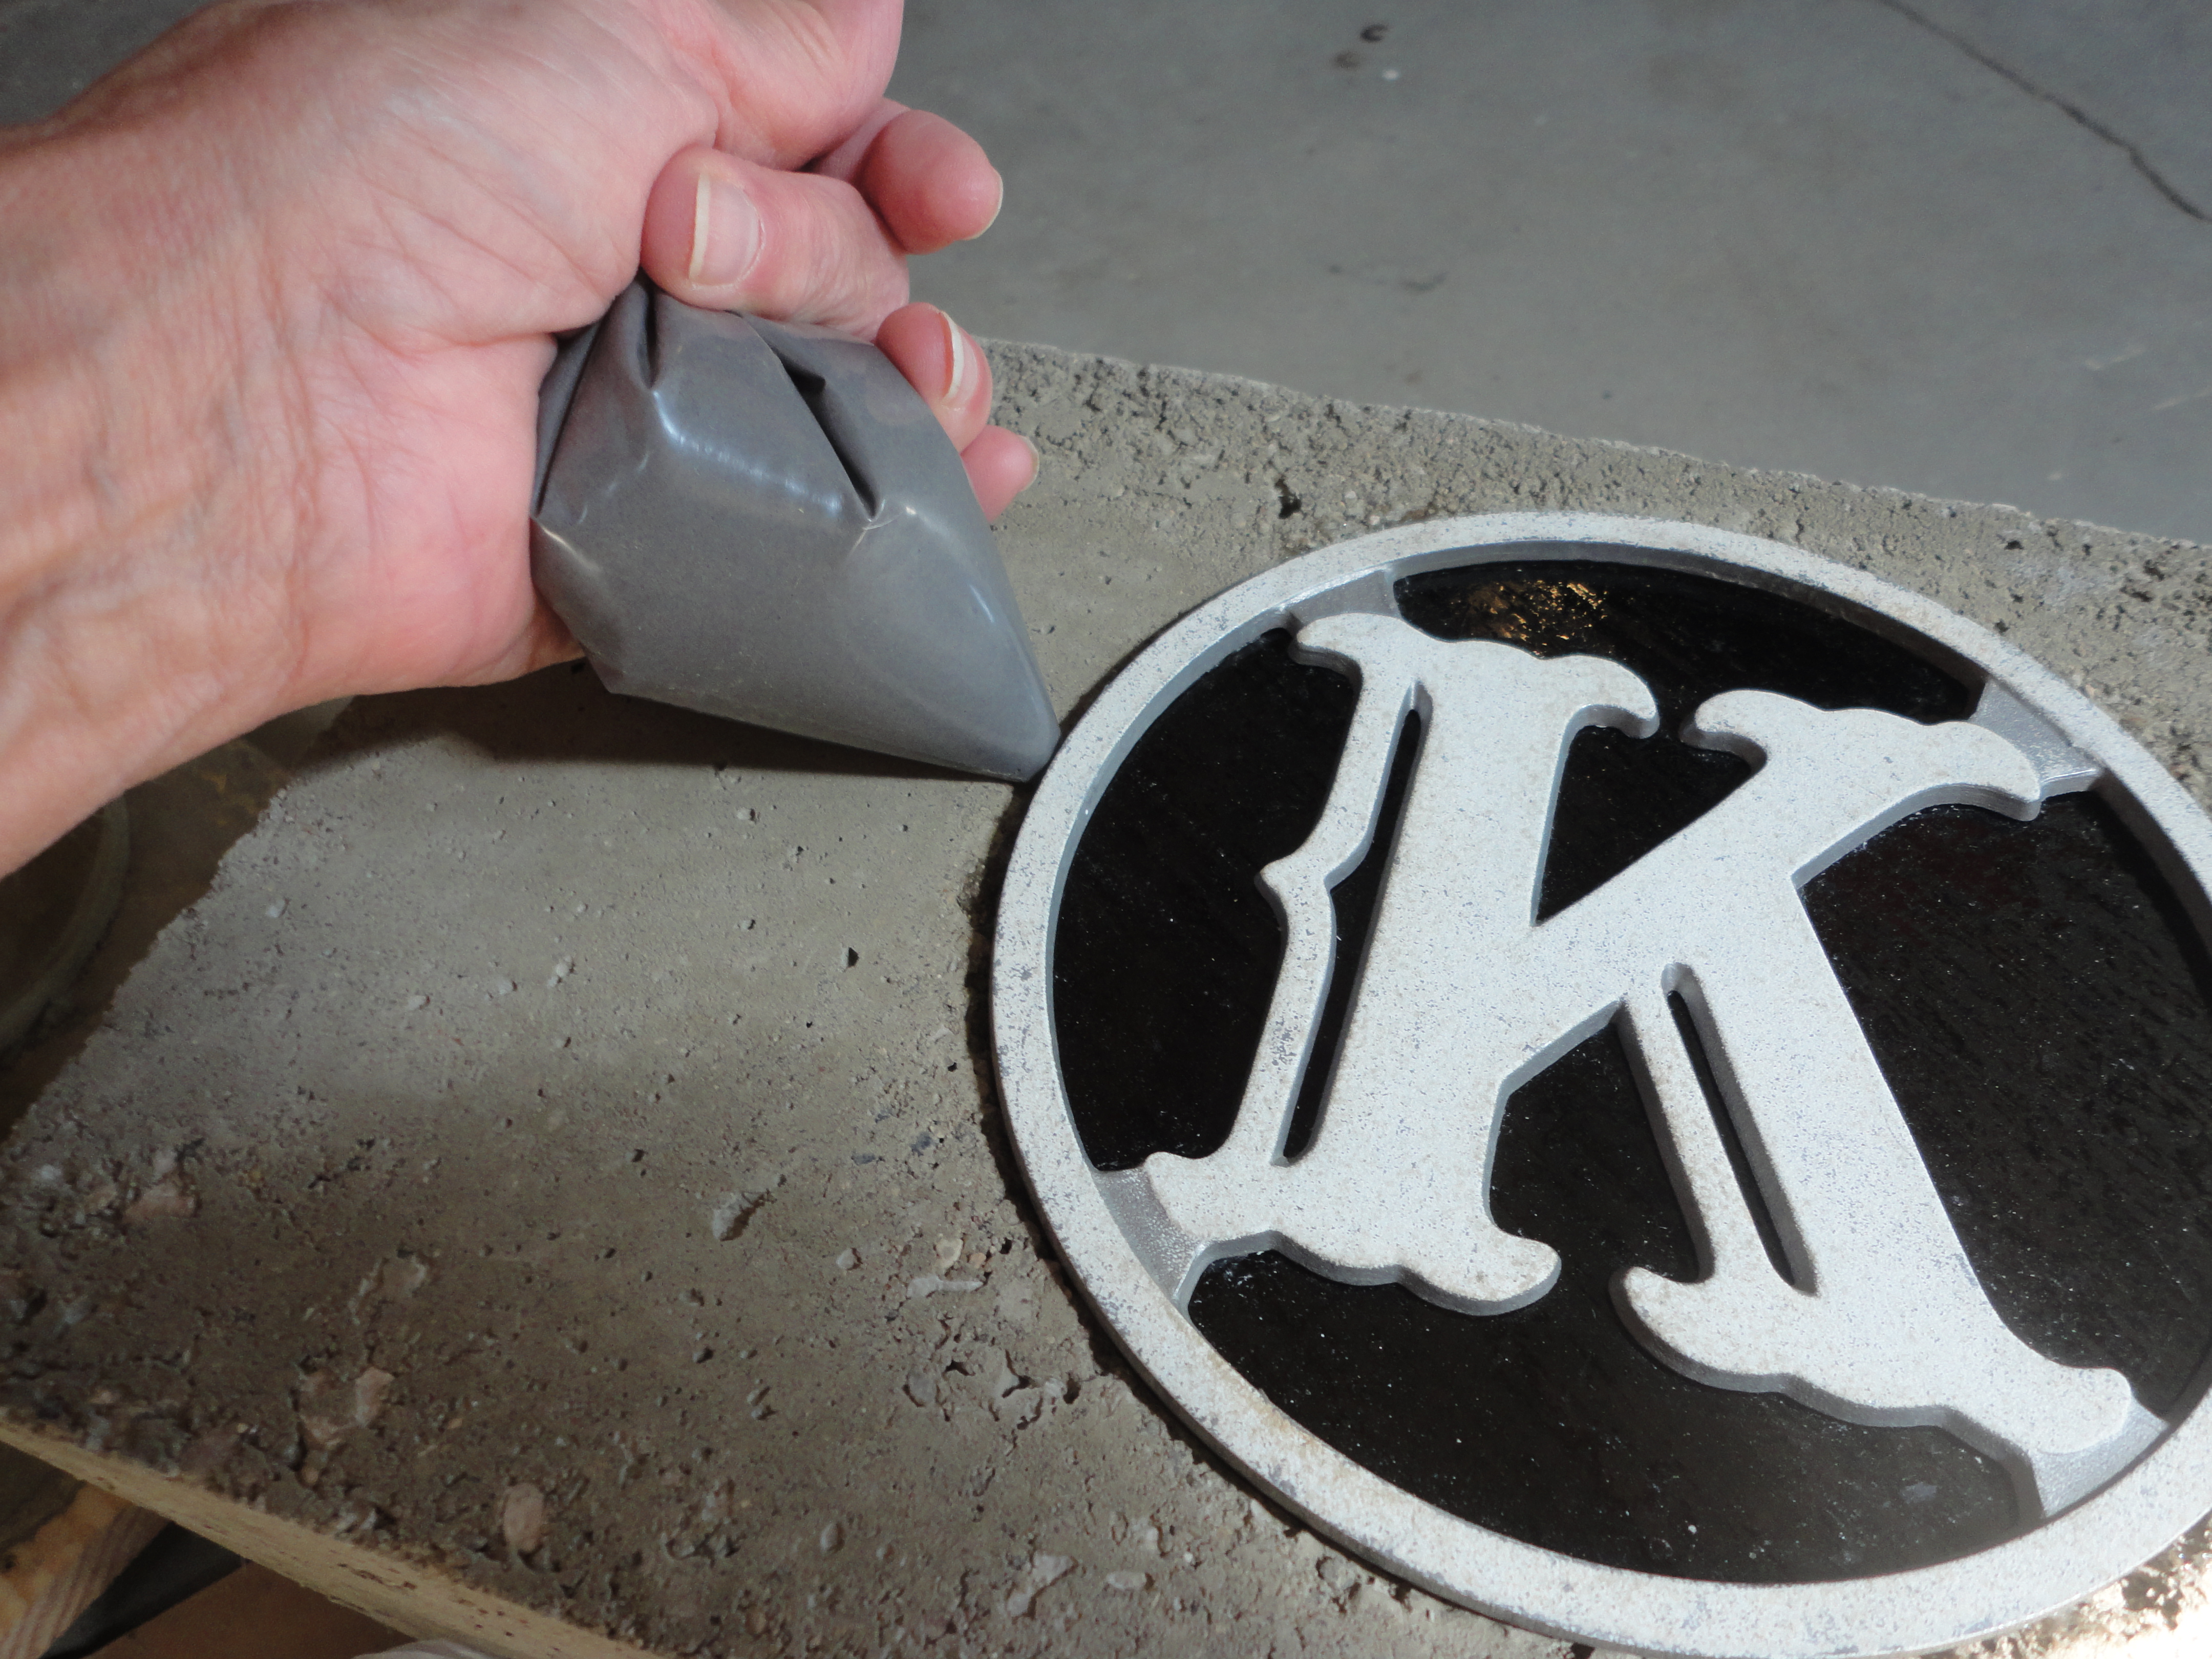
Let dry 12 hours and seal with grout sealer.

There it is.. this little “K” is once again greeting people at our door! What do you think?
I’m thinking the time for garden projects has come to an end for the year. Its time to start thinking Fall and Christmas!
Welcome to glassic touch!
I’ve been eager to start my own blog for a long time, and to join the ranks of all those wonderful people who are willing to share their ideas and techniques with the world. My lack of computer savvy and a fear of not knowing what I’m doing has always held me back. Well, we can’t have anymore of that! They say “you learn by doing”, so I’m going to jump in with both feet and see how it goes!
I have a huge enthusiasm for using reclaimed items, recycled materials, glass, and wire to create unique pieces for the garden or home. For me, the most challenging and funnest step, in designing a piece, is figuring out that little touch of something special or unexpected to make it my own…. I like to call it the “glassic touch”.
We were completing a project when I decided to start my blog, and I’d like to share it with you as my first post. I hope you find it interesting and inspiring.
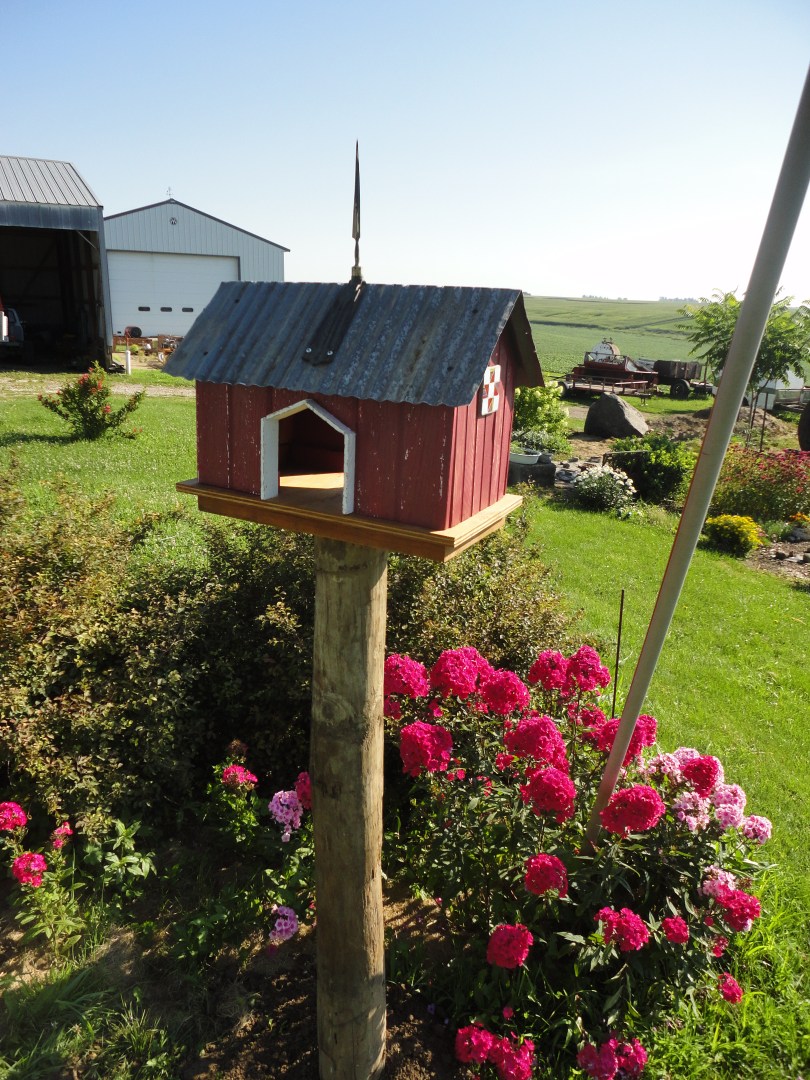
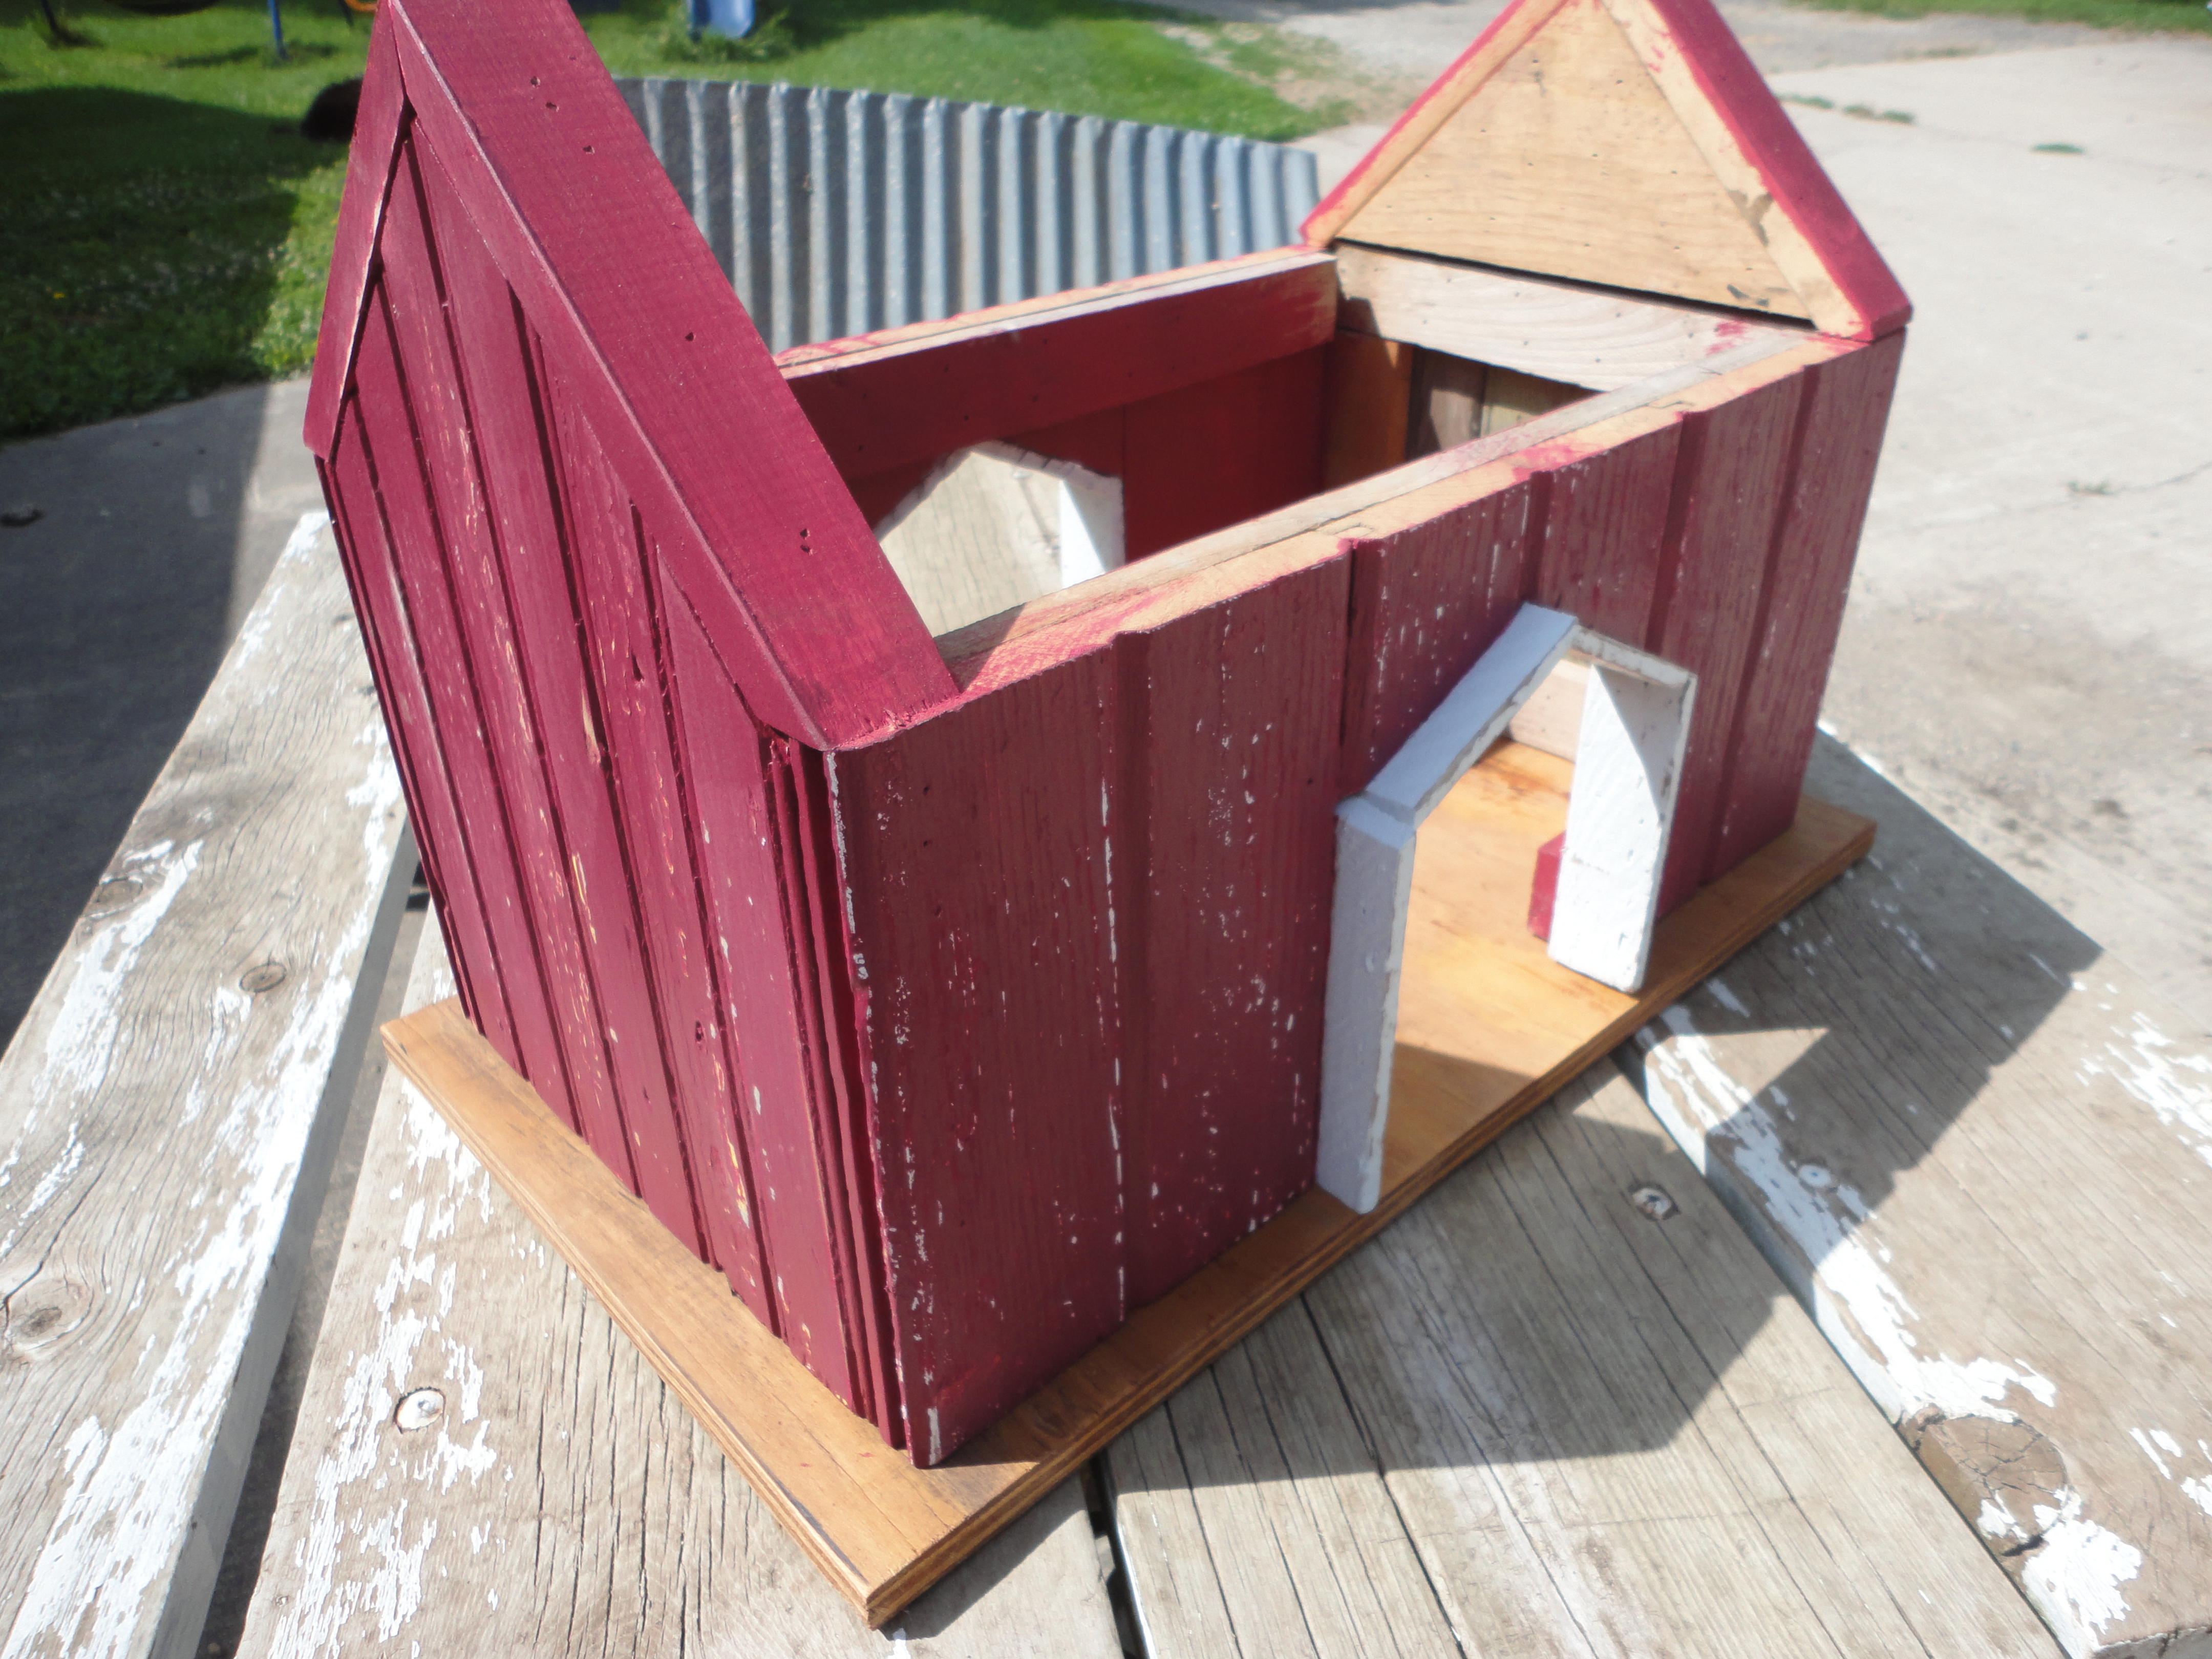
I came across a small pile of mismatched forgotten boards, while sorting through “my stuff” in the garage, and instantly recalled the image of an old rustic barn birdfeeder I had admired in a garden magazine several years ago. Although the boards were a mix of old narrow wainscoting and wide tongue and groove, it looked achieveable. After sketching out my idea and deciding the layout, my husband offered to help me build it.

The size of our feeder was determined by the boards we had available. We used the narrow wainscoting for the sides and the wide for the front and back. A simple frame was built from scrap lumber and the boards were attached with a brad nailer, painted red, then lightly sanded. I rescued a 1 1/2″W x 1/4″ thick piece of rough shipping crate lath from the trash bin to trim out the side entries. The trim pieces were cut, attached, and painted white. My completed barn measurements, without a base, are 20 1/2″L x 11 1/2″W. The side peaks are 14 1/2″H.
For the base, we used a piece of 3/4″plywood, cut 22 1/2″L x 13″W and a 1 1/2″thick plank cut 20 1/2″L x 11″W. Both were sanded and treated with Thompson’s Water Seal.

Please be careful with this next step, cut steel edges are very sharp and jagged! You may want to wear gloves. Using tin snips, cut a piece of corrugated steel, with furrows running lengthwise, 20″L x approximately 23 1/2″W. For a neater appearance, cut the steel so the sides are matching. For example, I needed the roof to be 23 1/2″W, but went a bit wider so I was at the top of a furrow on each side. I was lucky on this step and had a scrap of steel that was in very good condition on one end and I only had to make 2 cuts. Cutting up the side, along a furrow, may be difficult. We found it helpful to bend it back as we cut and take your time.
My husband clued me in on a very helpful tip for bending the steel. Once cut, lay it flat, topside down (we were working on concrete). Pencil mark in the middle where you want it to bend. Lay a steel rod on the mark and hold it down firmly.. I stood on one end while my husband held the other. Hammer on the rod to collaspe the furrows down. When done, keep the rod in place and slowly raise up one side of the steel, bending it evenly towards the rod. Easy Peasy!


Disappointingly, my bird feeder sit in pieces for the last two couple of months while I debated on what I wanted to add to the top. I remembered that the one in the magazine had something protruding from the top.. a little metal weathervane, I think. Regardless, I needed something and nothing I had was really clicking. My problem was solved a few weeks ago when my sister declared she was not leaving a 75% off junk booth until she found something. After digging around a bit she popped up with a mini lightning rod on an upside down v-shaped brass holder. TA-DAA! Six Dollars!! It was perfect! I’m so glad she didn’t want it, that could have been a problem.
So, finally, we were ready to set my feeder in place. We enjoy bird watching, so it was positioned close to the house, amid a patch of red garden phlox, and turned at an angle so there was a view through the sides.
Coming up from the bottom, so screws wouldn’t show, the feeder was attached to the plywood. Screw on roof and lightning rod. Set your post. Attach the plank to the wooden post with lag screws. Sit barn with plywood on the plank, and attach with long screws through the bottom of the plank, again so screws are hidden. Note – Screw tips may protrude through the plywood so place screws towards the side ends of the feeder so you maintain a clean view through the side entries.
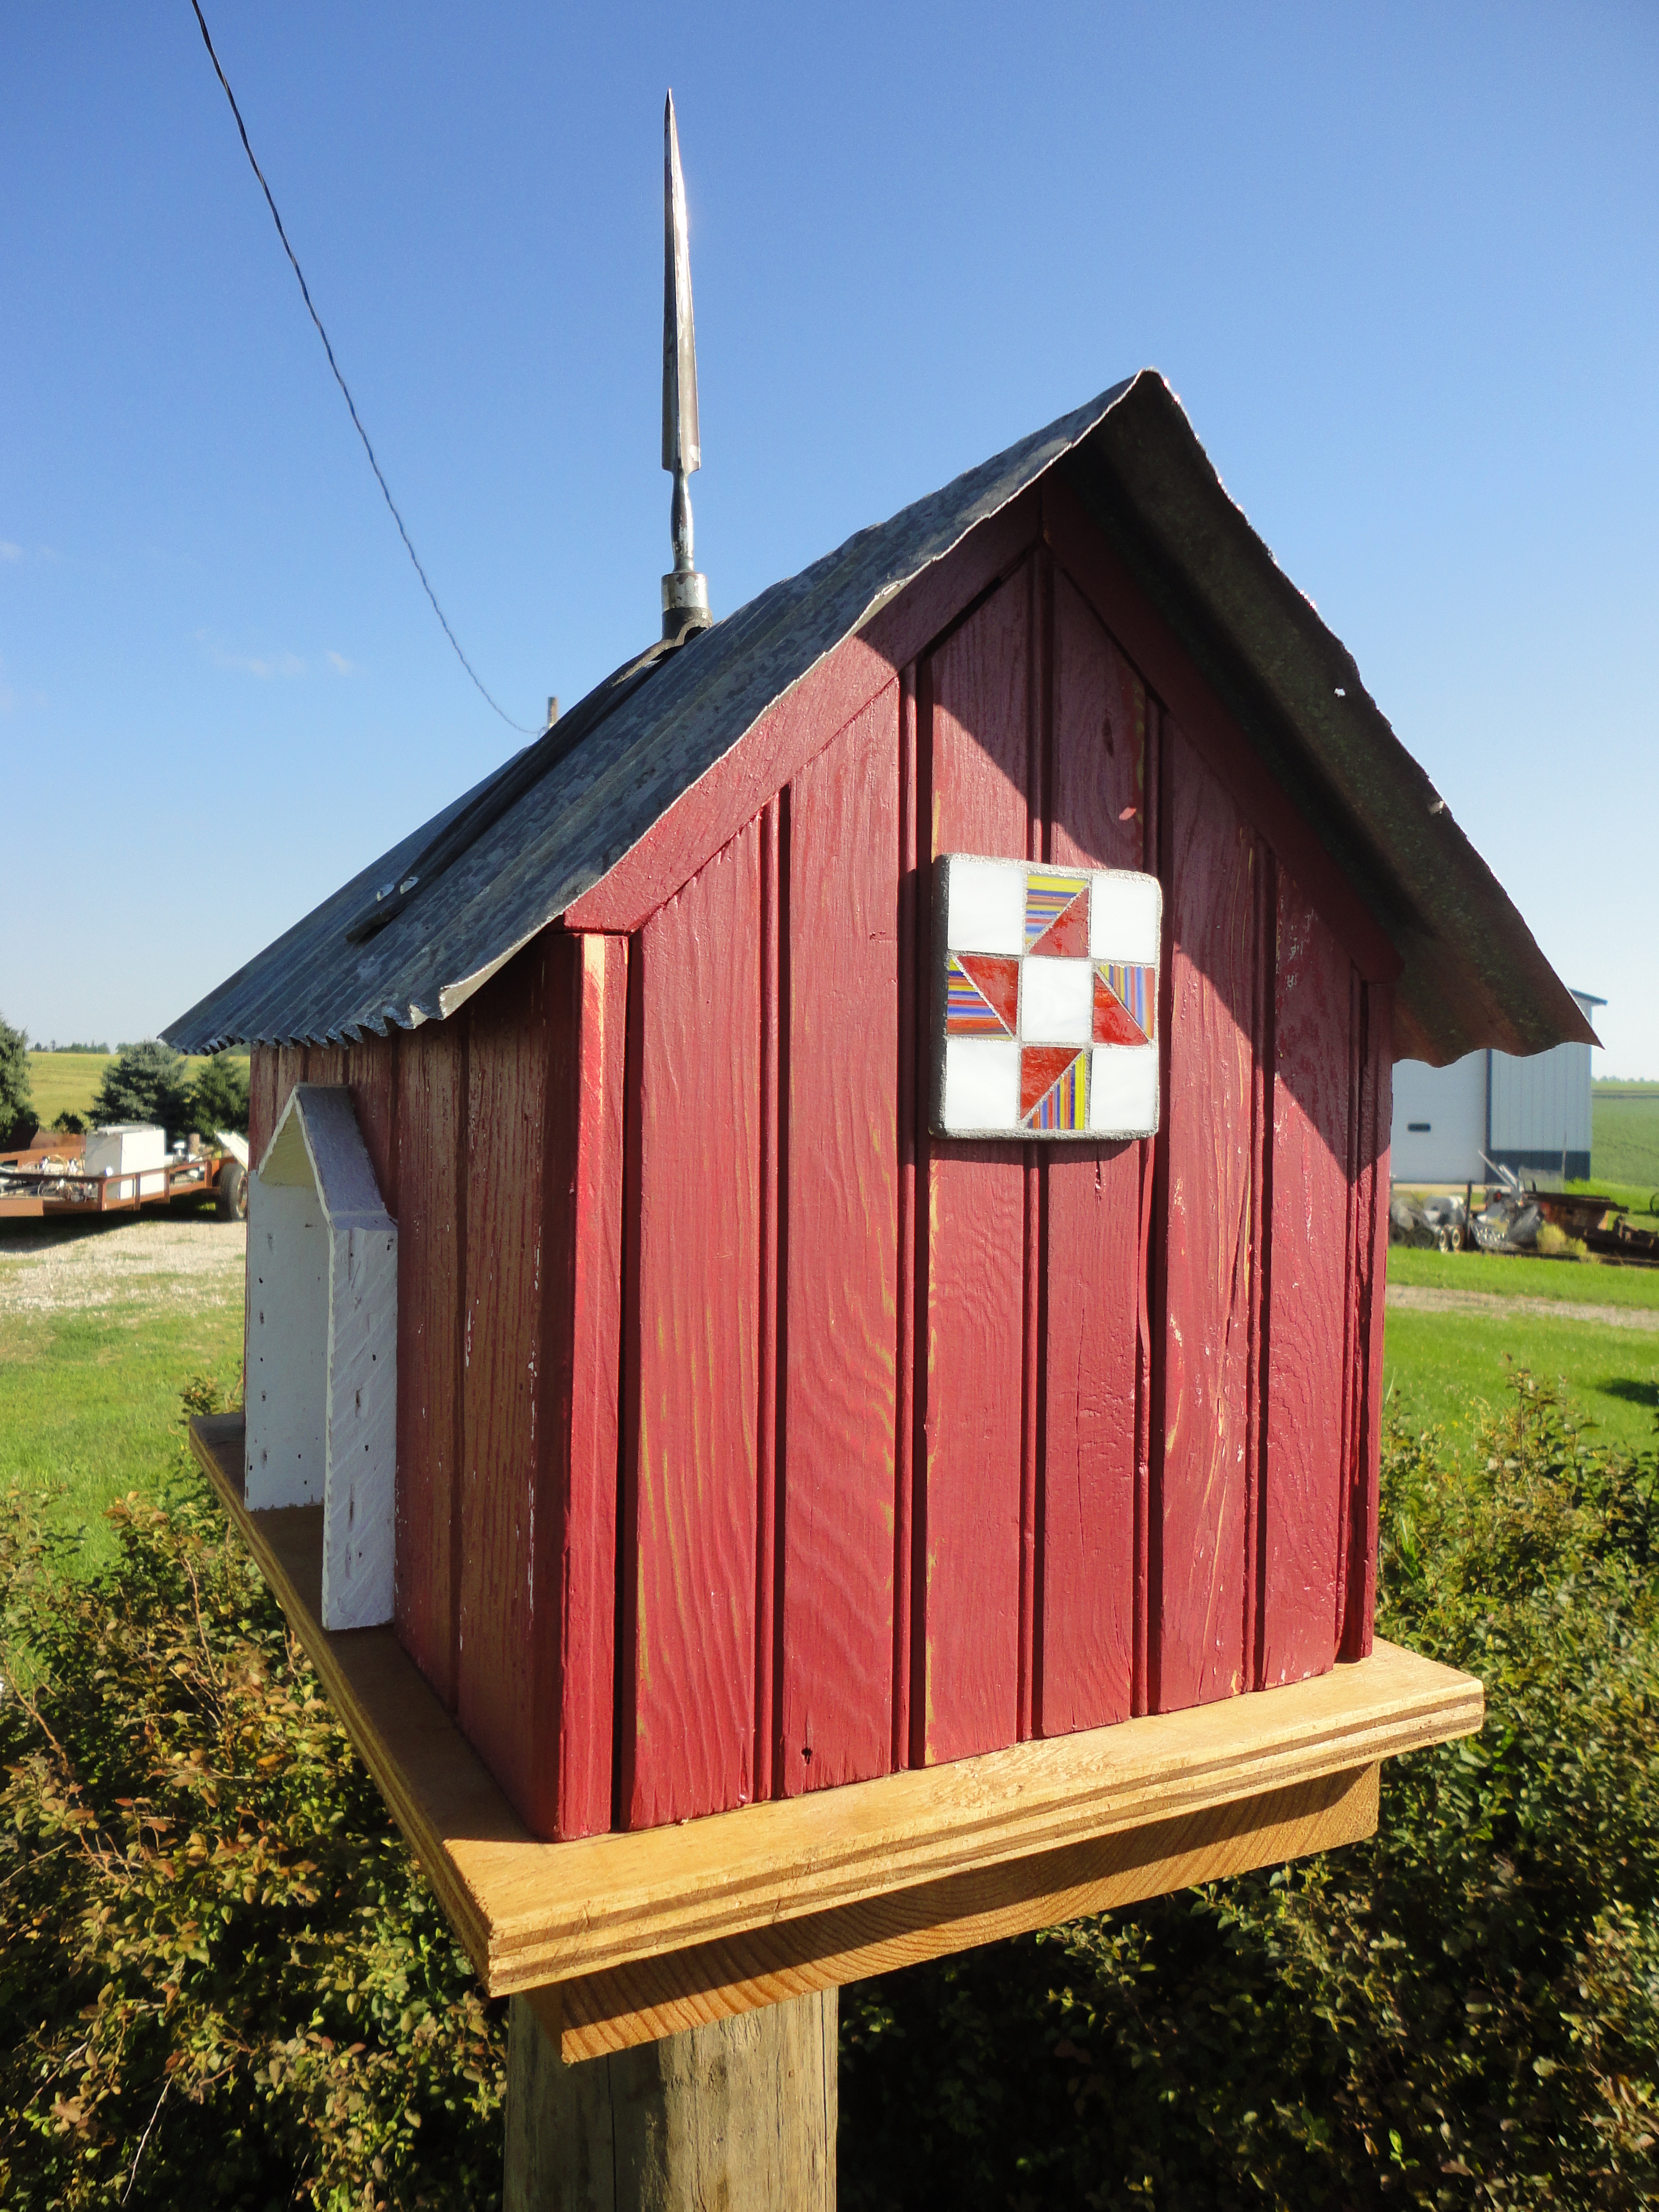
And for “the glassic touch“? What’s a barn without a barn quilt?!
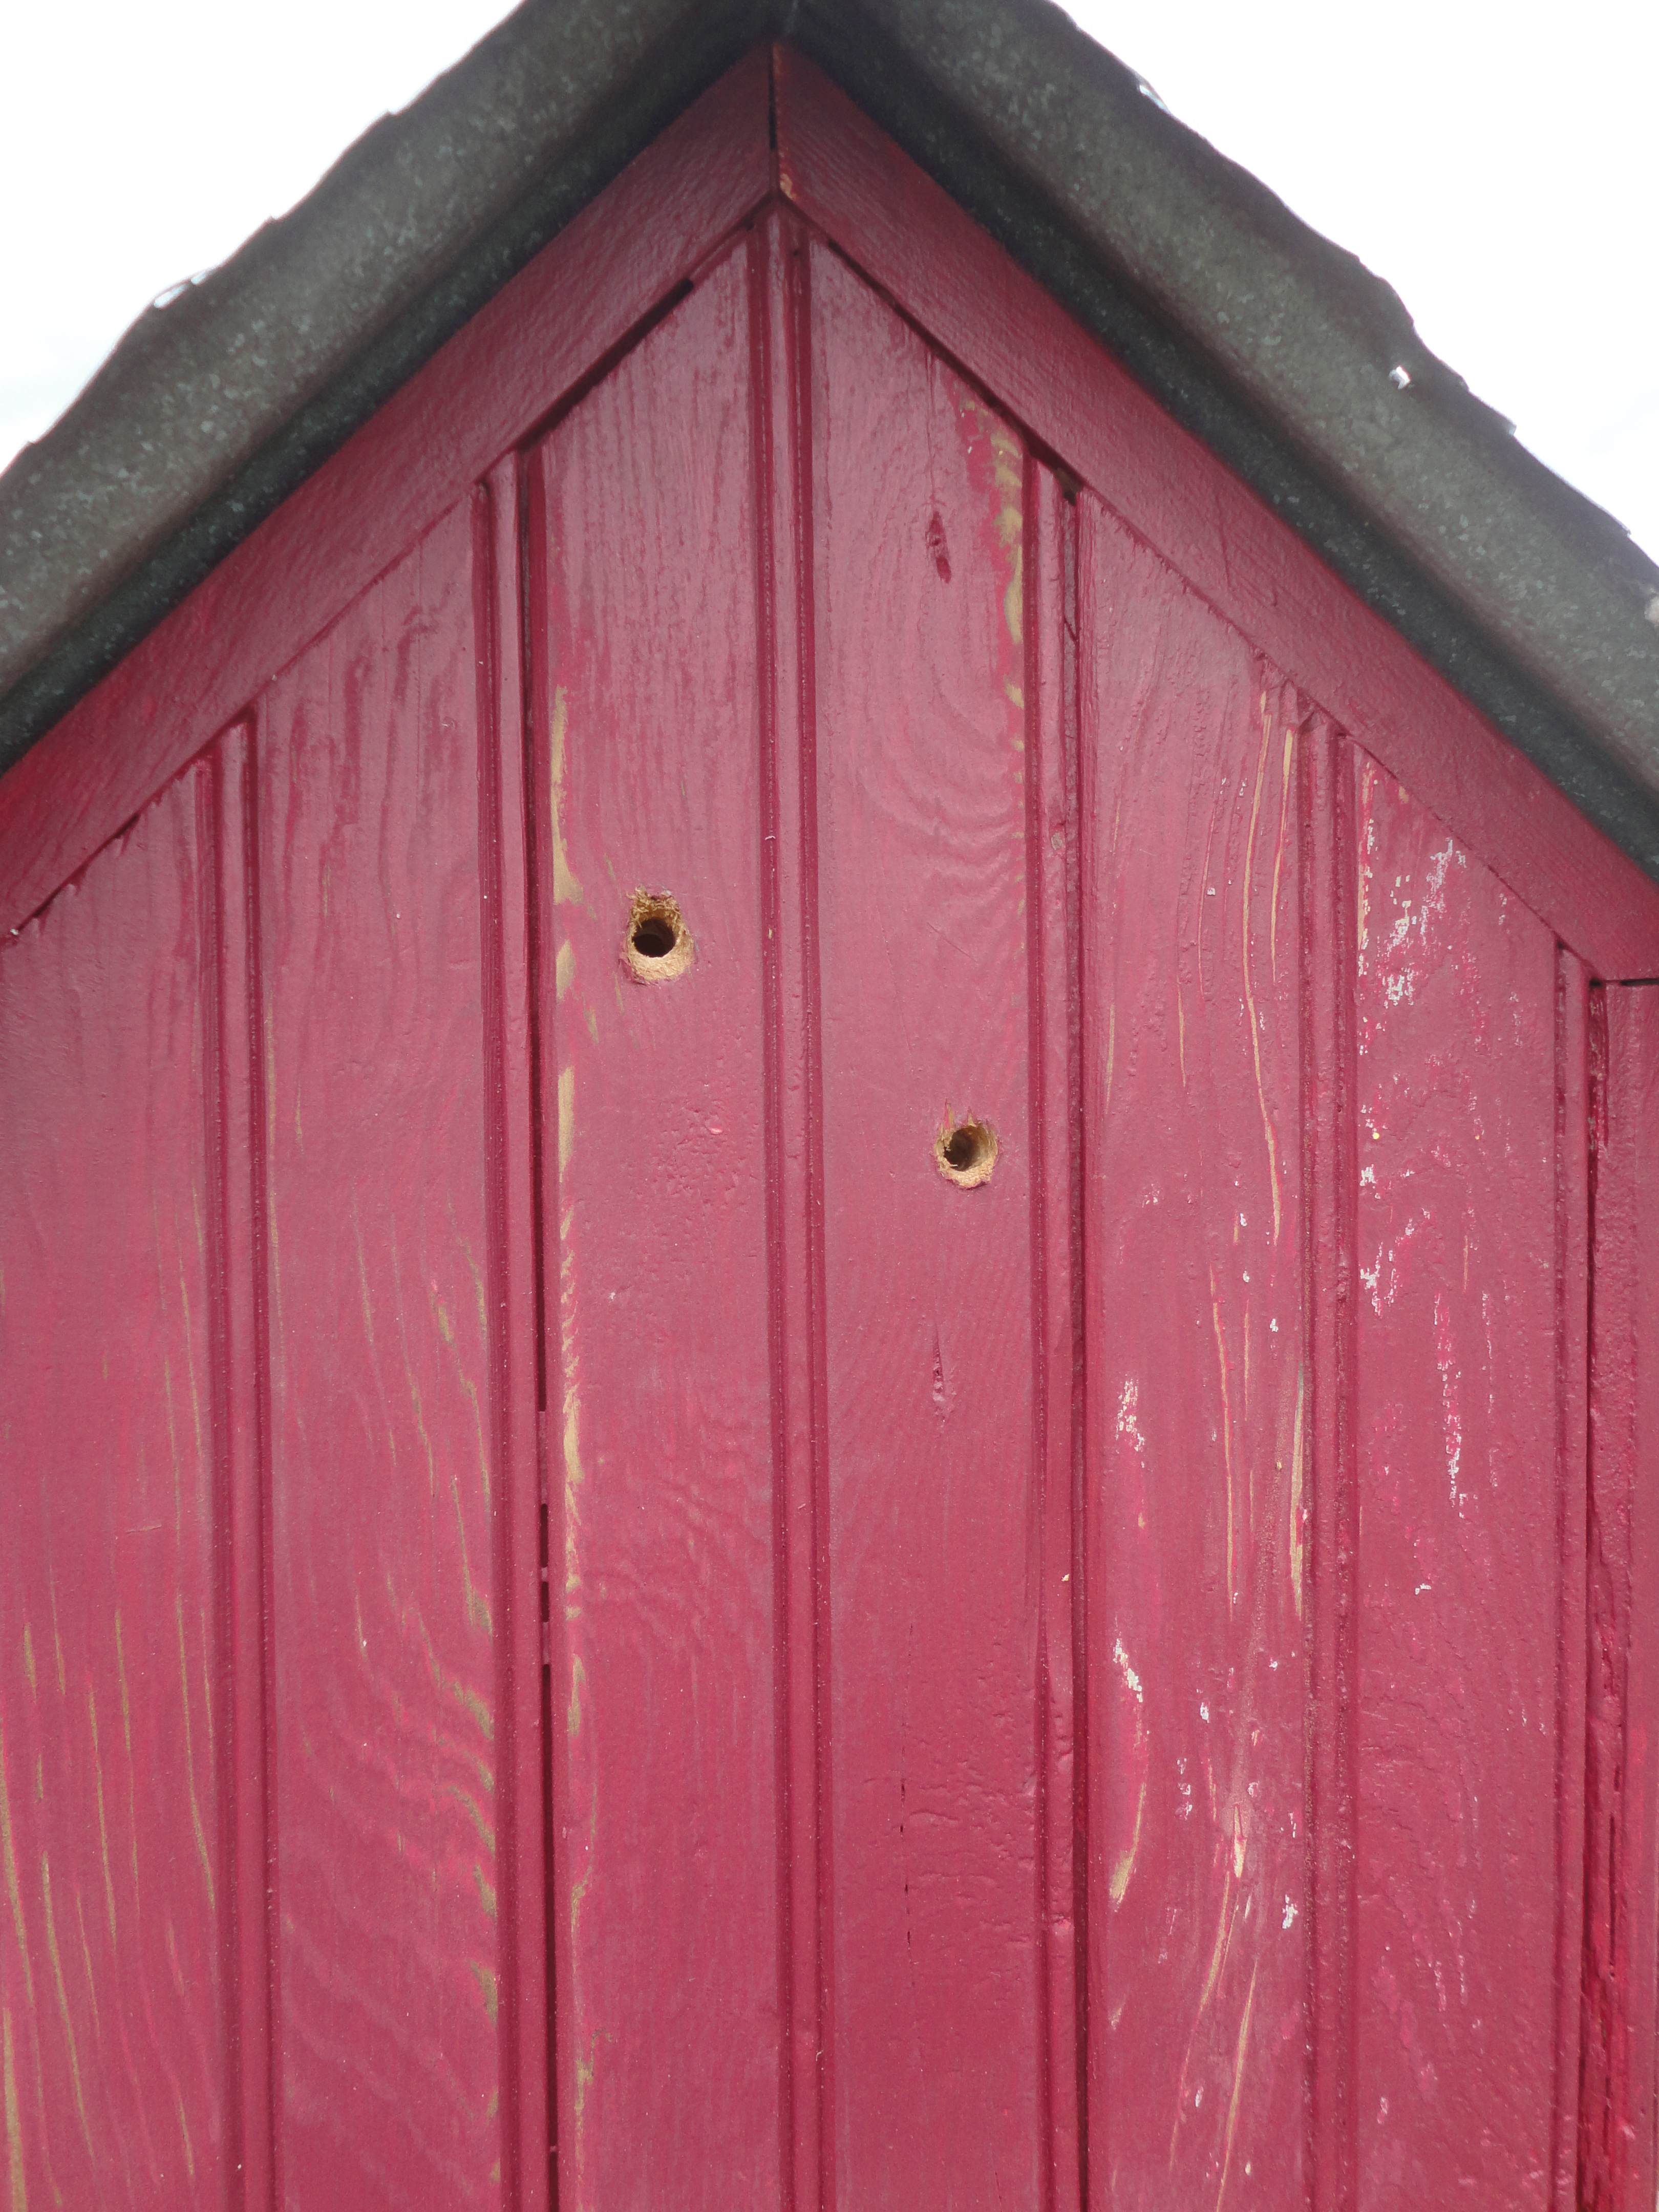

Before adding the roof, I drilled two holes, in one side, in preparation to hang a miniature mosaic glass barn quilt. The wooden frame was thick so reaming out the holes on the inside was necessary to accommodate the screws and nuts being used.
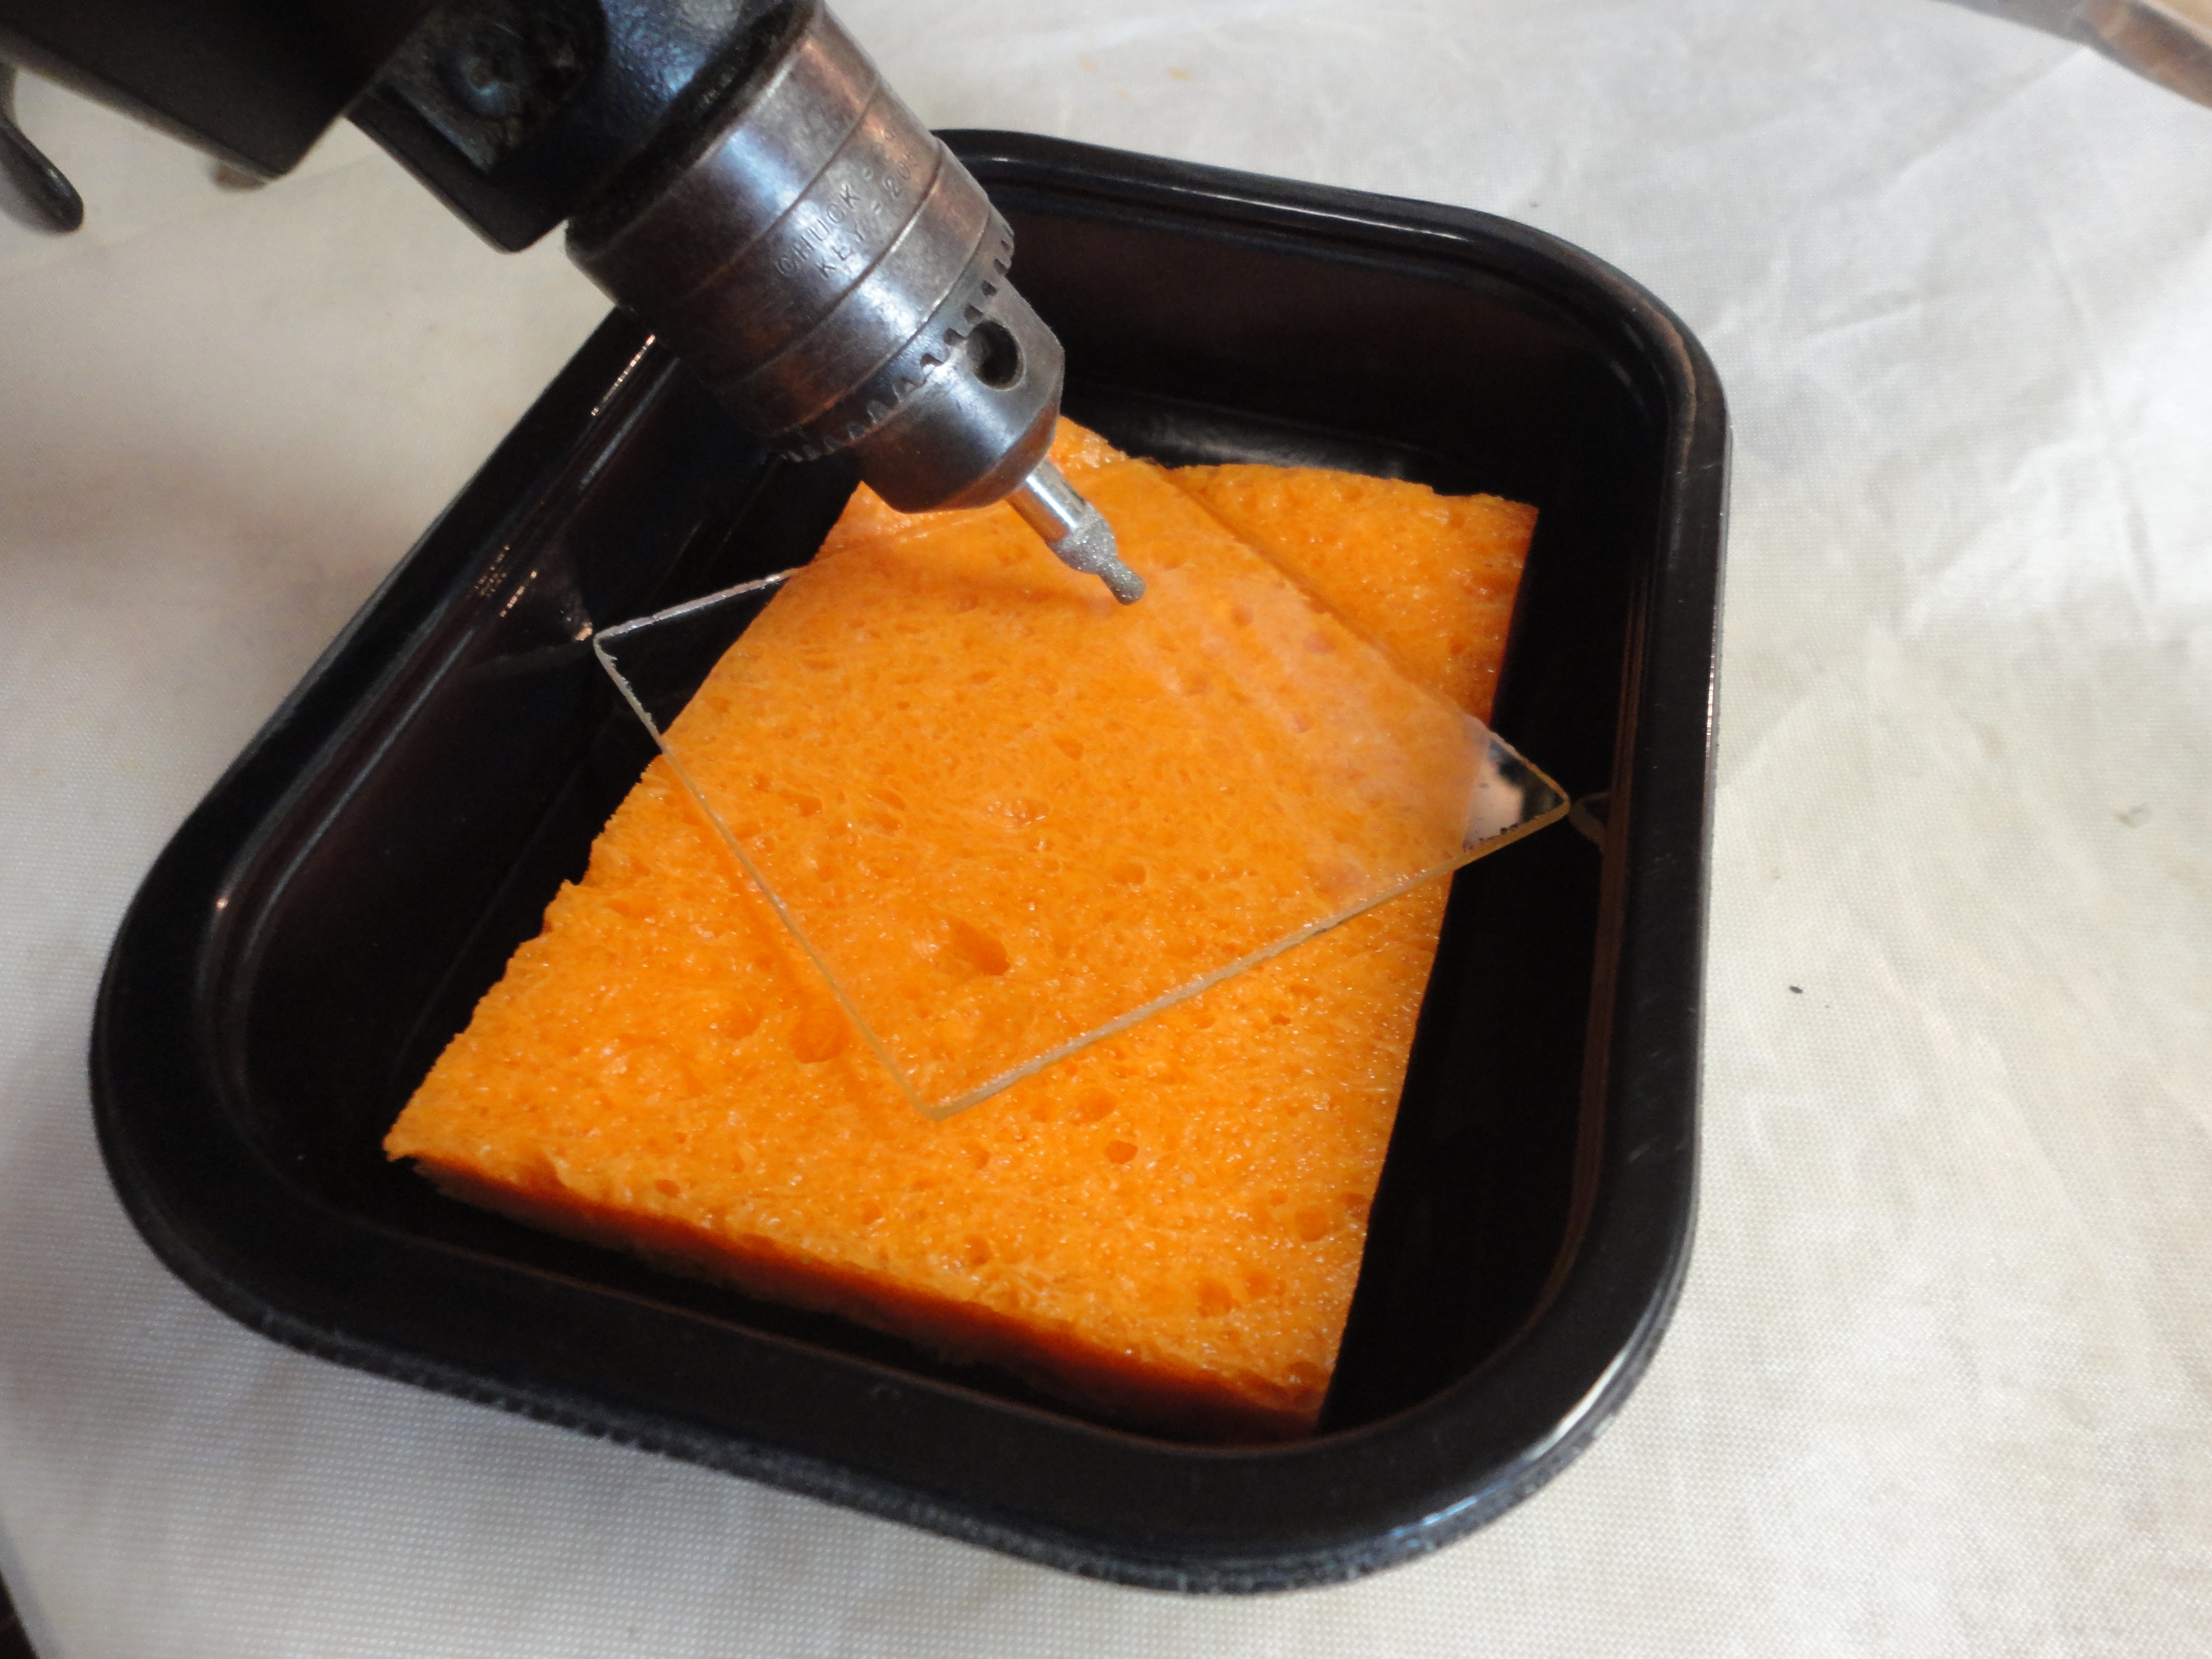
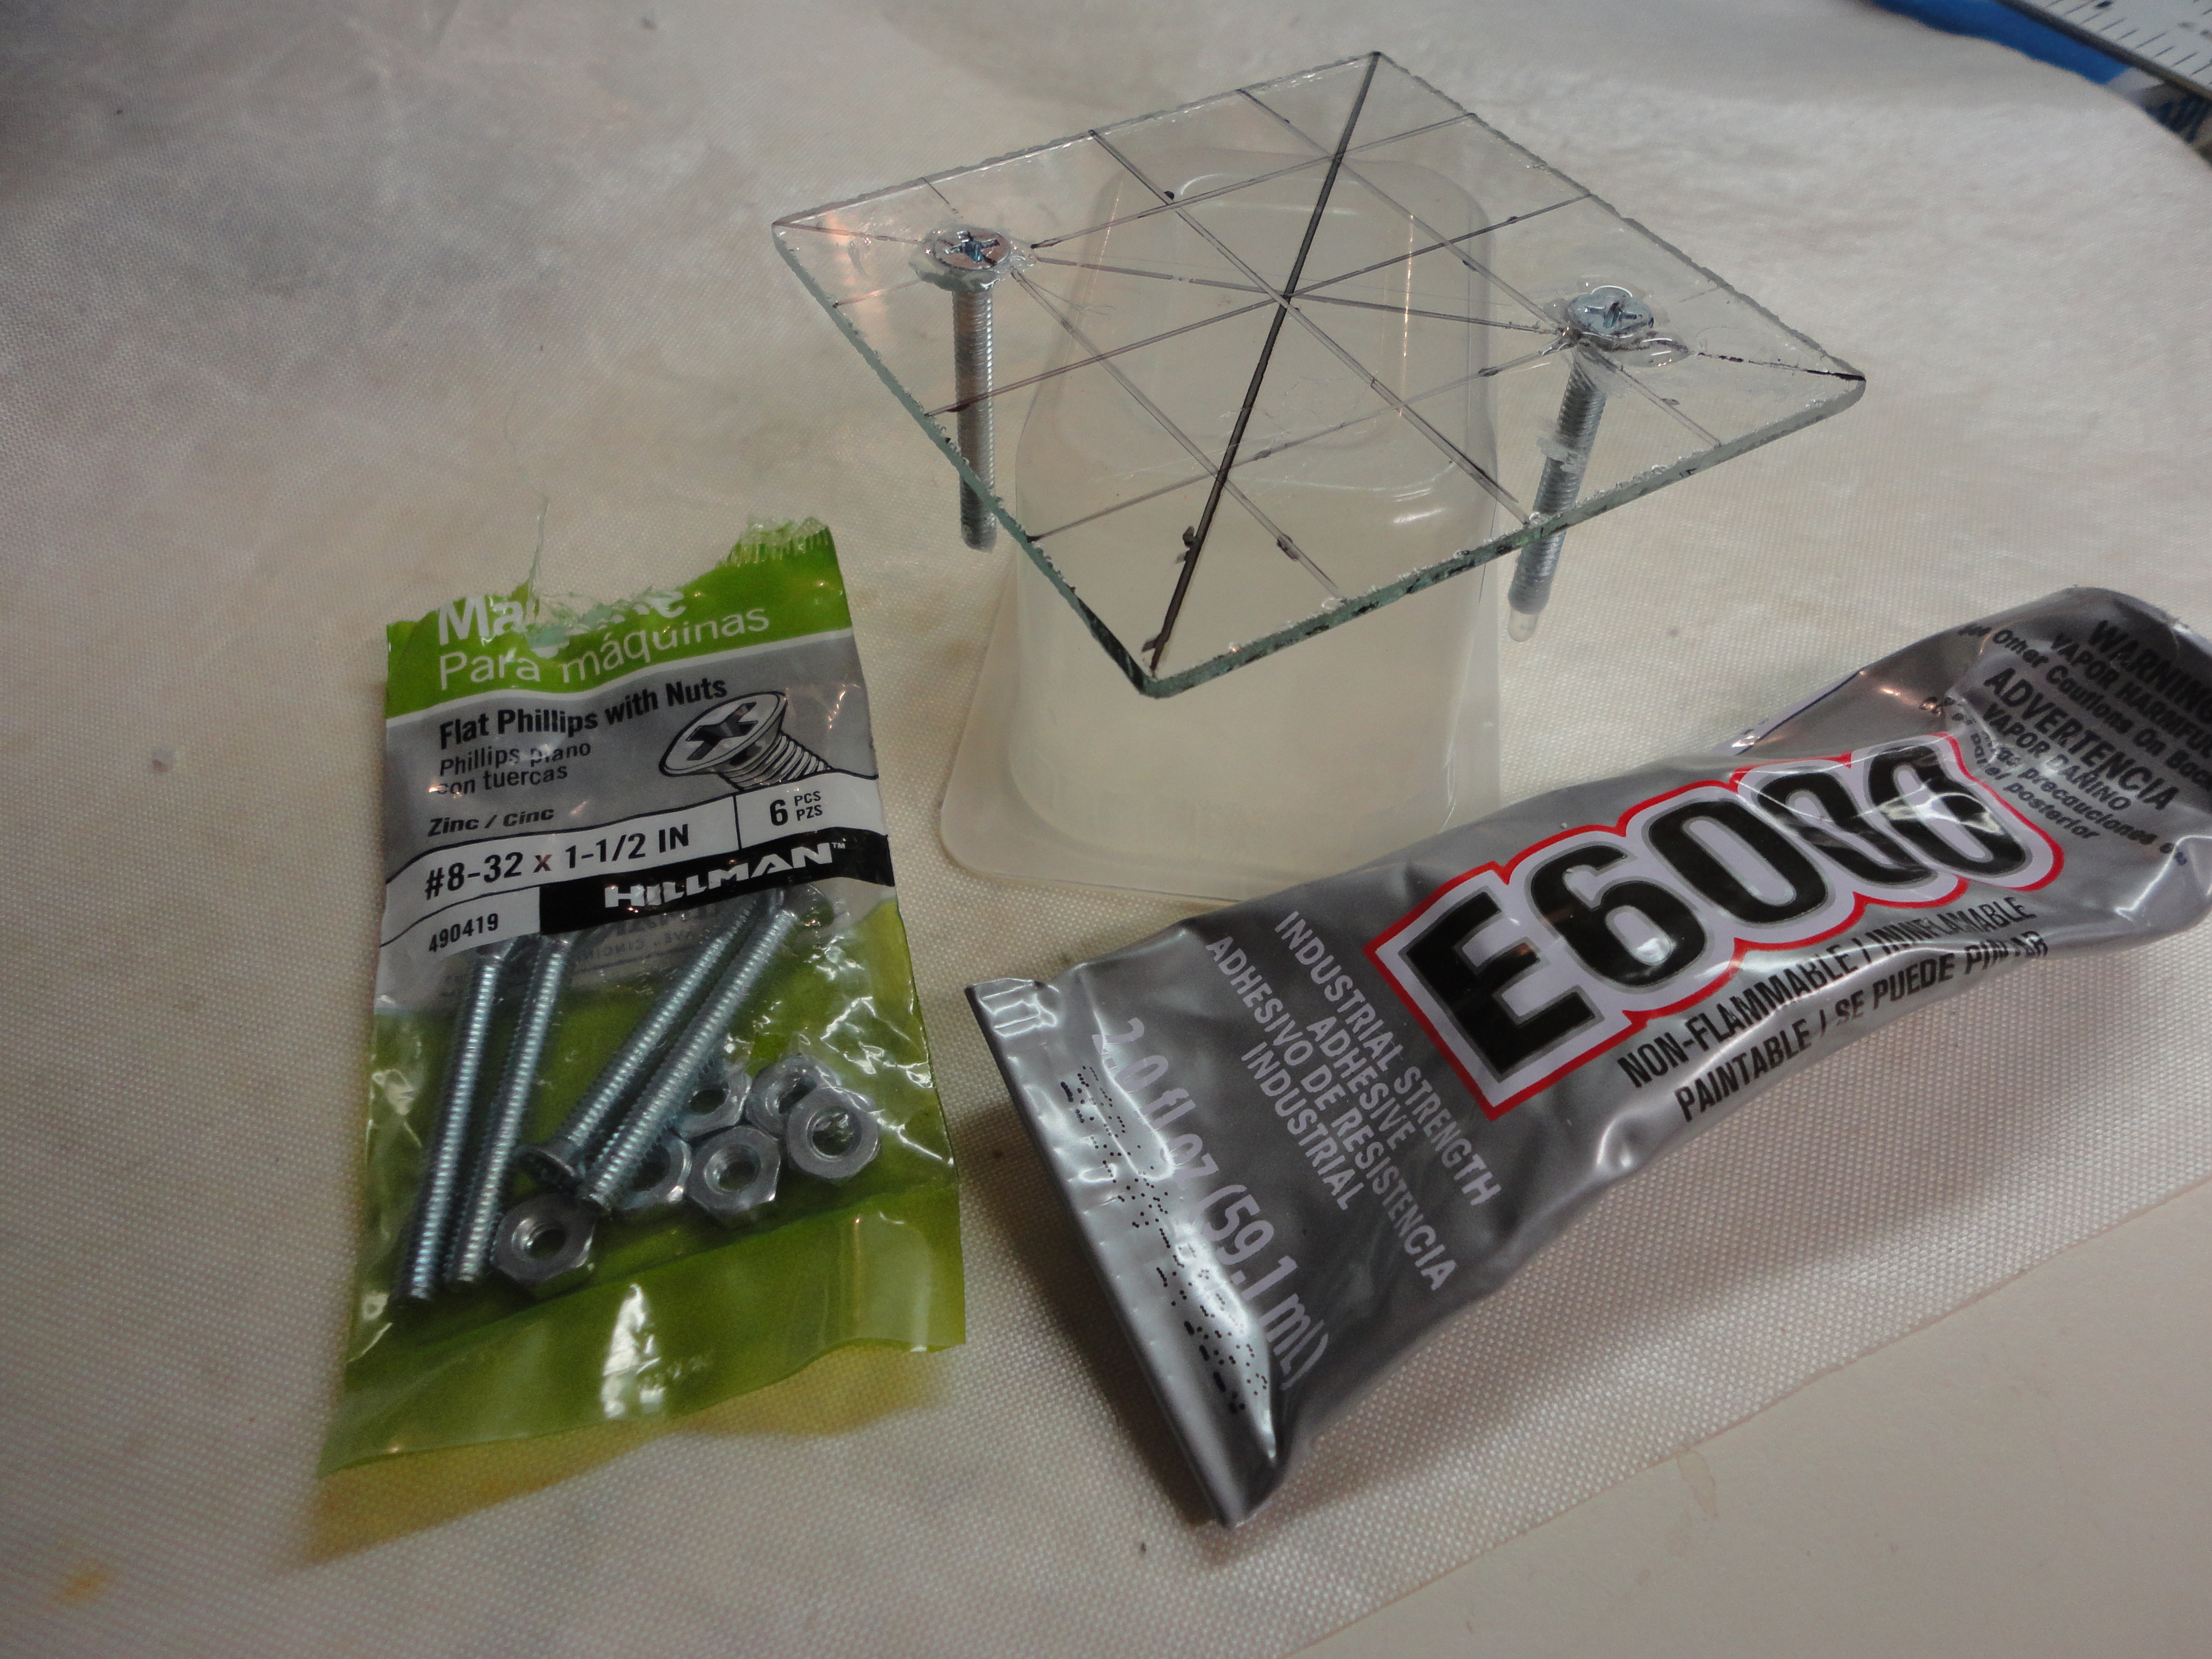
With bitter cold, icy Iowa winters, I make a habit of bringing my mosaics, glass chunks, and stepping stones inside for the winter. For this reason, I wanted my quilt removable. With a diamond head bit, I drilled 2 holes in a 3″ x 3″ square piece of glass. Then I used a coned shaped bit so the head of my screw would be inset. Always use water to cool the glass while drilling or it will break. I balanced my glass on an upturned plastic baby food container, that fit between the holes, and glued my screws in place with E6000, weighed them down with a rock, and let dry for 24 hours. With a glass marker, I drew lines from corner to corner and such so I would be able to center any design. Or, you can draw an actual design if you have one chosen.

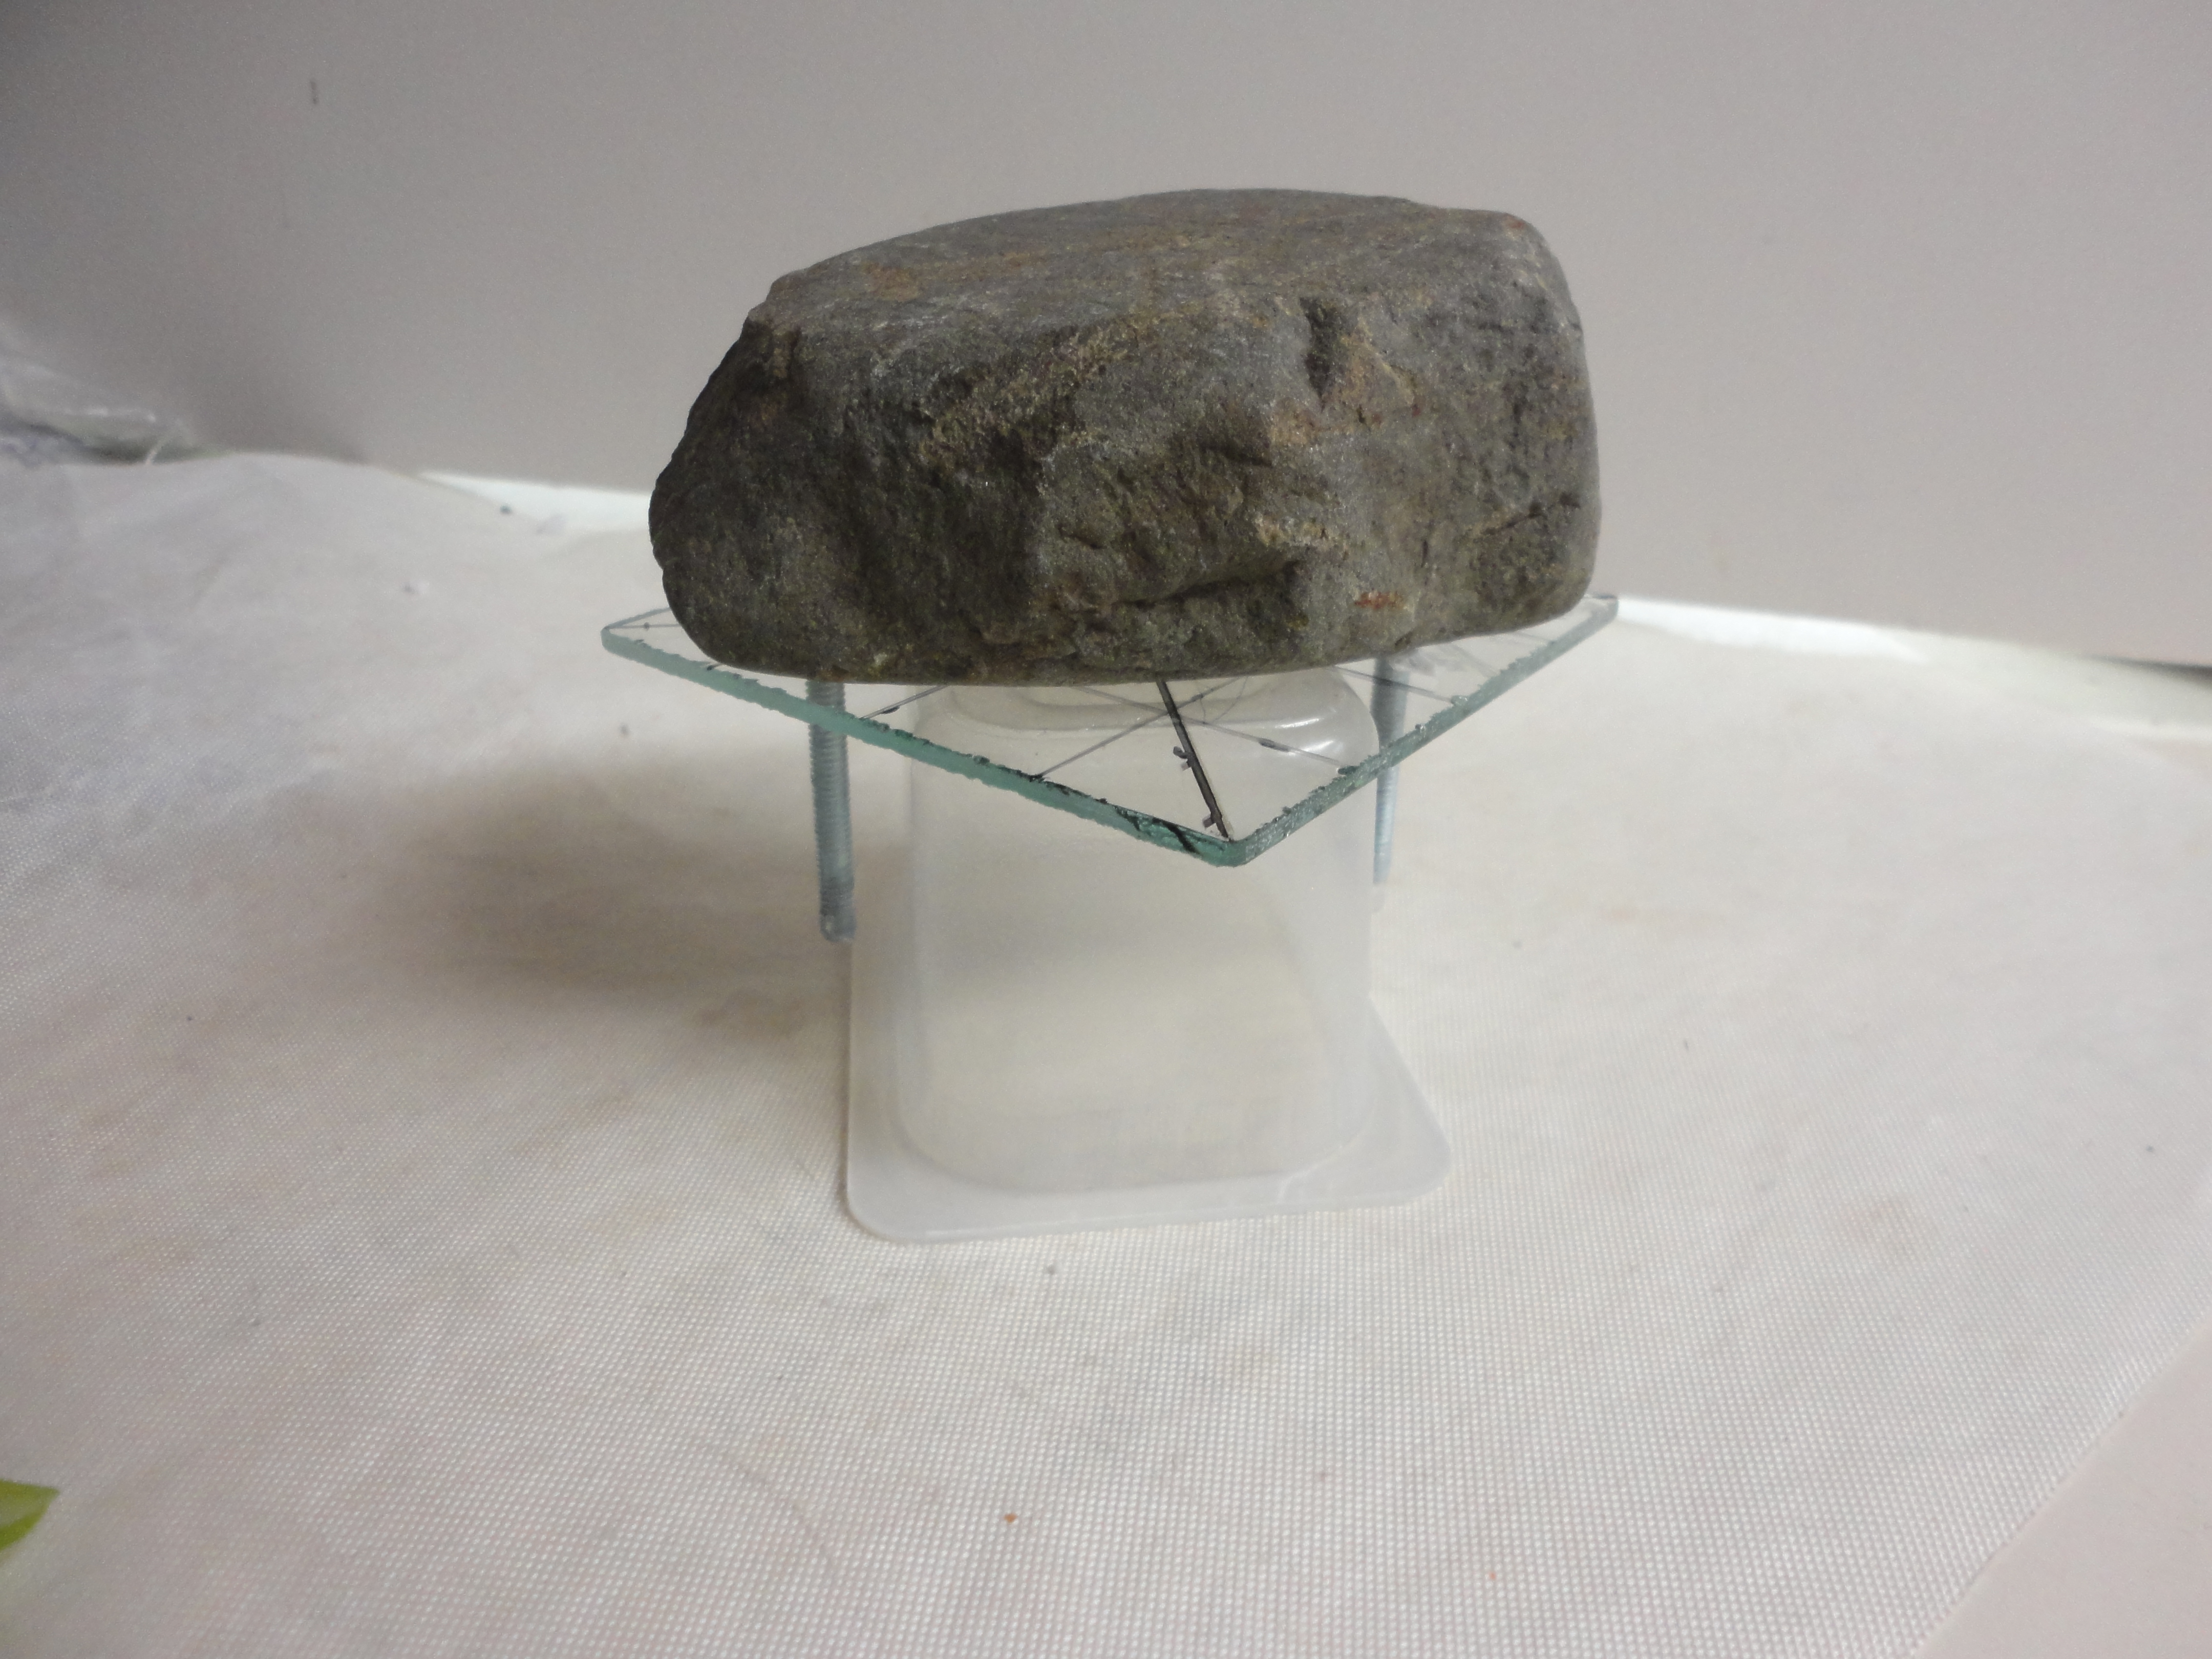
After deciding on a simple Pinwheel pattern, I cut some scrap glass and glued it on, again with E6000, and let dry 24 hours. I grouted with Interior/Exterior Sanded Gray Grout. Wanting a darker gray grout line I added a few drops of Exterior Black Primer to my water before mixing. I’ve never added paint before, so it will be a good test I guess. Let the grout dry 24 hours then seal. Follow the directions on your sealer for drying time before subjecting it to wet weather. With no light source from behind, I recommend using opalescent glass for this project to make it highly noticeable. If you do choose to use transparent glass, remember to remove any pattern lines that may show through the glass.

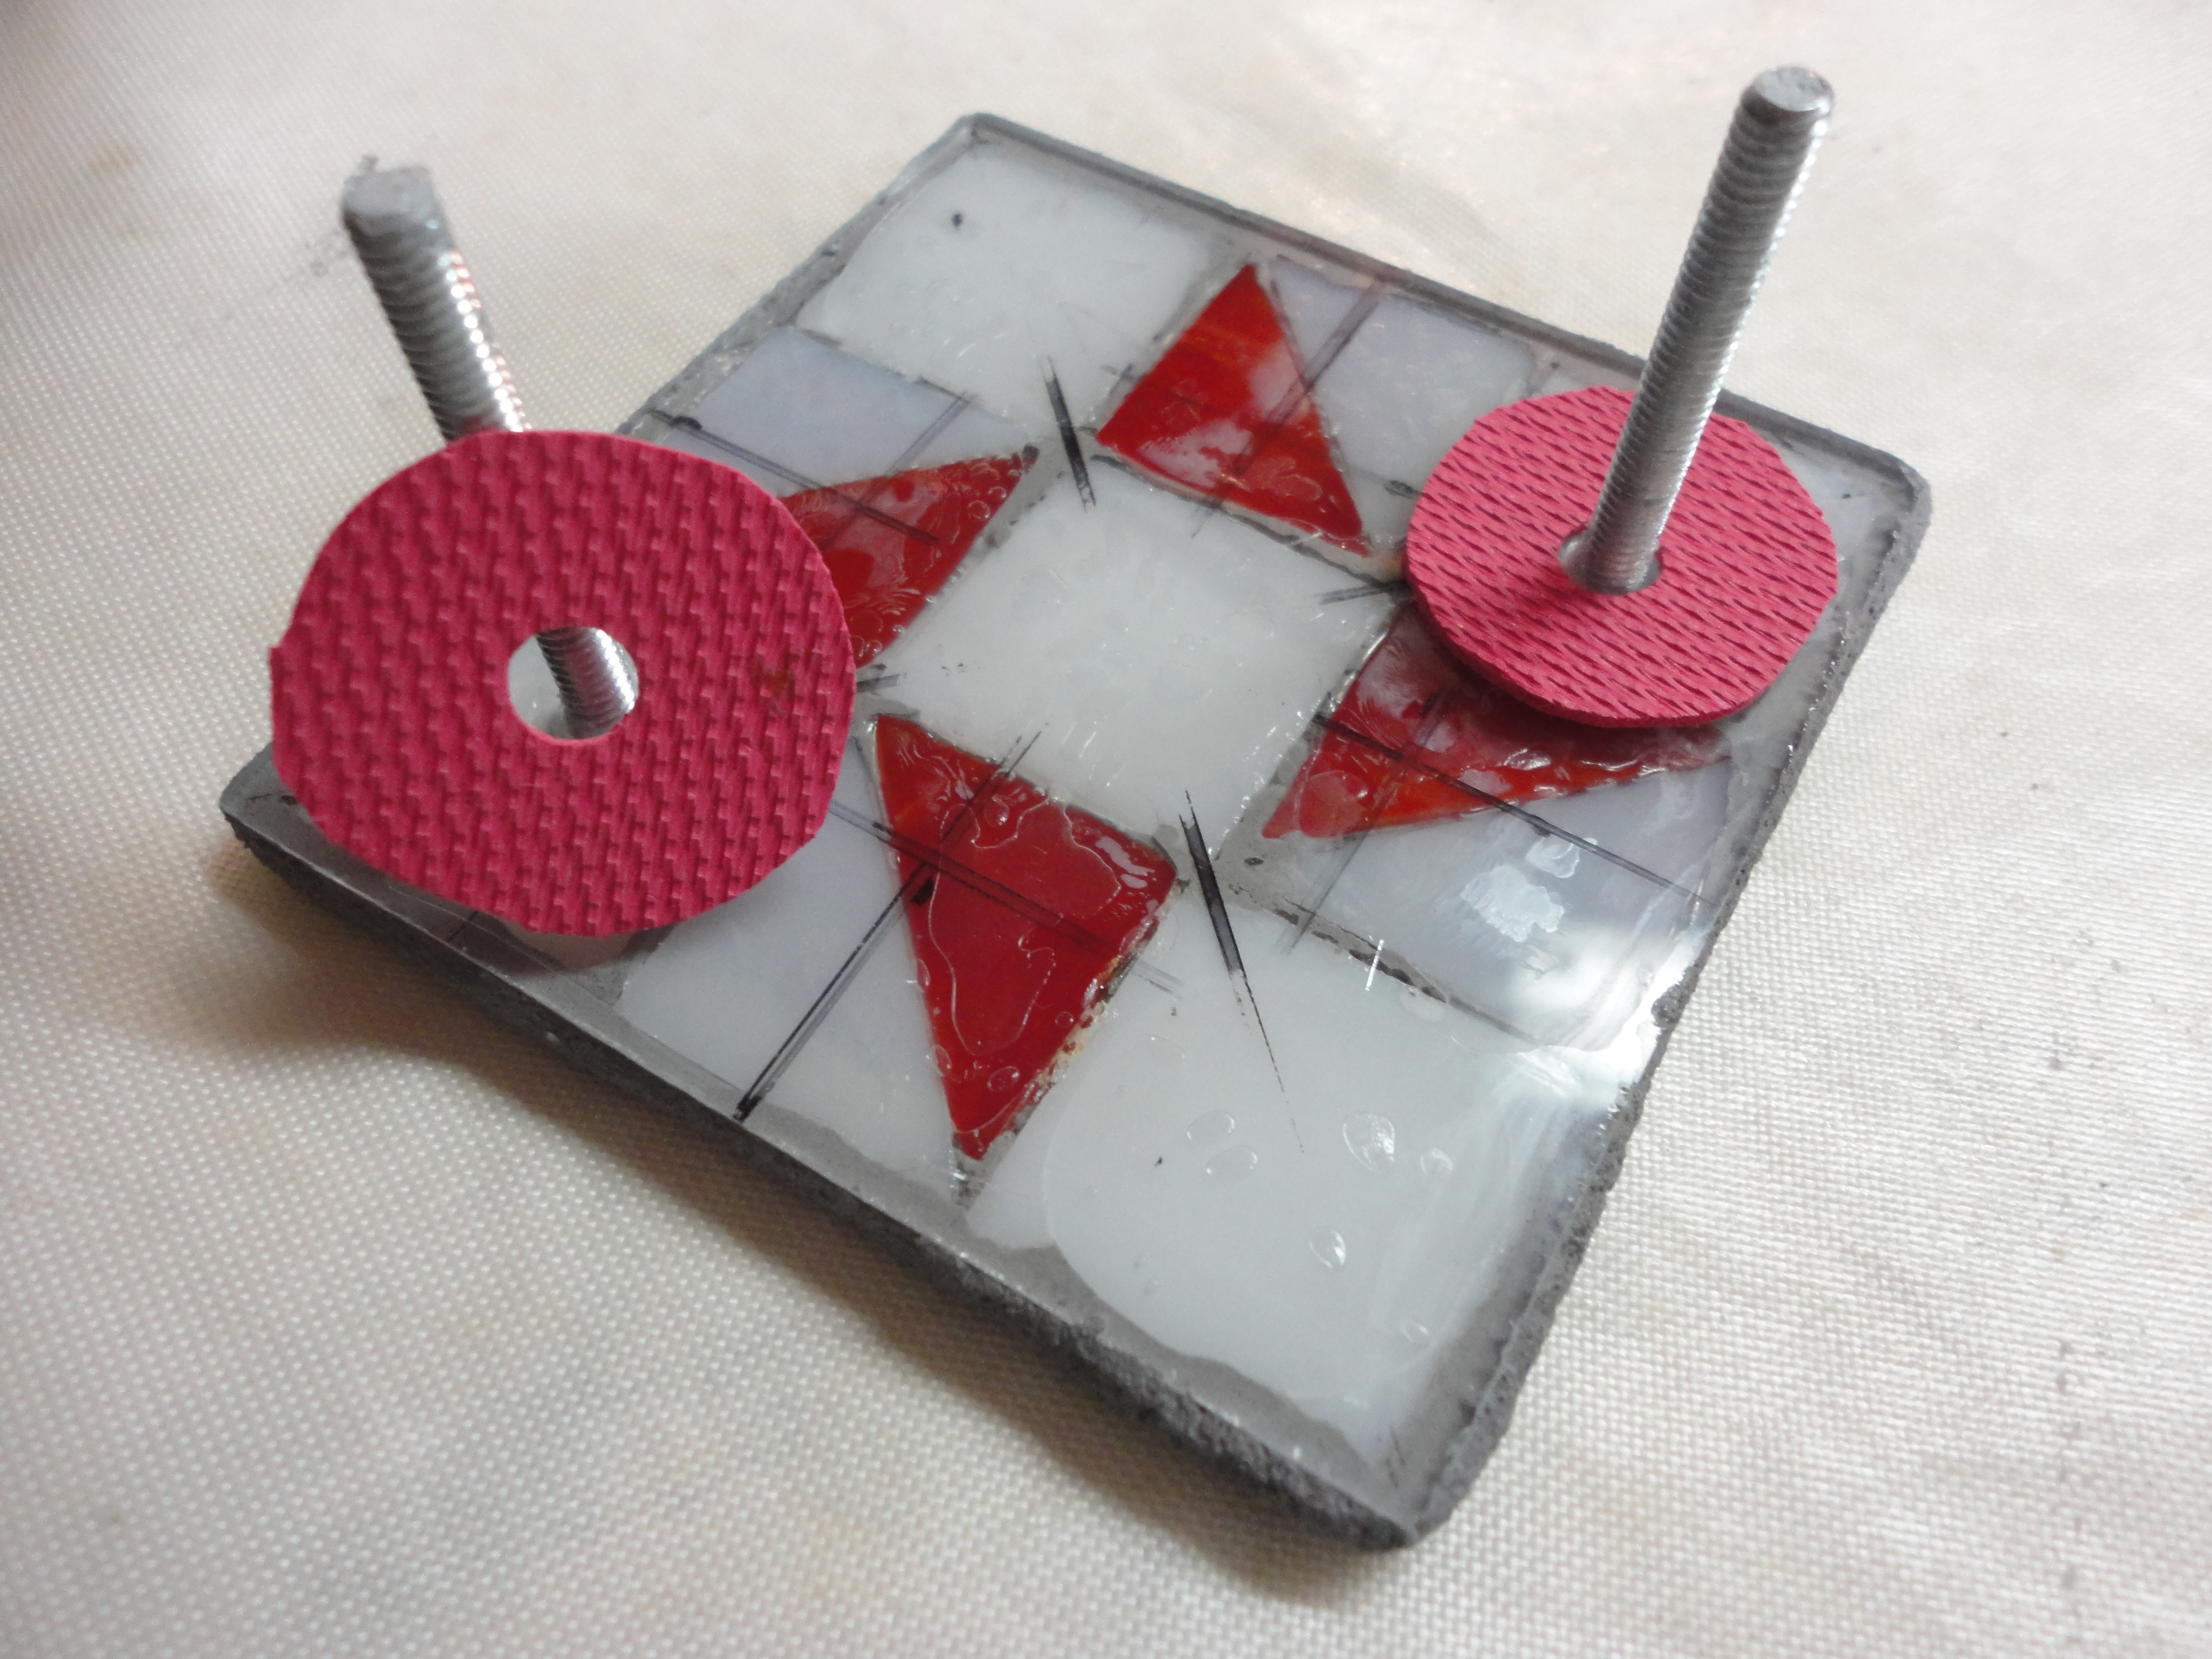
When hanging the quilt, I added two thin rubber washers, cut from an old jar gripper, to prevent movement and add cushioning between the glass and wood. And – DONE! It’s time to toss in some bread crumbs and watch the birds while I ponder what my next project will be……
I hope you enjoyed my post and were able to pick up a few helpful tips while visiting here. I welcome and look forward to your thoughts, questions, or suggestions. Thanks for stopping by!
